background image

OPEN/

CLOSE

CLEAR

OK

RETURN 

DISPLAY

TITLE

SEARCH

 MODE

MODE

ZOOM

REPEAT

MARKER

SETUP

AUDIO

PAUSE

A-B

SUBTITLE

ANGLE

POWER

3

2

1

6

5

4

9

8

7

0

+10

MENU

SKIP

Remote Control Buttons (cont’d)  15
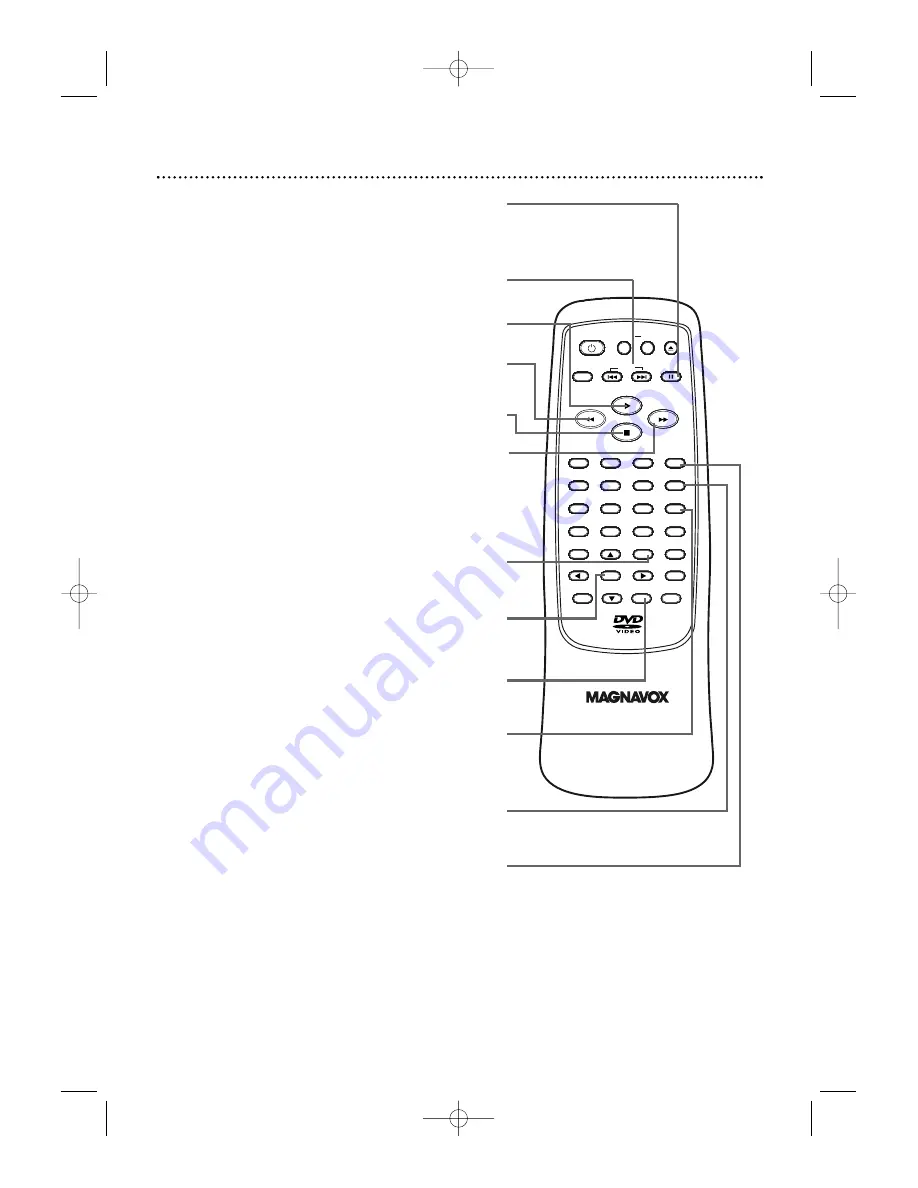
Stop 

C

Button

Press to stop Disc play.

Play 

B

Button

Press to begin Disc play.

SUBTITLE Button

Press to select a language for the subtitles (among those

available) or to turn off the subtitles. 

Details are on page 33.

ANGLE Button

Press to view the picture from a different angle (if available).

Press to choose one of the available angles. 

Details are on page 34.

RETURN Button

Press to return to the previous DVD Player Setup menu or to

remove the Setup menu from the TV screen.

SKIP

G

and 

H

Buttons

Press to skip Chapters or Tracks. 

Details are on page 24-25.

Pause 

F

Button

Press to pause Disc playback. 

Details are on page 21. 

Press

repeatedly to advance the DVD picture step by step (or one

frame at a time). 

Details are on page 21.

Fast Forward  

Button

Press to fast forward the Disc. 

Details are on page 22.

On a DVD, press the Pause 

F

button, then press the Fast

Forward 

g

button to begin slow motion playback. Press

the Fast Forward 

g

button repeatedly to change the for-

ward speed of slow motion. 

Details are on page 23. 

TITLE Button

Press to display the Title menu of the DVD, if available. 

Details are on page 20.

AUDIO Button

Press to choose one of the audio languages available on a DVD

or to choose a Stereo sound mode during Audio CD playback.

Details are on page 32.

OK Button

Press to select, change, or confirm a setting in

the DVD Player’s Setup menu. 

Press to select a feature in the DVD Disc menu.

Reverse 

h  

Button

Press to view the picture in fast reverse motion (DVD) or to

reverse playback of an Audio CD. 

Details are on page 22.

 MDV410/430  2/7/02  11:18 AM  Page 15

Summary of Contents for MDV430

Page 1: ...MS OUR REPRESENTATIVES CAN HELP YOU GET THE MOST FROM YOUR NEW PRODUCT BY EXPLAINING HOOKUPS FIRST TIME SETUP FEATURE OPERATION DO NOT ATTEMPT TO RETURN THIS PRODUCT TO THE STORE FOR FAST HELP CALL US...

Page 2: ...you must return your Warranty Registration Card within 10 days So please mail it to us right now Know these safetysymbols This bolt of lightning indi cates uninsulated material within your unit may c...

Page 3: ...Playback 26 A B Repeat Playback 27 Programmed Playback 28 Random Playback MP3 Playback 29 MP3 Display Information MP3 Track Selection 30 Random MP3 Playback Programmed MP3 Playback 31 Audio Language...

Page 4: ...no guarantee that interference will not occur in a particular installation If this equipment does cause harmful interference to radio or television recep tion which can be determined by turning the eq...

Page 5: ...e movie producers and will vary among Discs Not all Discs have menus However if the Disc has a menu you can access the Disc Menu by pressing the MENU button on the remote control Details are on page 2...

Page 6: ...tates Canada upper regions of North America Bermuda the U S Virgin Islands and small regions near Australia A Disc encoded in a specific region format can only play on DVD Players with the same region...

Page 7: ...oduct and its packaging contain materials that can be recycled and reused Specialized compa nies can recycle your product to increase the amount that needs to be properly disposed Your product uses ba...

Page 8: ...log recordings Digital audio connections provide the clearest sound Connect the DVD Player s DIGITAL AUDIO OUT COAXIAL jack to your Stereo for the best sound quality If digital connections are not pos...

Page 9: ...s 2 Connect the supplied yellow video cable to the VIDEO OUT jack on the DVD Player and to the VIDEO IN jack on the TV 3 Connect the TV s power cord to a power outlet Turn on the TV and set it to the...

Page 10: ...the cable colors to the jack colors 2 Connect an S Video cable not supplied to the S VIDEO OUT jack on the DVD Player and to the S VIDEO IN jack on the TV 3 Connect the TV s power cord to a power outl...

Page 11: ...and to the COAXIAL DIGITAL AUDIO IN jack on the Stereo 2 Connect the supplied yellow video cable to the yellow VIDEO OUT jack on the DVD Player and to the VIDEO IN jack on the TV You may use S Video o...

Page 12: ...nnect component video cables not supplied to the COMPO NENT VIDEO OUT jacks on the DVD Player and to the COMPO NENT VIDEO IN jacks on the TV 3 Plug in the Stereo s power cord Turn on the Stereo and se...

Page 13: ...S Video or Component Video is available on your TV See pages 10 and 12 for these optional video connections Remember you only need one video connection between the TV and the DVD Player 3 Plug in the...

Page 14: ...e Control Buttons POWER y y Button Press to turn the power on and off P ON or P OFF appears briefly on the display panel of the MDV430 The red POWER light appears on the front of the MDV410 when the p...

Page 15: ...c playback Details are on page 21 Press repeatedly to advance the DVD picture step by step or one frame at a time Details are on page 21 Fast Forward gButton Press to fast forward the Disc Details are...

Page 16: ...to pause Disc playback Press repeat edly to advance DVD playback one frame at a time Details are on page 21 POWER y y Button Press to turn the DVD Player s power on and off Details are on page 19 Rem...

Page 17: ...Lights when an Audio CD is in the tray and ready for playback Displays the elapsed playing time of the current Title or Track Briefly displays Title Chapter or Track numbers Power is turning on Appea...

Page 18: ...here and to the TV s Video In jack Details are on pages 9 11 and 13 AUDIO OUT Jacks Connect the supplied red and white audio cables here and to the Audio In jacks of a television or stereo Match the c...

Page 19: ...ayback will not begin until you press Play B To search forward or backward during playback see page 22 5 Press Stop C to stop playback DVD AUDIO CD Remember this DVD Player will play only certain Disc...

Page 20: ...button may not be active with all DVDs Helpful Hints 20 Menus DVD Disc Menus Some DVDs contain menus that describe the contents of the Disc or allow you to customize Disc playback For example the menu...

Page 21: ...is loaded and ready for playback Press Play B to resume play at the point you last stopped it Opening the disc tray will cancel Resume On Helpful Hints Resume On You may choose to resume playback fro...

Page 22: ...g or Reverse h button repeatedly will not affect the speed of the search Sound will be intermittent during searching on an Audio CD Use Fast Forward g for a forward search Press Reverse h for a revers...

Page 23: ...ast Forward D repeatedly during slow motion playback to vary the speed of slow motion playback You may play the DVD at 1 16 1 8 or 1 2 the normal playback speed 3 Press Play B to return to normal play...

Page 24: ...in the top right corner of the TV screen BUsing SEARCH MODE to Select a Track Press SEARCH MODE once so the Track Search display appears TR Within 30 sec onds press the Number buttons to select the T...

Page 25: ...lect the TT Title space then press the Number but tons to enter the Title number CH Chapter will be selected next automatically 3 While CH is selected and within 30 seconds press the Number buttons to...

Page 26: ...eat Track Repeat All or Repeat Off Selecting a new Track will cancel repeat playback on an Audio CD REPEAT OFF REPEAT TRACK REPEAT ALL The entire Audio CD will play repeatedly The entire current Title...

Page 27: ...teps to set up the section that you want to play over and over 1 Press Play B to play the Disc to the point at which you want repeated playback to begin 2 Press A B REPEAT to set the starting point A...

Page 28: ...Tracks will play in the order in which you pro grammed them The Program will play once Turning off the Player or opening the disc tray will erase the Program You can not use the Number but tons or SEA...

Page 29: ...ar Press K or L to select the Track you want to play then press Play B or OK Choose FIRST PLAY to start play from the first Track listed Press the TITLE button to go back to the first item on the firs...

Page 30: ...or subsequent Tracks If the Track you chose is not avail able or can not be accessed X will appear in the top right corner of the TV screen Play may resume at a different Track Specific Time playback...

Page 31: ...e while playback is stopped 2 Press Play B to play the tracks in random order 3 Press Play B to start programmed playback 4 Press Stop C to stop playing the Program RAMDOM MODE EXIT RETURN START PLAY...

Page 32: ...low you to change the language in the Disc menu If you are using the COAXIAL jack changing the sound mode is not applicable Details are on pages 11 and 13 For some Audio languages three dashes may app...

Page 33: ...that are available on the Disc 1 Press SUBTITLE repeatedly to select a subti tle language The subtitle display will appear at the top of the TV screen The number of available lan guages appears at th...

Page 34: ...five sec onds Playback will continue from the angle you selected as long as it is available DVD 34 Camera Angles OPEN CLOSE CLEAR OK RETURN DISPLAY TITLE SEARCH MODE MODE ZOOM REPEAT MARKER SETUP AUD...

Page 35: ...ing time of the current Chapter BIT RATE BIT RATE The quantity of information recorded on the DVD C L0 Layer number if applicable L0 Layer 0 is playing L1 Layer 1 is playing Current Repeat setting if...

Page 36: ...UP PARENTAL CONTROLS PASSWORD menu will appear 3 Press the Number buttons to enter your four digit password When doing this for the first time enter any four digits then press OK That number will be...

Page 37: ...ETUP The setup screen will appear Follow these steps to set the rating level for Parental Controls Discs whose ratings exceed the level you set will not play See Helpful Hints below 2 Press the Number...

Page 38: ...h you want to place the Marker 1 During playback press MARKER The Marker dis play will appear in the top left corner of the screen 2 Within 30 seconds press s or B to select 1 2 3 4 or 5 Make sure NOT...

Page 39: ...le Stereo Details are on page 11 If you selected DOWN SAMPLING press OK Then press o or p to select AUTO 48 kHz or 96 kHz then press OK The AUDIO CONTROLS menu will reappear Select 96 kHz if the Disc...

Page 40: ...ile playback is stopped The setup screen will appear 2 Press the Number 2 button to select DISPLAY 1 LANGUAGE 2 DISPLAY 3 AUDIO 4 PARENTAL SET UP EXIT SETUP CANCEL RETURN SELECT SET OK DVD 40 Display...

Page 41: ...TER BOX if you want black bars to appear at the top and bottom of the screen Choose 4 3 PAN SCAN for a full height picture with both sides trimmed Choose 16 9 WIDE If a widescreen TV is connected to t...

Page 42: ...4 SPANISH 5 GERMAN p SET UP EXIT SETUP CANCEL RETURN SELECT SET OK LANGUAGE CONTROLS AUDIO 1 OFF 2 ENGLISH 3 FRENCH 4 SPANISH 5 GERMAN p SET UP EXIT SETUP CANCEL RETURN SELECT SET OK LANGUAGE CONTROL...

Page 43: ...Panjabi 6247 Pashto 6265 Persian 5247 Polish 6258 Portugese POR 6266 Pushto 6265 Quechua 6367 Rhaeto Romance 6459 Romanian RUM 6461 Russian RUS 6467 S Samoan 6559 Sangho 6553 Sanskrit 6547 Serbian 656...

Page 44: ...or MPEG decoder Details are on page 11 Make sure the current DVD is recorded in Dolby Digital PCM 48 kHz or MPEG Audio OPEN CLOSE CLEAR OK RETURN DISPLAY TITLE SEARCH MODE MODE ZOOM REPEAT MARKER SETU...

Page 45: ...for the lumi nance and the color If you connect an optional S Video cable you will not need to use the supplied yellow video cable You can use S Video only if your TV has an S Video In jack VIDEO OUT...

Page 46: ...optional S Video cable or optional component video MDV430 only cables You only need one video connection between the DVD Player and the TV Details are on pages 8 13 Make sure the TV is set to the cor...

Page 47: ...d or changed only when Disc play is stopped while some are available only during play back Check the instructions for accessing the feature before trying again Details are on page five The DVD Player...

Page 48: ...RENEWED 90 DAY LIMITED WARRANTY...

Page 49: ...ment 120V AC 10 60 Hz 0 5 Connections S Video output Mini DIN 4 pin jack 75 Video output One pin jack 1 Vpp 75 Coaxial digital output One pin jack 500m Vpp 75 Analog audio output Two pin jacks one lef...

Page 50: ...on 14 38 markers 38 menu button 14 20 menus 5 20 mode button 14 28 29 MP3 playback 29 31 number buttons 14 ok button 15 on screen display 35 open close button 14 16 19 parental controls 36 37 password...

Page 51: ...OS E CL EA R OK RE TU RN DI SP LA Y TIT LE SE AR CH MO DE MO DE ZO OM RE PE AT MA RK ER SE TU P AU DI O PA US E A B SU BT ITL E AN GL E PO W ER 3 2 1 6 5 4 9 8 7 0 1 0 ME NU SK IP Remote Control 4835...

Reviews: