background image

12

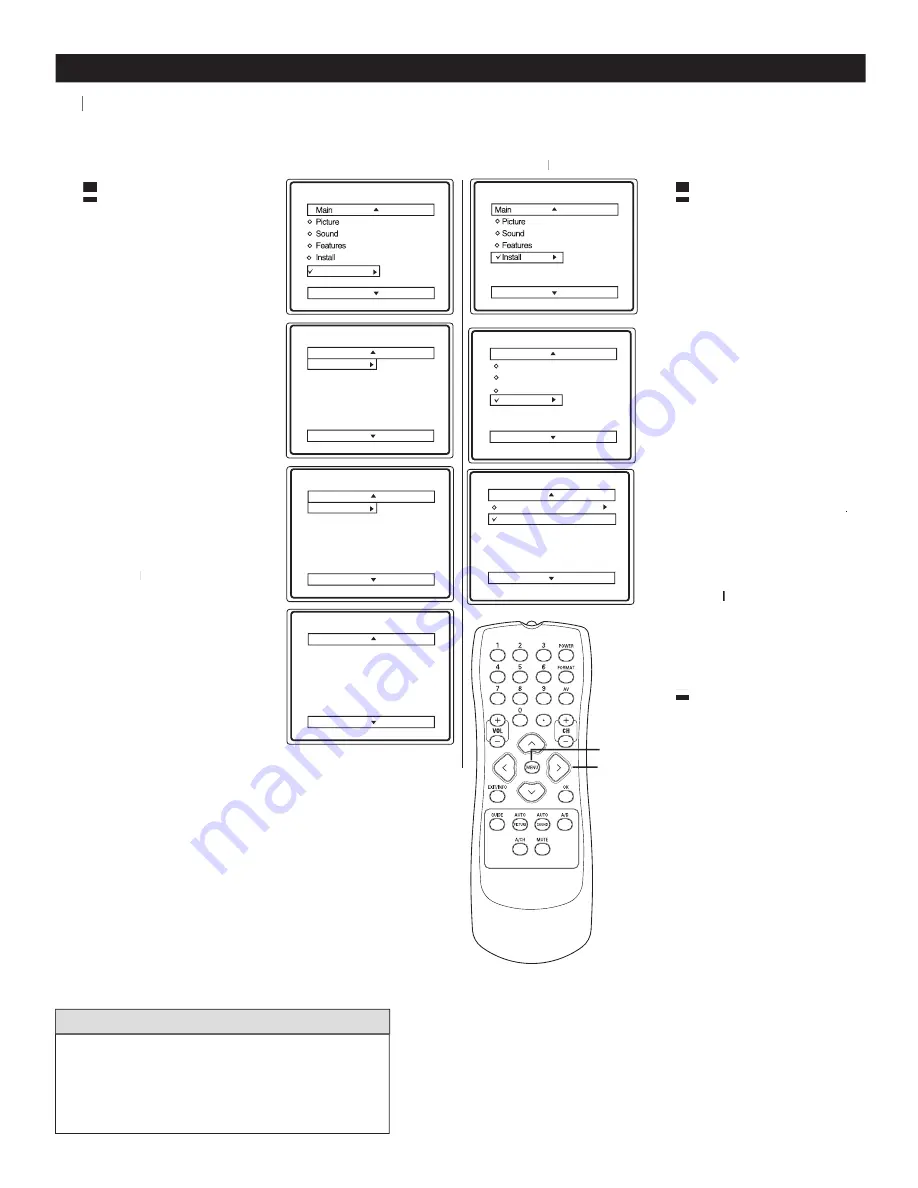
 CHANNEL EDIT (ADD OR DELETE CHANNELS)

1   

Press 

MENU

 on the  

    remote  control to  

1   

    display the onscreen  

1   

    menu

.

2   

Press 

CURSOR

<

 or 

>

to scroll through the 

onscreen menu until 

you see 

DTV Setup

highlighted.

3


Press 

CURSOR

>   

    to highlight the

Ch.  

    Install

 menu features.

4


Press 

CURSOR

<

 or  


>

to scroll through  

    the 

Ch. Install

 features  

    until you see 

Channel


Edit

 highlighted.

5


Press 

CURSOR

>  to 

display the Channel Edit 

options.

6


Press

CURSOR

<

 or  

 or

 or


>

to scroll the menu to  

to

to

    highlight the channel you  

    wish to add or skip.

7


Press

CURSOR

  >  or  < 


 to toggle between 

Added


or 

Skipped

.  If 

Skipped

 is  


selected,  the channels will  


be skipped when scrolling  


channels with the 

CH+

 or  

CH-

.   If 

Added


is selected, the channels  


will not be skipped when  


scrolling channels with the  

CH+

 or  

CH- 

.  

8  


When finished, press  


MENU

 on the remote  

    control  four times to  

    exit the menu from the  

    TV screen.

Note : 

When you are in Digital 

Mode you can only add or skip 

programs in Digital Channels.

C

hannel Edit allows you to add or delete channels

C

C

.

Follow these steps for Digital Mode

1   

Press 

MENU

 on the  

    remote  control to  

1   

    display the onscreen  

1   

    menu.

2


Press 

CURSOR

<

 or 

>


    to scroll through the  

    onscreen menu until you  

    see

Install

 highlighted.

3


Press 

CURSOR

>  to  

    display the Channel  

    Edit menu features.

4


Press 

CURSOR

< or 

> until the Channel you 

wish to Edit is displayed.

5


Press 

CURSOR

>

to 

highlight Skipped option.

6


Use 

CURSOR

> or <  to  

to

to

    toggle between 

on

 or 

off

.

off

off

If 

On 

is selected, the 

channels  will be skipped 

when scrolling  

channels 

with the 

CH+

 or 

CH- 

.   If 

Off

 is selected, the channels 

Off

Off

will not be skipped when 

scrolling channels with the 

CH+

 or 

CH-

.  

8   

When finished, press  

8   

MENU

 button on the  

    remote control three  

8   

    times to exit the menu  

    from the TV screen.

Note : 

When you are in Analog 

Mode you can only add or skip 

programs in Analog Channels.

Follow these steps for Analog Mode

DTV Setup

DTV Setup
Ch. Install
Digital Audio
Timer
Closed Caption
Emerg Alert

Channel Edit
Weak Dig Sig
AutoLock
Fact CH Reset

Channel Edit
2   -  1 WCBS - DT 

   Added

35 -  1 MELCO

Ch. Install
Channel Edit
Weak Dig Sig
AutoLock
Fact CH Reset

Install

Language
Tuner Mode
Auto Install
Channel Edit

Channel 
Skipped

Channel Edit

Channel  


3

Skipped


off

Language
Tuner Mode
Auto Install
Channel Edit

Digital Mode

Analog Mode

Analog

Analog

It is important to auto install the TV (Refer page 
9) before you try to Edit the Channels.   If auto 
installation is not done, Channel Edit will show an 
error message :  

Favorite Channel list is empty. 

You must Auto Install.

H

ELPFUL

 H

INT

>

>

< >

MENU

Summary of Contents for 27MT5005D - 27" Integrated Sdtv

Page 1: ...27MT5005D 27MT6005D 32MT5015D 32MT6015D 3139 125 35511 English...

Page 2: ...required from you to obtain warranty service Product Safety Notification By registering your product you ll receive notification directly from the manufac turer in the rare case of a product recall o...

Page 3: ...s been dropped or the enclosure damaged 17 Tilt Stability All televisions must comply with recommended international global safety standards for tilt and stability properties of its cabinet design Do...

Page 4: ...am at the same time This is often referred to as multicasting Digital television can also give you interactive video and data services through a single digital channel Attention Quick Tips before you...

Page 5: ...of the TV automatically or manually For automatic selection there will be queries for Time Zone Day Light saving and channel to seek clock For manual selection you need to key in the time Pg 13 AutoLo...

Page 6: ...us of the sleeptimer etc NUMERIC 0 9 Buttons To select TV channels or enter values in the on screen menu For single channel entries press the numbered button for the channel you desire The TV will pau...

Page 7: ...r to select TV to select TV channels 4 Point the remote control towards the remote sensor window on the front of the TV when using the remote control 5 Press MENU button on the remote to display the o...

Page 8: ...y take 20 to 40 minutes depending on the number of channels available The f The f T irst time you turn on the new TV set you will see a screen that helps you to auto install the programs Follow the in...

Page 9: ...You can auto install programs on your TV You can auto install programs on your TV Y This makes it easy for you to select only the TV stations in your area when the CHANNEL buttons are pressed Ywhen th...

Page 10: ...n text languages such as Closed Caption CC TV programmes HELPFUL HINT For French and Spanish speaking TV owners an onscreen Language option is present With the Language control you For French and Span...

Page 11: ...o scroll through the Install features until you see Tuner Mode highlighted 5 Press CURSOR to select Antenna or Cable 6 When finished press MENU button on the remote control twice to exit the menu from...

Page 12: ...2 Press CURSOR or to scroll through the onscreen menu until you see Install highlighted 3 Press CURSOR to display the Channel Edit menu features 4 Press CURSOR or until the Channel you wish to Edit is...

Page 13: ...e Daylight Sav Enter Channel 0 0 NUMERIC MENU 1 Press MENU button on the remote control to display the onscreen menu 2 Press CURSOR or to scroll through the onscreen menu until you see DTV Setup highl...

Page 14: ...Daylight Sav is Daylight Sav is Daylight Sav highlighted 5 Press CURSOR to select On or or or Off Off Off If Daylight Saving is set to On the Timer on the TV will display One hour ahead of the actual...

Page 15: ...ions 7 Use CURSOR or to highlight the to highlight the to channel you wish to add or skip 8 Use CURSOR to toggle between Added or Skipped If Skipped is selected the channels will be skipped when scrol...

Page 16: ...lets you display or discard emergency alerts for Low or Medium priority This feature is DTV Setup DTV Setup Ch Install Digital Audio Timer Closed Caption Emerg Alert Medium Low Emerg Alert Medium Low...

Page 17: ...nly available in Digital Mode ACTIVE CONTROL OPTIONS Timer AutoLock Active Control Rotation Timer AutoLock Active Control Rotation On Features MENU 1 Press MENU button on the remote control to display...

Page 18: ...Dynamic Noise Reduction helps to eliminate noise from the picture Contrast Control Contrast Control Contrast Control when set to On the Contrast control helps to sharpen the picture quality The black...

Page 19: ...apart from the current TV program sound Note If SAP is not present on a selected show No SAP will be displayed on the TV screen No SAP will be displayed on the TV screen No SAP Sound ound ound toggles...

Page 20: ...g the A V inputs Channel Block After an access code has been programmed you cannot block individual channels including the A V inputs Channel Block Clear All Lets you clear all channels being blocked...

Page 21: ...to enter the AutoLock mode Password _ _ _ _ will appear 6 Press CURSOR CURSOR CURSOR followed by the NUMERIC buttons on the remote control to enter the access code 0711 is the default The first time...

Page 22: ...URSOR or until you see Block Channel highlighted 2 Press CURSOR to enter the Block Channel menu Press CURSOR or to Block or Block or Block unBlock the unBlock the unBlock channel 3 Press CURSOR or to...

Page 23: ...viewing 3 When finished press MENU on the remote control four times to exit the menu from the TV screen Follow these steps for Digital Mode Follow these steps for Analog mode AutoLock Block Channel Bl...

Page 24: ...es are displayed on the screen Taccess code and the AutoLock features are displayed on the screen T refer to page 22 MOVIE RATINGS Follow these steps for Digital Mode Digital Mode Analog Mode Analog M...

Page 25: ...ne of the options Block All V S L D or FV 6 Press CURSOR to turn option On or Off Off Off Follow these steps for Digital Mode 1 Press CURSOR or until you see TV Rating highlighted 2 Press the CURSOR t...

Page 26: ...e Off Use the Off CURSOR or to toggle the AM and PM setting Channel In Digital Mode use CH or CH to select DTV which is the last viewed digital channel In Analog Mode use the NUMERIC buttons or the CH...

Page 27: ...he DTV Setup options 4 Press CURSOR or until you see Close Caption highlighted Press CURSOR to enter Caption Option menu options 5 Press CURSOR to toggle to the options that you want Use Default or Us...

Page 28: ...isplay the Close Caption menu 5 Press the CURSOR repeatedly to select one of the close caption settings namely CC Off CC1 CC2 and CC Mute CC Off ff Turns Close Captioning Off CC1 and CC2 Depending on...

Page 29: ...t Control feature allows you to select the picture format mode Picture Format Modes FORMAT 4 3 Shows picture in its original 4 3 aspect ratio format You will see 2 side borders on the TV screen 4 3 Ex...

Page 30: ...ate subwoofer Digital Tuner A digital tuner serves as the decoder required to receive and display digital broadcasts It can be included inside TV sets or via a set top box HDTV The generally agreed up...

Page 31: ...e available Settings Error messages appear on the screen of TV No Signal No Program Audio Only Sound Disturbing sound such as buzzing clicking cracking humming whistling etc It is normal to hear a dis...

Page 32: ...en surface Avoid wearing jewelry or using anything abrasive Do not use household cleaners Wipe the front screen with a clean cloth dampened with water Use even easy vertical strokes when cleaning Gent...

Page 33: ...pecifications and information are subject to change w Component Video Input Y Pb Pr S Video SVHS Composite Video input CVBS Antenna Cable RF In SPDIF Out Digital Only Audio Out Cinch Composite Video I...

Page 34: ...nt because of improper installation connections to improper voltage supply abuse neglect misuse accident unauthorized repair or other cause not within the control of Magnavox A product that requires m...

Page 35: ...og Mode 28 Color Control 18 Color Temperature Color Temp Control 18 Feature Highlights 5 Format Control 29 Glossary 30 Guide To Digital TV 4 Index 34 Language Control 10 Picture Control 18 Quick Tips...

Reviews: