background image

EN-11

ENGLISH

FRANÇAISE

ESP

AÑOL

Use your TV 

5. 

This section helps you perform basic TV operations. 

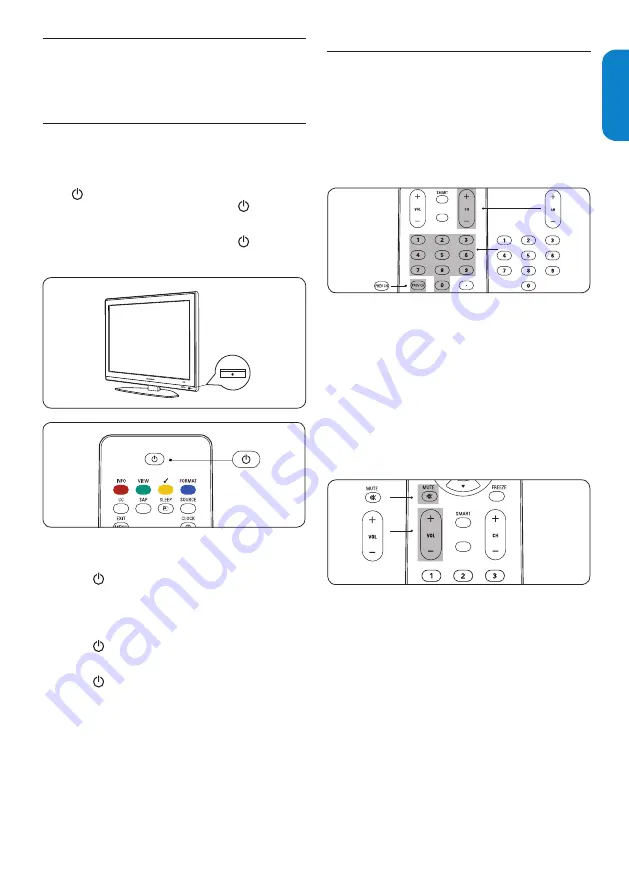
Switch your TV on or to standby

5.1 

To Switch the TV on

Press   

POWER

 at the front of the TV.

If the standby indicator is off, press 

• 


POWER


on the front of the TV. 

If the standby indicator is on, press 

• 

 on the 

remote control.

MODE

MODE

To Switch to standby 

Press 

• 

 on the remote control.

To switch on from standby without the remote 

control.

Press 

• 


POWER

 at the front of the TV to 

switch the TV off.  

Press 

• 


POWER

 again to switch the TV on.  

Note


D


The 

TV is never powered off completely 

unless it is physically unplugged.

Watch TV

5.2 

Switch channels

Press a number (1 to 999) or press 

• 

CH


+

/

-

 on 

your remote control.

Press 

• 

PREV CH


to return to the previously 

viewed TV channel.

MODE

MODE

Note 


D

You can also switch channels by pressing 

CH


+

/

on the top of the TV

Adjust volume

Press 

1. 

VOL+

 or 

VOL-

 on your remote control.

Press 

2. 

MUTE

 on your remote control to mute 

the sound.  Press 

MUTE


again or press 

VOL


-


or 

+


to restore the sound.

MODE

MODE

Note 


D

You can also switch volume by pressing 

VOL


+

/

on the top of the TV

Summary of Contents for 19MF338B - 19" LCD TV

Page 1: ...tomer support service in your country 1 800 705 2000 Enter below the Serial No located on the rear of the cabinet ES Para obtener m s informaci n llame al servicio de soporte al cliente de su pa s 1 8...

Page 2: ...stering your product you ll receive notification directly from the manufacturer in the rare case of a product recall or safety defect Additional Benefits Registering your product guarantees that you l...

Page 3: ...ormally or exhibits a marked change in performance E The appliance has been dropped or the enclosure damaged Tilt Stability All televisions must comply with recommended international global safety sta...

Page 4: ...nce will not occur in a particular installation If this equipment does cause harmful interference to radio or television reception which can be determined by turning the equipment off and on the user...

Page 5: ...channels from a cable receiver box 12 5 4 Watch a DVD 12 6 Use more of your TV 13 6 1 Remote control overivew 13 6 2 Change picture and sound settings 14 6 3 Use Smart mode 16 6 4 Create favorite cha...

Page 6: ...he type plate at the rear of the TV 2 2 Screen care Turn off and unplug the AC power cord before cleaning the screen Clean the screen with a soft dry cloth Do not use substances such as household clea...

Page 7: ...as a camera or game console You can also connect to the headphone Rear connectors 75 2 1 4 3 5 Cable 75 Use the TV rear connectors to connect to the antenna and permanent devices such as a high defin...

Page 8: ...Your TV is equipped with a Kensington Security Slot at the back of the TV If you connect an anti theft Kensington lock not supplied position the TV within reach of a permanent object that can be attac...

Page 9: ...to digital TV This means that a given broadcaster can have channels available either in analog or in digital or both analog and digital at the same time The TV has stereo sound if the broadcasting cha...

Page 10: ...ns a digital TV tuner for receiving off air digital television broadcasts Contact your local DBS provider for more information about the connections and the TV channels Connect to a cable receiver box...

Page 11: ...press power the remote control The TV normally takes 10 15 seconds to start up and the following screen appears the first time you turn on the TV Thank you for your purchase TV Please proceed with the...

Page 12: ...the front of the TV to switch the TV off Press POWER again to switch the TV on Note D D The TV is never powered off completely unless it is physically unplugged WatchTV 5 2 Switch channels Press a num...

Page 13: ...SOURCE repeatedly to select the connected cable receiver box and wait a few seconds for the picture to appear MODE Press 2 OK Use the remote control of your set top box to 3 select channels Watch a D...

Page 14: ...allation mode Antenna or Cable CURSOR BUTTONS 8 To navigate through the menus FREEZE 9 No function CH 10 Switches to the next or previous channel SMART MODE 11 Selects the among Personal Sports Standa...

Page 15: ...ures Parental control Installation Picture format Picture Contrast Brightness Color Sharpness Color temperature Tint Dynamic contrast Summary of picture settings The following picture settings can be...

Page 16: ...r zoom Not for HD and PC Removes the black bars on the side of 4 3 broadcasts with minimal distortion 4 3 Not for HD Displays the classic 4 3 format Movie expand 14 9 Not for HD and PC Scales the clas...

Page 17: ...and second audio program SAP when it is available in analog channel Digital audio language This gives you the possibility to swap between main and alternative language when it is available in digital...

Page 18: ...how set the time Press 1 MENU on the remote control and select Installation Clock Installation Clock Settings Autoprogram Source Language AM Clock Current software info Reset AV settings Features Slee...

Page 19: ...gs lock US Movie ratings lock Change PIN Parental control US TV ratings lock US Movie ratings lock Settings Canada English ratings lock Canada French ratings lock Region ratings lock AV1 Side AV HDMI...

Page 20: ...dults and may be unsuitable for children under the age of 17 These programs may contain graphical violence explicit sexual activity and or crude or indecent language Language L Sex S Violence V Use th...

Page 21: ...n French movie ratings Movie rating Description G Appropriate for all ages with little or no violence and little to no sexual content 8 ans Appropriate for children 8 and up which may contain little v...

Page 22: ...on services are necessarily being used by a TV channel during the transmission of a closed caption program Select a caption service for digital channels 3 Press MENU on the remote control and select F...

Page 23: ...ion to the center of the screen with the cursor buttons Select yourTV in 6 10 PC mode Press 1 MENU on the remote control and select Installation Source Installation Source Settings Autoprogram Clock L...

Page 24: ...Language English Fran ais Settings Autoprogram Source Clock Espa ol Language Current software info Reset AV settings Autoprogram Settings I Installation Cable Antenna Start now Antenna Select 2 Cable...

Page 25: ...r with Audio L R connectors for camcorder game console etc Select connection quality 8 2 This section describes how you can enhance your audio visual experience by connecting your devices with the bes...

Page 26: ...onent video red gree blue Audio L R red white S video Composite audio vi yellow red white Component video cable Red Green Blue Component video red gree blue Audio L R red white S video Composite audio...

Page 27: ...and game console via HDMI Connect a DVD player recorder via HDMI DVI and DIGITAL AUDIO OUT connectors Connect a DVD recorder orVCR and a second A V device via composite connectors OUT OUT IN RF OUT S...

Page 28: ...der via component video output connectors YPbPr and analog audio L AUDIO R DVD Cable receiver box L AUDIO R VGA TO PC Connect a digital home theatre amplifier Warning B B Due to legal requirements it...

Page 29: ...AC 3 or Digital 5 1 The channels consist of front left front right front center surround or rear left surround or rear right and a separate subwoofer Digital Tuner A digital tuner serves as the decod...

Page 30: ...power socket outlet wait 60 seconds and reconnect the AC power cord The picture is distorted It is stretched out has short fat black bars on the side or top Broadcast video format 1 Press the FORMAT...

Page 31: ...m 16 9 subtitle Wide Screen Smart modes Personal Sports Standard Movie Power saver CONNECTIONS Rear connectors AV1 Component video input with Audio L R support 480i p 720p 1080i HDMI Ver 1 3a HDMI sup...

Page 32: ...ices 26 D DBS 9 Dynamic contrast 14 F Favorite lists 17 H HDMI cable 24 I Installation 7 L Language 23 M Manage cables 10 Model number 1 Movie expand 15 Movie ratings 19 Mute 13 O Overview Connection...

Page 33: ...EN 32 ENGLISH FRAN AISE ESPA OL Trouble shooting 29 V V chip 18 VESA wall bracket 7 Volume 13 W Warranty 33 Y Y Pb Pr 27...

Page 34: ...llation of programs data or other information is not covered under this Limited Warranty This warranty does not apply a to damage caused by accident abuse misuse neglect misapplication or non supplied...

Page 35: ......

Reviews: