background image

5

Before Using

Remote Control

1. Return to the home menu

2. Eject the disc

3.  Access to tuner source

4. Access to disc source

5. -  Search an available radio station by

decreasing tuning frequency

-  Select the previous chapter/track for

playback

6.  Select radio band

7. - Zoom in (Picture menu)

-  Access to music list (Audio menu of

music playing)

8. Adjust screen settings

9.  Open EQ menu

10. Menu cursor

11. Enter

12. -  Open route menu (DVD)

- Turns on/off PBC (VCD)

13. Digit area

14. Repeat playback

15. Change to next source

16. Power on/off

17. Access to Bluetooth source

18. Access to navigation source

19. Pause playback/Start playback

20. -  Search an available radio station by

increasing tuning frequency

-  Select the next chapter/track for

playback

21. -  Playback disc in different angle for a

scene (DVD)

- Rotate (photo playing)

- Access to video list

22. -  Language selection for subtitle (DVD)

 - Access to photo list

23.  Change the audio language for disc

playback (DVD)

24. Increase/Decrease volume

25. Access to settings source

26. Mute on/ off audio output

27. Activate direct access mode

28. Dial/Receive a call

29. Hang up

30. Play all chapter/tracks in random order

31. -  Press to clear the number one by one

- Hold to clear all the numbers

Note:

Your remote control may differ 

slightly  from the one pictured here. 

The above diagram is for illustrative 

purpose only.

6

Notes on Remote Control Usage

1. Aim the remote control at the remote sensor on the unit.
2.  Replace the battery from the remote control or insert a battery insulator if the battery has not

been used for a month or longer.

3. DO NOT store the remote control in direct sunlight or in a high temperature environment, as it

may not function properly.

4. The battery can last up to for 6 months in normal conditions. If the remote control does not

work, please change the battery.

5. Use “button shaped” lithium battery “CR2025” (3V) only.
6. DO NOT recharge, disassemble, heat or expose the battery to fire.
7. Insert the battery in the proper direction according to the ( + ) and ( - ) poles.
8. Store the battery in a place where it cannot be reached by children to avoid the risk of accident.

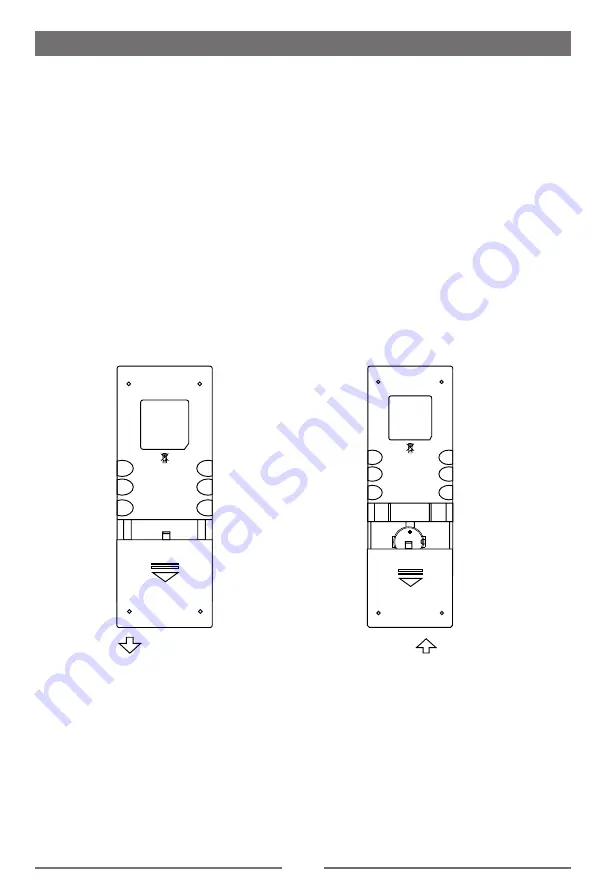
Uninstall Battery

Slide out the battery compartment tray 

at the bottom on the back of the remote 

control.

Install Battery

Use  button-shaped  lithium  battery 

CR2025  (3V)”  only.  Insert  the  battery 

in the battery tray in the proper direction 

according to the (+) and (-) poles.

Before Using

PULL OUT

PUSH IN

Summary of Contents for M9970

Page 1: ...CD DVD MP3 USB BLUETOOTH PLAYER WITH FM AM TUNER AND 7 TFT MONITOR Installation and Operating Instructions M9970 DIABLO A V MULTIMEDIA PLAYER A V MULTIMEDIA PLAYER...

Page 2: ...culiar smell Only connect the unit to a 12 volt power supply with negative grounding Never install this unit where operating it may impair safe driving conditions Never use the front video display fun...

Page 3: ...arked the car in hot or cold weather for a long time please wait until the temperature in the car becomes normal before operating the unit 5 Using the car heater in a low temperature environment may r...

Page 4: ...emove an USB Device 12 Play Pause 13 Previous Next 13 Search for a Folder 13 Repeat 13 Repeat A B 14 Shuffle Random Play 14 Select Audio Mode 14 Select Subtitle Language 14 Change Viewing Angle 14 Vid...

Page 5: ...peatedly to adjust screen brightness Press and hold PIC to turn off the display 5 TILT Knob Increase the display angle 6 OPEN CLOSE Key Open Close the TFT monitor 7 TILT Knob Decrease the display angl...

Page 6: ...navigation source 19 Pause playback Start playback 20 Search an available radio station by increasing tuning frequency Select the next chapter track for playback 21 Playback disc in different angle fo...

Page 7: ...trol does not work please change the battery 5 Use button shaped lithium battery CR2025 3V only 6 DO NOT recharge disassemble heat or expose the battery to fire 7 Insert the battery in the proper dire...

Page 8: ...the volume or using any of the audio setup features cancels the mute function Audible Beep Confirmation An audible beep tone confirms each function selection The Beep tone can be disabled through the...

Page 9: ...l selectively boost certain bass and treble frequencies Adjust FAD BAL You can adjust front back left right balance of the speaker and the subwoofer volume to get balanced listening effect according t...

Page 10: ...mation on the screen A submenu is displayed 3 Touch or to set year month and day Set Clock Mode 1 Touch Clock mode 2 Touch 12Hr or 24Hr to switch to clock mode Set Time 1 Touch Time 2 Touch the time o...

Page 11: ...the or button on remote control or touch the icon on the user interface to tune in a higher lower station Method 2 1 Touch the numeric keypad icon Numeric keyboard is displayed touch numbers to input...

Page 12: ...nt band automatically Manual Store 1 Tune to a station manually 2 Touch 3 Touch one of the channels P1 to P6 to save the selected station Tune to a Preset Station 1 Touch Radio 2 Touch one of the pres...

Page 13: ...tlined below A Return to the main menu B Play the video and display playback information C Display onscreen control menu D Time display Controlling Playback To access the on screen controls touch the...

Page 14: ...start play For Picture Files 1 Touch to display all available picture folders 2 Touch a folder then touch the desired file 3 Touch the file again to start play For Folder Control 1 Touch to display al...

Page 15: ...ch the screen to display control menu if necessary 2 Touch to display the 2nd menu if necessary 3 Touch on the screen or press RANDOM on the remote control repeatedly to turn random play on or off Sel...

Page 16: ...8 indicates that this VCD has 8 tracks and the track playing back now is the first title Elapsed Time 1 Elapsed time of the current track 2 Total time of the current track Direct Chapter Entry To sele...

Page 17: ...uetooth capabilities of the device Compatibility with all Bluetooth devices is not guaranteed Any obstacle between this unit and a Bluetooth device can reduce the operational range Keep this unit away...

Page 18: ...al minutes to load on initial setup Tip You can also adjust Bluetooth settings in the Settings menu Music Mode A2DP A2DP is short for Advanced Audio Distribution Profile The mobile phones supporting t...

Page 19: ...TFT open Auto on Turn TFT open Auto on Auto off Turn TFT open Auto off Manual Turn TFT open Manual Calibration When the touch operation is not sensitive or valid you should calibrate the touch screen...

Page 20: ...it Language settings Description OSD Select on screen display language DVD audio Select DVD audio language Options available depending on DVD disc DVD subtitle Select DVD subtitle language Options ava...

Page 21: ...for children under 17 R Restricted re parental guidance is advised for children under the age of 17 NC 17 Unsuitable for children under age 17 Adult Acceptable for adults only DRC On Off Dynamic rang...

Page 22: ...When the unit hangs up you can reset it Press RESET with a ball point pen or similar tool Tip When the unit has been reset all the settings will return to default settings Replace a Fuse If there is n...

Page 23: ...ency Response 3dB 20Hz 20KHz Maximum Output Power 4 45W Load Impedance 4 AUX IN Distortion 0 5 Frequency Response 3dB 20Hz 20KHz Audio Input Level 0 5Vrms Preout Output Impedance 100 Output Level 2V V...

Page 24: ...pported Video Formats VCD DVD MP4 RMVB Region Code According to DVD sales regions the whole world is divided into six regions A DVD disc can be played back only when its region code is compatible with...

Page 25: ...ion is shown at all times Parking break wiring is not correct Check wiring and correct Flashing image or interference appears on screen The color system of DVD disc does not match the monitor Adjust t...

Page 26: ...NT Remote AMP ANT Remote KEY GROUND KEY B KEY A BACKUP CAMERA YELLOW BRAKE INDICATION PARKING BRAKE SWITCH BATTERY GND ACC LIGHT BATTERY GND IGNITION SWITCH GND SIGNAL REVERSE DRIVING GEAR White Purpl...

Page 27: ......

Page 28: ...P N 127075007084 M9970_UM_IM_5 4 16 CLASS 1 LASER PRODUCT...

Reviews: