

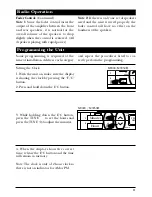

Installation Procedure
Step 1:
After obtaining the required space and
mounting hold dimensions required,
release the mounting sleeve from the unit
by pressing inward on the sides of the unit
and sliding the mounting sleeve off the
unit.
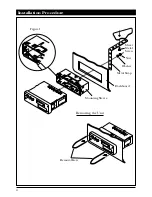
Insert the mounting sleeve into the hole
on the dashboard. Secure it by bending
the tabs inward as shown in fig 1. Select
the appropriate tab according to the
thickness of the dashboard.
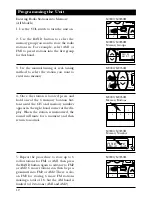
Step 2:
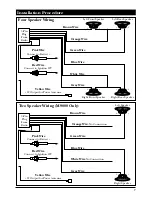
Bring the power, ground, antenna and
speaker wires through the center of the
mounting sleeve. Make all the speaker
and power connections to the main har-
ness supplied with the unit. Refer to the
“wiring” section of this unit for proper
connection. After all the connections
have been made and are correct, plug the
harness and the antenna cable into the
mating plugs located on the rear of the
unit.
Step 3:
Turn on the ignition key and do a pre-
installation check of all the functions with
the unit out of the dashboard to make
sure that everything is operating properly
before final installation.
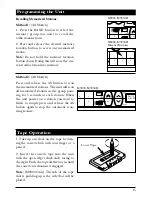
Step 4:
Securely attach the rear support strap pro-
vided to the rear of the unit with the fas-
teners provided. Bend the strap to allow
the unit to slide into it’s mounting sleeve.
Reach up behind the unit and grab the
strap while sliding the unit into the
mounting sleeve until it snaps into place.
Secure the end of the strap to a solid por-
tion of the dashboard structure or the fire
wall.
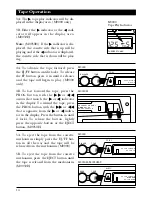
Removing the Unit:
In the event that the unit requires
removal from it’s mounting location,
repeat the following procedures.
A. Release the rear support strap.
B. Insert the keys provided into the slot
on both sides of the chassis until locked.v
(snapped into place)
C. Pull on the keys with equal pressure to
release and remove the unit from the
mounting sleeve.
D. Disconnect the wire harness and the
antenna.
3
M9000/M9050H/-2 08/04/00 7:57 AM Page 3


