background image

15

Care and Maintenance

Fuse Replacement:

To replace the the fuse, press the holder
together and twist it slightly until the two
pieces separate. Replace the fuse with only the
specified rating located in the outside of the
fuse holder.

Tape Usage:

Your new Magnadyne stereo cassette player will
play any tape up to 90 minutes in length. Any
tape longer than 90 minutes is not recom-
mended as the added load on the tape motor
and belts could cause premature wear acceler-
ating the need for replacement. Also, 120
minute tape is thinner and prone to tangle
inside the mechanism regardless of how clean
the heads and pinch rollers are kept.

Cleaning:

The tape head should be cleaned regularly to
prevent sound deterioration. Insert a head
cleaning cassette into the mechanism follow-
ing the instruction provided with the cleaner.
If you play pre-recorded tapes (store bought)
the head should be cleaned every 10 to 15
hours of playing time. If you record your own
tapes on high quality CRO2 or metal tape, you
should clean the head about once a month.

Specifications:

AM/FM Tuner:
FM Frequency Range............... 87.5 - 108.1MHz
AM Frequency Range..................520 - 1720KHz
IF Rejection............................................ 46dB
Image Rejection...................................55dB
Selectivity................................................... 35dB
S/N ratio (signal to noise)................... 48dB
Stereo Separation....................................... 36dB

Cassette Player:
M9000 Tape Mechanism....... Auto Stop with

Locking FF

M9050H/M9050H-2 Tape Mechanism.... Auto

Reverse with Locking FF/REW

Wow & Flutter..............Less Than 0.35% WRMS
Signal to Noise Ratio............Better Than 50dB
Frequency Response..... (M9000) 60Hz - 10kHz

(M9050H/M9050H-2) 35Hz - 14kHz

General:
Power Requirement...................11.2V - 14.4V

DC NEGATIVE GROUND

Bass Tone Control.................+ - 10dB @ 100Hz
Treble Tone Control..............+ - 10dB @ 10kHz
Speaker Impedance Requirement...4 or 8 Ohm
Output Power..(M9000) 5 Watts x2 @ 1% THD
Output Power..................(M9050H/M9050H-2)

7 Watts x 4 @ 1% THD

Weight........................................................3.3lbs

Features and specifications are subject to change and
improvement without notice.

Tape Operation

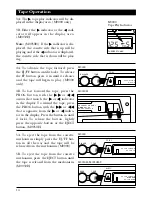
6. To reverse the playing direction of the
tape press both 

and 

together

and release. The 

or 

indicator in the

display will change. (M9050H)

M9050H

GE PRESET MEMORY

POWER 25 + 25

VERSE CASSETTE

FM 1 2 3

AM

M9000/M9050H/-2  08/04/00  7:58 AM  Page 15

Summary of Contents for M9000

Page 1: ...NCE VOL POWER AUTO STORAGE PRESET MEMORY AUTO STOP CASSETTE FAD SEEK AS BAND F C 1 2 3 4 5 6 TUNE UP DOWN PLL SYNTHESIZER TUNER SEEK FM 1 2 3 AM ST CH EJECT TREB BASS VOL POWER BAL PULL AUTO STORAGE P...

Page 2: ...____________________ 2 Introduction Mechanical Installation Most all automobiles trucks and vans pro vide a mounting location somewhere in the fascia of the dashboard or center con sole to install a r...

Page 3: ...ar of the unit Step 3 Turn on the ignition key and do a pre installation check of all the functions with the unit out of the dashboard to make sure that everything is operating properly before final i...

Page 4: ...Installation Procedure 4 Nut Washer Sheet Metal Screw Metal Strap Dashboard Mounting Sleeve Removal Keys Removing the Unit Figure 1...

Page 5: ...nition key Use a test light or volt meter to locate a connection point at the fuse block Note If your are replacing a factory installed radio this wire will exist in the wires that connected to the ol...

Page 6: ...nnect the white wire to both Right speaker Negative wires Blue Wire Connect the blue wire to the Right Rear speaker Positive wire Wiring Two Speakers M9000 Only Fader Control Deleted Brown Wire Connec...

Page 7: ...Plug From Radio Yellow Wire 12 Output for Power Antenna Pink Wire Connect to Battery Red Wire Connect to Ignition 12V Right Speaker Left Speaker Brown Wire Gray Wire White Wire No Connection Blue Wire...

Page 8: ...els To select the AM or FM radio band press the BAND button FM1 FM2 FM3 AM1 or AM2 will appear in the display ST will appear in the display when the tuner is receiving a stereo FM signal 3 How to Tune...

Page 9: ...s played in the digital display area To con tinue seeking stations the SEEK button will have to be pressed again Controlling the Sound Adjust the following controls to suit your listening preference V...

Page 10: ...and right speaker output to suit your listening taste Balance Control M9050H Only Pull and rotate the balance control left or right to achieve the desired left and right speaker output to suit your li...

Page 11: ...e time of installation Address each category and repeat the procedures listed to cor rectly perform the programming Setting the Clock 1 With the unit on make sure the display is showing the clock by p...

Page 12: ...number appear in the right hand corner of the dis play When the station is memorized the sound will mute for a moment and then return to normal 5 Repeat the procedure to store up to 6 radio stations f...

Page 13: ...the group paus ing for 5 seconds at each station When the unit pauses on a station you want to listen to simply press and release the AS button again to stop the automatic scan ning feature 1 Take up...

Page 14: ...or indicator in the display To rewind the tape press the PROG button with the or that is opposite from the or indica tor in the display Press the button in until it locks To release the button lightly...

Page 15: ...me If you record your own tapes on high quality CRO2 or metal tape you should clean the head about once a month Specifications AM FM Tuner FM Frequency Range 87 5 108 1MHz AM Frequency Range 520 1720K...

Page 16: ...ch cost are the sole responsibility of the purchaser This warranty does not cover the cabinet appearance items or accessories used in connec tion with this product or any damage to recording or record...

Reviews: