background image

35

 Bluetooth Operation

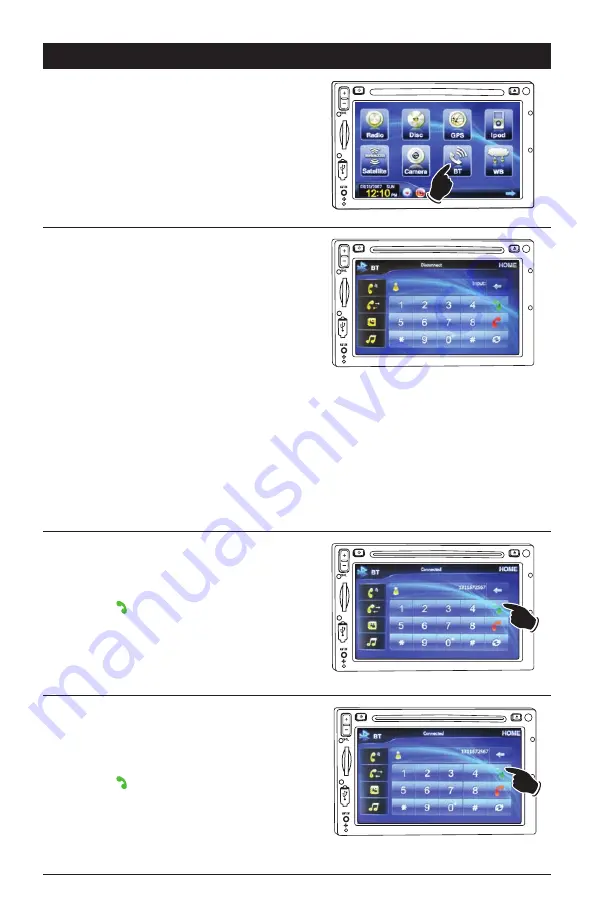
Selecting the Bluetooth Source:

Touch the HOME button to activate the Homepage 
screen. Touch the BT button to enter the 
Bluetooth interface.

Pairing Bluetooth Devices:

1. Enter the Bluetooth interface on M4-LCD.
2. Open the mobile phone’s setup menu.
3. Open the Bluetooth setup program on the mobile 

phone and activate the Bluetooth feature.

4. From you mobile phone scan for available devices.
5. Select ”MAGM4LCD” and connect to the unit.
6. Type the passcode “0000”.
7. When phone has been paired “Connected” will 

appear in the unit’s Bluetooth interface display.

Note 1: If the mobile phone has been previously 

paired with the M4-LCD, the unit will connect auto-

matically to the Bluetooth mobile phone when the 

unit is turned on.
Note 2: If the Bluetooth mobile phone is already 

paired with the radio, select MAGM4LCD on your 

phone and touch “Connect”.

Making Calls:

1. Make sure the mobile phone is connected to 

M4-LCD.

2. Using the key pad type in the phone number .

3. Touch the   green phone to make the call.

Answering Calls:

1. Make sure the mobile phone is connected to 

M4-LCD.

2. The incoming call’s phone number will appear in the 

display.

3. Touch the   green phone to answer the call.

NAV

MIC
RES

NAV

NAV

MIC
RES

NAV

Summary of Contents for M4-LCD

Page 1: ...Operation and Installation Manual Model M4 LCD AM FM WB Stereo Receiver with Disc Player and Touch Screen Controls NAV...

Page 2: ...on 7 Brightness Adjustment 7 System Setup 7 8 Calibration Setup 8 Audio Setup 8 Wallpaper Setup Background 8 Reset 9 Sound Controls 9 10 Screen Dimmer 10 Wallpaper 10 Radio Operation AM FM Radio Opera...

Page 3: ...with too much dust or the possibility of water splashing Backing Up Your Vehicle Do not backup your vehicle while looking at the monitor Always look in the direction of your vehicle s motion Use the...

Page 4: ...5mm audio input plug The M4 LCD will not control the device it just allows the audio video to be played through the system 10 Microphone 11 Restart Button Press the restart button if the unit freezes...

Page 5: ...ture selec tion up down left or right 23 OK Confirms the selected item 24 Select SEL Accesses the Sound menu 25 Mute Mutes the volume 26 Slow Motion Press to play the movie disc in slow motion 27 Back...

Page 6: ...ns Press the in the lower right hand corner of the screen to reveal the second Homepage screen In the Navigation GPS mode the Homepage can be accessed by pressing and releasing the power button Pressi...

Page 7: ...update the navigation software access to a PC with a SD card reader and internet access is required Note Updating the navigation software requires a credit card transaction with the navigation softwar...

Page 8: ...allpaper icon to enter the wallpa per selection interface 3 Either select a file pre stored in the system or select Scan SD which select an image from the SD card slot Note You must remove the navigat...

Page 9: ...lassical Bluesy Old Operatic Speech and UserDefine Press to save and return to previous source Note 1 Each one of these pre defined equalizer setting can be customized to fit your taste Select the equ...

Page 10: ...ute The majority of source menu options have a MUTE button Pressing the MUTE button will mute the volume level Press again to restore the volume level Screen Dimmer Dimming the Screen Pressing the but...

Page 11: ...then it will stop seeking and start playing Manually Tuning in a Radio Station Press and hold either the or button until MANUAL appears in the display then release Then press the or button until the d...

Page 12: ...g sta tion the radio must be switched from distant to local reception To switch from distant to local reception press the LOC button LOC ON will momentarily appear in the display indicating local rece...

Page 13: ...ND button to select from the FM1 FM2 or FM3 radio band 2 Press the RDS button and TA AF and PTY but tons appear on the left of the display 3 Press the PTY button to display the program type screen 4 P...

Page 14: ...tting will not be performed and the player will not play the disc Therefore remove the rough edges in advance by using a ball point pen or pencil as shown To do this press the side of the pen or penci...

Page 15: ...tton to select a lower track Press the l button to select a higher track Tracks can also be selected by using the remote control Press the track selection number button that corresponds to the track y...

Page 16: ...ton on the remote until INTRO ON appears on the screen Each track on the disc will play for 15 seconds To cancel this function press the ASM button until SEQ PLAY appears in the display Random Music D...

Page 17: ...screen Note If a drive does not insert DO NOT FORCE it into the slot flip the drive over and try again Selecting the USB or Disc Source Touch the HOME button to activate the Homepage screen Touch the...

Page 18: ...ss the file you want to play Note If your file does not appear on the screen you must use file selection Method 2 Method 2 Using the Control Panel 1 Touch the button to reveal the file and folder cont...

Page 19: ...ntrols 2 Press the in lower right hand corner of the screen to reveal the secondary disc controls 3 Press the and REP OFF will appear in the display Press the button until REP 1 appears the file will...

Page 20: ...button on the remote will also access the menu screen General Operations Gently insert the disc into the slot with the label side up The unit will automatically load the disc Note If a disc does not...

Page 21: ...2 or BACKWARD X 2 will appear in the display Press and hold the l or l button again will increase the speed X 4 X 8 and X 20 Touch the ll button to resume normal movie disc playback Movie Disc Operati...

Page 22: ...on the char acteristics of the movie disc the angle func tion may be invalid This is not a malfunction NAV Zoom Selection 1 Touch the screen to reveal the disc controls 2 Press the in lower right hand...

Page 23: ...disc controls 3 Press the button to show the number key pad Select the numbers keys to directly select the desired chapter 4 Press button to execute your selection NAV Screen Adjustment Controls 1 To...

Page 24: ...7 8 Adult Default Restore Exit Setup Language Setup Page OSD Language English German Spanish French Portuguese or Italian Audio Lang English German Spanish French Portuguese or Italian Subtitle Lang E...

Page 25: ...Navigation Menu The typical way of using the navigation system is to select a destination and start navigating You can select your destination in the following ways Use the selected location on the m...

Page 26: ...some useful warnings and disable the touch screen in a moving vehicle with Safety Mode NAV NAV Settings Menu 2 of 2 Press the button to access the second group of settings GPS Sets up the connection...

Page 27: ...s 13 Detour Opens the Detour screen offering two way of modifying the route The list of Saved Search Criteria A button to avoid parts of the route 14 Opens the Position menu 15 Menu Opens the Navigati...

Page 28: ...tton 4 The map appears with the selected point in the middle of the screen Touch the Set as Destination button The route is then automatically calculated and you can start navigating NAV NAV Entering...

Page 29: ...mber When the necessary destination information is entered press the Done button Note Press the icon to select a city from recently used cities 6 The map appears with the selected point in the middle...

Page 30: ...pears with the selected point in the middle of the screen Touch the Set as Destination button The route is then automatically calculated and you can start navigating NAV NAV NAV A destination can also...

Page 31: ...Press the Avoid button 4 Select your preference on how to avoid the route segment Once your preference is selected the map appears and the route is automatically calculated and you can start navigati...

Page 32: ...your detour will disappear NAV Direct Selection Detour 1 Zoom the map so the part of the route you want to detour is visible on the screen Touch the part of the route you want to detour until a red f...

Page 33: ...can move route points up or down in the list reverse the route optimize the route or remove a route point 4 Load Route You can navigate a route your previously saved You can choose to keep the curren...

Page 34: ...the map 3 POI Points of Interest Creating updating or deleting POIs or POI groups Modify POI vis ibility settings 4 Recent Places List of recent destinations 5 Favorites Renaming or deleting Favorite...

Page 35: ...Connected will appear in the unit s Bluetooth interface display Note 1 If the mobile phone has been previously paired with the M4 LCD the unit will connect auto matically to the Bluetooth mobile phon...

Page 36: ...ssed Delete a Phone Number Note If you want to delete a phone number touch the phone number then press the button NAV NAV Last Phone Number Redial 1 Make sure the mobile phone is connected to the unit...

Page 37: ...he call 8 Press to return to the previous screen Note If you want to delete a phone number touch the phone number then press the button To delete all the phone numbers press the button Bluetooth Music...

Page 38: ...reference Radio ID __________________________ Note The SiriusXM Radio ID does not include the letters I O S or F continued MIC RES NAV MIC RES NAV MIC RES NAV MIC RES NAV What is SiriusXMTM Satellite...

Page 39: ...he antenna if the cable is damaged Check Tuner The radio is having difficulty communicating with the SiriusXM Connect Vehicle Tuner The tuner may be disconnected or damaged Verify that the SiriusXM Co...

Page 40: ...n Tuning method to scan to the next available channel listen to the chan nel for 5 seconds before scanning to the next available channel Channel List Browsing Tuning Use the Channel Tuning method to v...

Page 41: ...n to access the master channel list menu Note Skipped channels will not be displayed Locked channels will be displayed 2 Browse through the channels by pressing the or button Touch the screen to selec...

Page 42: ...nnels will be displayed 4 Once the SELECT button is pressed the channel will start playing Note A locked channel will require a passcode See Unlocking a Locked Channel section for more infor mation MI...

Page 43: ...Preset Number 2 Press the DIRECT TUNE button 3 Enter the numbers of the desired channel then press the ENTER button For example For SiriusXM Channel 121 press 1 2 1 and then press the ENTER button The...

Page 44: ...he Preset Channel menu 4 Additional channels can also be programmed in the different preset bands SXM1 SXM2 and SXM3 Press the BAND button to access the different preset bands Press to return to the m...

Page 45: ...ll no longer unlock the channels Note 2 If you forget your user passcode the mas ter passcode 5365 will always unlock the channels See page 47 to create a new user passcode MIC RES NAV Skipping a Chan...

Page 46: ...continued 5b Locking a Channel Press the button and will appear next to the channel indicating that the chan nel is locked 1a Reinstating a Locked Channel Press the next to the channel to be unlocked...

Page 47: ...ore setup features 3 Select the Satellite icon to change the pass code 4 Enter master passcode 5365 then press the button 5 Enter your new user passcode 4 numbers then press the button Note To change...

Page 48: ...Navigation touch the screen Note The IPOD interface does not allow for direct screen selection of items you must use the controls at the bottom of the screen NAV Track Controls Track Controls Touch t...

Page 49: ...on to scroll down through the menu item Same operation as the IPOD s Click Wheel The OK button has the same operation as the Center Select Enter button on an IPOD This button has the same operation as...

Page 50: ...50 IPOD Operation Option Continued Browse for a Song continued 3 Press the OK button 4 Press the or button to scroll through the songs 5 Press the OK button and the song will start playing NAV NAV NAV...

Page 51: ...e s speakers Note This system only provides for one way audio from the camera to the M4 LCD The M4 LCD is unable to transmit audio to the camera Side View Cameras Left and Right if equipped The side v...

Page 52: ...Once the vehicle is stopped and the parking brake is engaged the video will play on the screen Menu Screen Press the AUX IN1 or AUX IN2 button to select the auxiliary source The display will indicate...

Page 53: ...e metal tabs on the sleeve to secure the mounting sleeve to the dashboard Step 3 Bring all wiring for the connection of the unit including the antenna through the center of the mounting sleeve Removin...

Page 54: ...Left Front Speaker White Wire Gray Black Wire Gray Wire Right Front Speaker Center Channel Speaker Brown Black Wire Brown Wire Right Rear Speaker Violet Black Wire Violet Wire Green Black Wire Green W...

Page 55: ...Ignition Yellow Wire to 12 Volt Constant Black Wire Ground Orange Wire Parking Brake Switch Infrared Remote Sensor Optional IPOD Optional IPOD Cable RV5 HAR6 Optional This unit for use only with a 12...

Page 56: ...nued SiriusXm Vehicle Tuner SXV100 Optional Blue Wire Power Antenna 12V Out Video Input Yellow Audio Input Left White Audio Input Right Red SiriusXm Antenna Optional External Automotive Type Antenna O...

Page 57: ...Connections Continued TV Monitor Optional Video Second Monitor Optional Video Output Yellow Audio Output Left White Audio Output Right Red Video Output Yellow Note Audio Output is not controlled by th...

Page 58: ...ite Wire Left Trigger 12V Gray Wire Right Trigger 12V Green Wire Rear Trigger 12V C125 Front C125 Rearview C SDR Right Side C SDL Left Side CAM1 White Connector CAM2 Gray Connector CAM3 Green Connecto...

Page 59: ...o see if the radio functions normally Restart Button If the fuse should blow check that the wiring is correct If the wiring is correct replace the fuse with the same amperage rating as the original 15...

Page 60: ...r the cabinet appearance items or accessories used in con nection with this product or any damage to recording or recording tape or any damage to the products resulting from improper installation alte...

Reviews: