Magna BLUEPIRAT Series Camera User Manual Download Page 54


 BLUEPIRAT SERIES | CAMERA USER GUIDE/ 

page 54 of 93


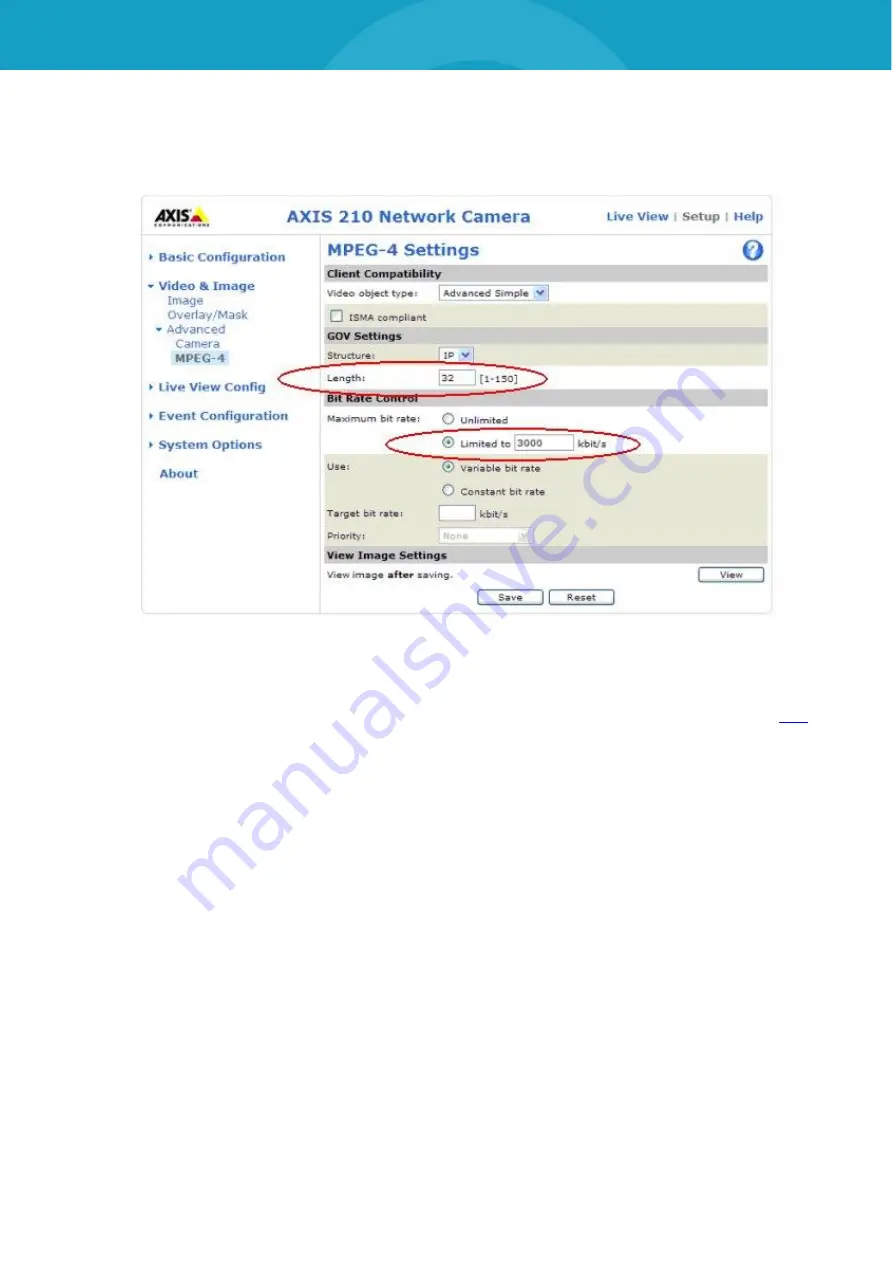
8.3.5  Setting MPEG-4 

Change to the entry 

[Video & Image]


[Advanced]


[MPEG-4]

. Change <Length> to 32. 

Choose the <Maximum bit rate> 

(o) Limited to  …  kbit/s

. Type in 

“3000”. 


Figure 8.13: MPEG-4 settings 


Index


Summary of Contents for BLUEPIRAT Series

Page 1: ...BLUEPIRAT Series Camera User Guide 30 09 2020 Version 5 0 1...

Page 2: ...ng the network camera AXIS F41 F44 25 6 1 Connecting the network camera AXIS F41 F44 25 6 2 Access to the network camera AXIS F41 F44 26 6 3 Creating the user admin 29 6 4 Setting date and time 30 6 5...

Page 3: ...10 4 Setting date and time 67 10 5 IP configuration 69 11 Save and restore the Video Encoder settings 71 12 Resetting the Video Encoder AXIS Q7404 P7214 74 13 Connecting video equipment to the data lo...

Page 4: ...mit or to transfer the software or its rights from this license agreement 6 Licensor is not liable to licensee for any damages including compensatory special incidental exemplary punitive or conseque...

Page 5: ...PRODUCT LIABILITY 2 1 Terms and Conditions of Sale and Delivery The General Terms and Conditions of Sale and Delivery of MAGNA Telemotive GmbH can be found on our website https telemotive magna com u...

Page 6: ...efault to standby mode which may be a reason for an empty battery After rebooting the system takes approximately 120 seconds to be synchronized The recording starts immediately after the synchronizati...

Page 7: ...rnet to a PC Control Unit You need a Windows based Laptop or PC to configure the devices by the System Client It also allows to save the recorded data and to use them offline later System Client Updat...

Page 8: ...mote control can handle all connected loggers BLUEPIRAT Remote optional While Remote Control Touch is just a control unit for handling unique devices or a TSL network the blue PiraT Remote additional...

Page 9: ...r manual for BLUEPIRAT Rapid https sc telemotive de 4 uploads media BLUEPIRAT_Rapid_UserManual pdf User manual for BLUEPIRAT Mini https sc telemotive de 4 uploads media BLUEPIRAT_Mini_UserManual pdf U...

Page 10: ...ous isochronous data MLBevo QXDM The license Connected Gateway MLBevo enables the recording of data of the ATOP control unit MLBevo via USB to the Magna Telemotive data log ger and convert these data...

Page 11: ...the date of purchasing the BLUEPIRAT This period can be extended For details please contact your sales partner see contact at the end of the manual for ad dresses Affected products BLUEPIRAT Rapid BL...

Page 12: ...ing the network camera AXIS F54 Connect the camera with the associated main unit Connect the power supply to the main unit Connect your PC or laptop via Ethernet cable to the main unit Turn on the pow...

Page 13: ...axis com support technical notes browser support The latest versions of Chrome and Firefox are recommended Figure 5 3 Initial login mask Choose your password and type it in This password will be need...

Page 14: ...u start recording always set the date and time in the data logger first It is impossible to change the timestamp at recorded video data This means the setup of a new logger time before downloading doe...

Page 15: ...Figure 5 6 Login to the Main Unit after changing the IP address Click on the Done button at the bottom right Then the Settings button will also appear in the bottom right hand corner please click on...

Page 16: ...6 of 93 Important Please enter as password 2x8bg4 Username admin Password 2x8bg4 Figure 5 8 Create new user Admin After entering the password click on Save Now two users root and Admin should appear i...

Page 17: ...ER GUIDE page 17 of 93 In the Anonymous Users field move the slider to the right to allow anonymous users Figure 5 10 Anonymous Users field and confirm the note by clicking the Yes button Figure 5 11...

Page 18: ...g is set On the System tab click on Plain config Figure 5 12 Selection menu Click on the Got it button in the message that now appears Figure 5 13 Confirmation query Advanced settings To check whether...

Page 19: ...Figure 5 15 RTSP Menu 5 4 2 Displaying the date and time in the video image These settings must be made individually for each camera To select a camera click on the corresponding camera in the Start...

Page 20: ...ext input in the Overlay menu Finally click on the button Create Attention Before you start recording always set the date and time in the data logger first It is impossible to change the timestamp at...

Page 21: ...reaks please reduce the preset Maximum frame rate Reducing to 15 or 20 fps eliminates the problem which is caused by to high frame rates especially with HD cameras Figure 5 22 Frame rate settings Up t...

Page 22: ...5 24 Audio settings menu Further settings can be made by selecting the audio source Figure 5 25 Further audio source settings The audio quality can still be adjusted with the Encoding settings Figure...

Page 23: ...ck on the menu item System Click on the Maintenance icon there Figure 5 27 System menu Various system tasks can be performed in the System Maintenance menu including resetting to factory settings and...

Page 24: ...as follows 1 Disconnect power from the product 2 Hold down the control button between the two SD card slots on the right side and 3 Reconnect the power supply 4 Keep the control button pressed for 15...

Page 25: ...supply to the main unit Connect your PC or laptop via Ethernet cable to the main unit Turn on the power supply All LEDs should light green after about 60 seconds Network camera AXIS F41 Figure 6 1 Con...

Page 26: ...it in This password will be needed later If the system asks for a further authentication please type in the same password like before Figure 6 3 Creating an user password After setting the password pl...

Page 27: ...pture mode and the power line frequency of the power supply In Europe 50 Hz is common Figure 6 5 Configure the capture mode F41 Figure6 6 Configure the capture mode F44 Figure 6 7 Configure the power...

Page 28: ...BLUEPIRAT SERIES CAMERA USER GUIDE page 28 of 93 Figure 6 8 Picture of a connected network camera Index...

Page 29: ...6 9 Adding a new user A new window is opened Name the new user admin and define a password This user and password will be needed later too Recommended User name admin Password 2x8bg4 Choose the User g...

Page 30: ...ion Before you start recording always set the date and time in the data logger first It is impossible to change the timestamp at recorded video data This means the setup of a new logger time before do...

Page 31: ...13 Include date and time in the video stream The setup for in the video image embedded timestamps is finished Note In case that the video is stuttering or has breaks please reduce the preset Maximum f...

Page 32: ...le audio to enable the general audio functionality Note Using the AXIS F44 these settings must be made for Camera 1 to 4 Basic Setup 4 Video Stream Camera Figure 6 14 Enable audio 6 5 1 Adjusting audi...

Page 33: ...ty to power a microphone Figure 6 17 Select audio input Microphone The setting of the Input gain can be used to configure an internal preamplifier for signal im provement Note If the source configurat...

Page 34: ...ress Confirm the settings with Save Note By changing the IP address you lose the connection to the network camera This also will be told to you in an information window Figure 6 20 Hint 1 Figure 6 21...

Page 35: ...default settings by the following steps 1 Disconnect the connection to the power supply 2 Press and hold the control button next to the SD slot and 3 reconnect to the power supply 4 Hold the control...

Page 36: ...main unit Connect the power supply to the main unit Connect your PC or laptop via Ethernet cable to the main unit Turn on the power supply All LEDs should light green after about 60 seconds Network c...

Page 37: ...ssword and type it in This password will be needed later If the system asks for a further authentication please type in the same password like before Figure 7 2 Create a user password After setting th...

Page 38: ...er you have to set the power line frequency of the power supply In Europe 50 Hz is common Figure 7 4 Configure the power line frequency Now you should see the live stream of the connected network came...

Page 39: ...gure 7 6 Add a new user A new window is opened Name the new user admin and define a password This user and password will be needed later too Recommended User name admin Password 2x8bg4 Choose the User...

Page 40: ...date and time on the video image Attention Before you start recording always set the date and time in the data logger first It is impossible to change the timestamp at recorded video data This means t...

Page 41: ...o stream The setup for in the video image embedded timestamps is finished Note In case that the video is stuttering or has breaks please reduce the preset Maximum frame rate Reducing to 15 or 20 fps e...

Page 42: ...Use the following IP address Type in these data IP address 192 168 1 90 Subnet mask 255 255 255 0 Figure 7 10 Setting an IP address Confirm the settings with Save Note By changing the IP address you...

Page 43: ...change your PCs or laptops IP configuration back to dynamic configuration 7 6 Resetting configuration The AXIS P series can be set to default settings by the following steps 5 Disconnect the connectio...

Page 44: ...lable 8 1 Related manuals AXIS 207 User Manual 1 AXIS 210 User Manual 2 AXIS 211 User Manual 3 8 2 Automatic configuration recommended Needed software AXIS Camera Management v2 00 31 http www axis com...

Page 45: ...gures your camera automatically The download file is available in our ServiceCenter at BLUEPIRAT Doku mentations under the manual of the camera connection 15 Click Apply Template 16 Click on the templ...

Page 46: ...BLUEPIRAT SERIES CAMERA USER GUIDE page 46 of 93 17 Click OK to confirm the template A dialog opens 18 Check the configuration process Figure 8 3 Result of the configuration process Index...

Page 47: ...S camera with the right mouse button 20 Click User Management Add Edit User in the shortcut menu Figure 8 4 Add a user A dialog opens 21 Add administrator as follows Name the new user admin and define...

Page 48: ...is described in the camera manual In this case you have to use the fix IP address 192 168 0 10 for your PC The camera is reachable by the IP address 192 168 0 90 A step by step configuration of the ca...

Page 49: ...55 255 0 Default router 192 168 1 1 Figure 8 7 Setting an IP address Note When using a port on the rear side of the logger please type in the IP address 192 168 0 90 and the Default router 192 168 0 1...

Page 50: ...h administrator rights Click Setup Basic Configuration 1 Users Add A new window is opened Name the new user admin and define a password This user and password will be needed later too Recommended User...

Page 51: ...BLUEPIRAT SERIES CAMERA USER GUIDE page 51 of 93 Figure 8 10 Enable anonymous viewer login Index...

Page 52: ...play date and time on the video image Attention Before you start recording always set the date and time in the data logger first It is impossible to change the timestamp at recorded video data This me...

Page 53: ...o stream The setup for in the video image embedded timestamps is finished Note In case that the video is stuttering or has breaks please reduce the preset Maximum frame rate Reducing to 15 or 20 fps e...

Page 54: ...CAMERA USER GUIDE page 54 of 93 8 3 5 Setting MPEG 4 Change to the entry Video Image Advanced MPEG 4 Change Length to 32 Choose the Maximum bit rate o Limited to kbit s Type in 3000 Figure 8 13 MPEG...

Page 55: ...ered Always start with the first connector Connect the power supply to the Video Encoder Connect your PC or laptop via Ethernet cable to the Video Encoder Turn on the power supply All LEDs should ligh...

Page 56: ...ord will be needed later If the system asks for a further authentication please type in the same password like before Figure 9 3 Creating a user password After setting the password please login to the...

Page 57: ...of 93 Figure 9 5 Selecting a language In some cases a browser add on is necessary to display the video stream Now you should see the live stream of the connected network camera number 1 Figure 9 6 Pi...

Page 58: ...rs 2 Add 3 Figure 9 7 Adding a new user A new window opens Name the new user admin and define a password 4 This user and password will be needed later too Recommended User name admin Password 2x8bg4 C...

Page 59: ...ideo image Attention Before you start recording always set the date and time in the data logger first It is impossible to change the timestamp at recorded video data This means the setup of a new logg...

Page 60: ...eo stream The setup for in the video image embedded timestamps is finished Note In case that the video is stuttering or has breaks please reduce the preset Maximum frame rate Reducing to 15 or 20 fps...

Page 61: ...Configura tion o Use the following IP address 13 Type in these data 14 IP address 192 168 1 90 Subnet mask 255 255 255 0 Confirm the settings with Save 15 Figure 9 10 Setting an IP address Note By ch...

Page 62: ...to the Video Encoder AXIS Q7404 is now configured If more than one camera should be connected the same changes for all connected cameras have to be done Use the specified IP address in the following t...

Page 63: ...ays start with the first connector Connect the power supply to the Video Encoder Connect your PC or laptop via Ethernet cable to the Video Encoder Turn on the power supply All LEDs should light green...

Page 64: ...68 0 90 Choose your password and type it in This password will be needed later If the system asks for a further authentication please type in the same password like before Figure 10 3 Selecting a user...

Page 65: ...lect a language In some cases a browser add on is necessary to display the video stream Now you should see the live stream of the connected network camera number 1 Figure 10 6 Display a video stream T...

Page 66: ...0 7 Adding a new user A new window is opened Name the new user admin and define a password 4 This password will be needed later Recommended User name admin Password 2x8bg4 Choose the User group o Admi...

Page 67: ...and time on the video image Attention Before you start recording always set the date and time in the data logger first It is impossible to change the timestamp at recorded video data This means the se...

Page 68: ...eo stream The setup for in the video image embedded timestamps is finished Note In case that the video is stuttering or has breaks please reduce the preset Maximum frame rate Reducing to 15 or 20 fps...

Page 69: ...8 1 90 Subnet mask 255 255 255 0 Confirm the settings with Save 6 Figure 10 11 Setting an IP address Note The video server AXIS P7214 has only one IP address The camera configuration auto matically ch...

Page 70: ...r reconnecting you have to change your computers IP address to 192 168 1 80 Then type in your browser the new IP address of the network camera to access the configuration again Note Finally change you...

Page 71: ...lient and data logger is disturbed That is because the program changes some network settings so UDP pings are not correctly transferred from the logger to the AXIS Camera Management Client In this cas...

Page 72: ...ge 72 of 93 Figure 11 3 Adding devices step 2 Figure 11 4 Adding devices step 3 Figure 11 5 Device added To save the current settings please right click your device In the shortcut menu select Parame...

Page 73: ...am reads the configuration from the video server Activate the checkbox Select De select all and then click Save to save the configuration to your local system To restore the saved settings to your dev...

Page 74: ...y default settings First disconnect the power supply from the AXIS Video Encoder Then press and hold the RE SET button 1 while reconnecting with the power supply AXIS Q7404 Figure 12 1 Reset button AX...

Page 75: ...used for access to the logger while the Video Encoder is recording data This alternative is described in the following Connect the Gigabit Ethernet port of the logger via an Ethernet cable with the E...

Page 76: ...System Client Figure 14 2 Setting the network settings in the System Client Please be sure about the setting of the logger s standby You can activate or deactivate the automatic standby at General Sta...

Page 77: ...no further channels are connected or they are inactive the logger shuts down and enters standby mode according to the lower time indication despite the video recording So you have two options Deactiv...

Page 78: ...in the window to the right and click on General settings Figure 14 3 Camera General settings If the checkbox for Only record video data around a Marker is activated the logger records no data except t...

Page 79: ...e more than one single camera like Axis 207 210 211 the synchonisation must be ena bled to guarantee a synchronised recording of all cameras 14 2 1 1 Encrypting video data If the video data should be...

Page 80: ...he cameras In the folder Camera click Camera 1 1 and activate the checkbox for Camera interface active 2 Choose the connector 3 depending on the Ethernet port the Video Encoder net work camera is conn...

Page 81: ...llowing IP addresses Camera 1 Camera 2 Camera 3 Camera 4 AXIS Q7404 207 210 211 AXIS P1204 F41 192 168 1 90 192 168 1 91 192 168 1 92 192 168 1 93 AXIS P7214 F44 FA54 192 168 1 90 192 168 1 90 192 168...

Page 82: ...but no configuration has been performed All four channels are however recognized Figure14 8 Display VID Case 2 X means all parameters are configured The video data are not recorded or there is no con...

Page 83: ...nual pdf While all of the other trace files are recorded in the Telemotive format from the logger video sig nals are directly provided as MPEG4 stream from the camera and saved as it is on the logger...

Page 84: ...nverted to one video file Choose the required option in the client output window 4 For both options the result will be the mpeg4 video format Figure 16 1 Settings for converting video data in the Syst...

Page 85: ...only if they have been downloaded or converted and saved to a computers disk first They can be played on any standard video player Note In case that the video is stuttering or has breaks please reduc...

Page 86: ...ip utility Figure 18 1 Axis IP Utility AXIS IP Utility helps you set the IP address of an Axis network video product Axis devices on the network are automatically discovered and displayed Assign netwo...

Page 87: ...ata Acquisition DTO Data Transmission Object ECL Electrical Control Line ECU Electronic Control Unit FIBEX FIeld Bus Exchange Format FW Firmware GMT Greenwich Mean Time INCA INtegrated Calibration and...

Page 88: ...A blue PiraT System Access bPSL blue PiraT System Link UDP User Datagram Protocol USB Universal Serial Bus UTC Universal Time Coordinated Wi Fi Wireless Fidelity WLAN Wireless Local Area Network XCP U...

Page 89: ...eo stream 21 Figure 5 24 Audio settings menu 22 Figure 5 25 Further audio source settings 22 Figure 5 26 Setting the audio quality 22 Figure 5 27 System menu 23 Figure 5 28 Reset to factory settings 2...

Page 90: ...age 57 Figure 9 6 Picture of a connected network camera 57 Figure 9 7 Adding a new user 58 Figure 9 8 Set date and time manually 59 Figure 9 9 Including date and time in the video stream 60 Figure 9 1...

Page 91: ...ral settings 79 Figure 14 6 Setting an IP address 80 Figure 14 7 Configuring the cameras 81 Figure14 8 Display VID 82 Figure14 9 Display VID XX 82 Figure14 10 Display VID TT 82 Figure 16 1 Settings fo...

Page 92: ...BLUEPIRAT SERIES CAMERA USER GUIDE page 92 of 93 21 List of tables Table 4 1 Additional features by optional licenses 10 Table 19 1 Abbreviations 88 Index...

Page 93: ...x 49 89 357186 520 E Mail TMO info magna com Web https telemotive magna com Sales Tel 49 89 357186 550 Fax 49 89 357186 520 E Mail TMO Sales magna com Support Tel 49 89 357186 518 E Mail TMO productsu...

Reviews: