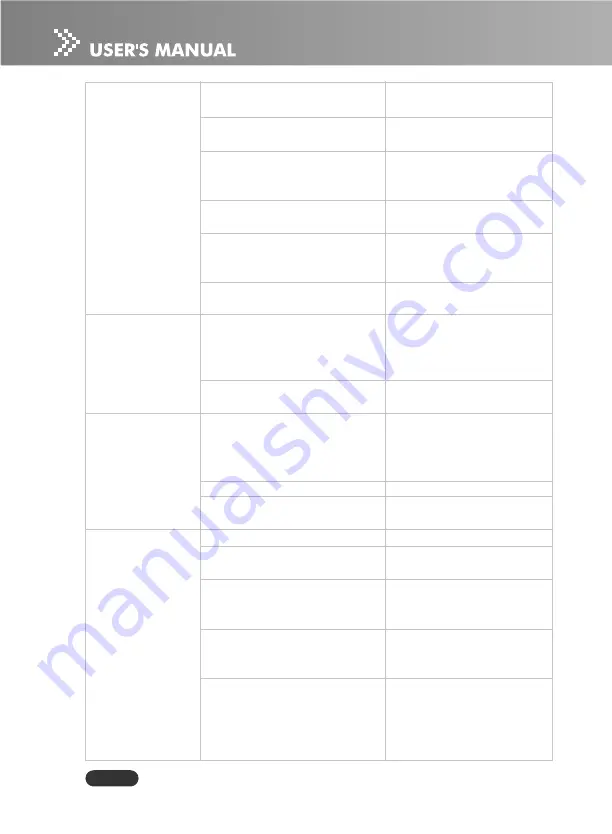
background image

EN-40

Picture blurred.
Part of picture
out of focus.

Image is dark.

Colors too light.
Bad shading.

Remote control
doesn’t work.

The lens is dirty.

The lens focus is not adjusted
optimally.
The projection distance is not
within the projector’s
supported range.
The projector’s screen
placement angle is tilted too far.
The frequency or tracking has
not been adjusted properly.

The lens cap is attached to the
lens.
The brightness or contrast has
not been adjusted properly.

The lamp is near the end of its
service life.
The saturation, tint, color R,
color G or color B has not been
adjusted properly.

The screen is dirty.
The lamp is near the end of its
service life.
The battery could be weak.
The polarity is not correct.

The remote control is not being
used within the effective
range.
There are some obstructions
between the remote control and
projector.
There are some fluorescent or
other bright lights shining at the
projector’s infrared remote
sensor.

Wipe clean with a soft, dry
cloth or lens paper.
Adjust the focus with the
focus ring.
Place the projector within the
supported range.

Adjust the screen placement
angle.
Adjust frequency and tracking
in the “Image (Computer
Mode)” menu properly.
Remove the lens cap.

Adjust the brightness or
contrast in the “Color
(Computer/Video Mode)”
menu properly.
Replace with a new lamp.

Adjust the saturation, tint,
color R or color G in the
“Color (Computer/Video
Mode)” menu properly.
Wipe clean with a soft, dry cloth.
Replace with a new lamp.

Replace with a new battery.
Insert the battery with
correct polarities.
Use the remote control
within the effective range.

Check that there are not any
obstructions between the
remote control and projector.
Check that there are not any
fluorescent or other bright
lights shining at the
projector’s infrared remote
sensor.

Summary of Contents for DLP 1400S

Page 1: ...ion If this equipment does cause harmful interference to radio or television reception detectable by turning the equipment in question off and on the user is encouraged to try to correct the interfere...

Page 2: ...o not place the projector where the cord can be stepped on as this may result in fraying or damage to the lead or the plug Be alert to tripping hazards 8 Never look into the projector lens when the la...

Page 3: ...ure degradation or damage to the projector 15 When you replace the projector lamp never touch the new bulb with your bare hands The invisible residue left by the oil on your hands may shorten the bulb...

Page 4: ...es dealer This projector is equipped with a grounding type AC line plug Make sure that your outlet fits the plug Do not defeat the safety purpose of this grounding type plug We highly recommend using...

Page 5: ...sting the Projector Zoom and Focus 18 Adjusting Projection Image Size 18 Using the Projector 20 Control Panel 20 Remote Control 21 MenuOptions 24 Color Computer Video Mode 25 Image Computer Mode 27 Im...

Page 6: ...ight weight for portability 1 2x manual zoom lens Auto image re sizing Auto Sync to 800 x 600 full screen with scaling compression compatibility for VGA SVGA XGA and SXGA State of the art motion adapt...

Page 7: ...ip your unit For maximum protection repack your unit as it was originally packed at the factory Accessories and components may vary by retailer and region Projector with Lens Cap AC Power Cord VGA Cab...

Page 8: ...nts Front View 1 Lens cap 2 Lens cap strap 3 Front IR remote control sensor 4 Lens 5 Ventilation holes intake 6 Zoom ring 1 2 4 7 8 9 10 5 6 12 11 3 7 Focus ring 8 Control panel 9 Speaker 10 Ventilati...

Page 9: ...h EN 9 Rear View 1 Interface connector 2 Rear IR remote control sensor 3 Security lock receptacle 4 AC power socket 5 Ventilation holes intake 6 Tilt adjustment foot Bottom View 1 Lamp cover 1 2 3 4 5...

Page 10: ...tor This connector is used for engineering purpose 2 AUDIO input connector Connect an audio output from video equipment to this jack 3 COMPUTER IN D SUB connector Connect image input signal analog to...

Page 11: ...Components 1 power button 2 Four direction buttons 3 Menu button 4 Enter button 5 Keystone c d buttons 6 Volume c d buttons 7 Source button 8 Mute button 9 Blank button 10 4 3 16 9 button 11 Auto but...

Page 12: ...EN 12 Installation Connecting the Projector A Connecting to a computer 1 AC Power Cord 2 VGA Cable D SUB to D SUB Desktop type Laptop type 1 2...

Page 13: ...English EN 13 B Connecting to a Video Source 1 Connecting with S Video Cable 1 AC Power Cord 2 S Video Cable 3 Audio Cable 1 2 3...

Page 14: ...EN 14 2 Connecting with Composite Video Cable 1 AC Power Cord 2 Composite Video Cable 3 Audio Cable 1 2 3...

Page 15: ...h EN 15 3 Connecting with HDTV Cable 1 AC Power Cord 2 D SUBtoHDTVCable 3 Audio Cable When connecting cable power cords of both a projector and external equipment should be disconnected from AC outlet...

Page 16: ...ng multiple sources to the projector simultaneously press the Source button either on the Projector Control Panel or the Remote Control Warning Never look into the lens when the lamp is on This can da...

Page 17: ...tend the foot so it may be adjusted 2 While holding down the elevator button adjust the foot to the desired height then release the button to lock the elevator foot into position 3 Use tilt adjustment...

Page 18: ...mage Rotate to the left to enlarge the image 2 Focus the image by rotating the focus ring A still image is recommended for focusing Adjusting Projection Image Size Refer to the graphic and table below...

Page 19: ...26 2 105 1 6 165 0 137 5 151 4 126 2 7 192 5 160 4 176 6 147 2 8 220 0 183 3 201 9 168 2 9 247 5 206 2 227 1 189 3 10 275 0 229 1 252 4 210 3 This table is for user reference only Position the project...

Page 20: ...r 4 Auto X Automatically adjusts frequency and phase This function is available for computer mode only 5 Menu Displays or exits the on screen display menus 6 Four direction buttons The four direction...

Page 21: ...ction 5 Keystone c d Adjustsimagedistortioncausedbytilting the projector 6 Volume c d Press the Volume c button to increase the volume press the Volume d button to reduce the volume 7 Source Manually...

Page 22: ...of the reach of children There is a danger of death by accidentally swallowing the battery Do not recharge the used battery or expose the battery to fire or water Do not dispose of the used battery a...

Page 23: ...the front of the remote sensor The remote control may not operate when there is sunlight or other strong light such as a fluorescent lamp shining on the remote sensor Operate the remote control from...

Page 24: ...e Projector Control Panel or the Remote Control 3 Select the desired menu option item with the c d buttons either on the Projector Control Panel or the Remote Control 4 Adjust the settings with the e...

Page 25: ...the X button to increase the contrast Color Temperature Adjusts the color temperature At higher temperature the screen looks colder at lower temperature the screen looks warmer Gamma Gamma affects ho...

Page 26: ...X button to increase the amount of color in the image Tint Adjusts the color balance of red and green Press the W button to increase the amount of green in the image Press the Xbutton to increase the...

Page 27: ...source will be scaled to fit the width of the screen 4 3 Theinputsourcewillbescaledtofittheprojectionscreen 16 9 Image Pressthee fbuttonstochoosetheimagepositionshowedon Position top center or bottom...

Page 28: ...than SVGA or component 1080i 720p only 16 9 or 4 3 aspect ratio will be available Auto Keep the image with original width height ratio and maximize the image to fit native horizontal or vertical pixe...

Page 29: ...mal mode Source Lock When source lock is turned off the projector will search for other signals if the current input signal is lost When source lock is turned on it will Lock the current source channe...

Page 30: ...Audio Computer Video Mode Option Actions Descriptions Volume Press the e button to decrease the volume Press the f button to increase the volume Mute Choose On to turn mute on Choose Off to turn mute...

Page 31: ...ions Descriptions Language Choose the multilingual OSD menu Use the c dbuttons to select your preferred language Press Menu button either on the Projector Control Panel or the Remote Control to confir...

Page 32: ...ce this product yourself Refer all servicing to qualified service personnel Cleaning the Lens Gently wipe the lens with lens cleaning paper Do not touch the lens with your hands Cleaning the Projector...

Page 33: ...f hours of use as its lifetime draws to an end Risk of explosion may differ according to the environment or conditions in which the projector and lamp are being used Wear protective gloves and eyeglas...

Page 34: ...the new lamp 7 Place back the screws on the bottom of lamp assembly 8 Place the panel and screw back the screws on the lamp cover Dispose of the used lamp according to local regulations Ensure that sc...

Page 35: ...requency Horizontal Freq 31 79 KHz Vertical Freq 50 85 Hz PixelRate 108 MHz Digital Keystone Correction Vertical 15 degrees Analog RGB input signal D Sub connector HDTV Display 720p 60 Hz 720p 50 Hz 1...

Page 36: ...of life and must be changed soon The lamp will continue to operate until it fails Change the lamp If the lamp is off then the ballast will become malfunction The projector is shutting down The fan mot...

Page 37: ...77 72 188 H V 1040 SVGA VESA 75 Hz 46 875 75 000 H V 1056 SVGA VESA 85 Hz 53 674 85 061 H V 1048 1024 x 768 XGA VESA 60 Hz 48 363 60 004 H V 1344 XGA VESA 70 Hz 56 476 70 069 H V 1328 XGA VESA 75 Hz 6...

Page 38: ...requency kHz Vertical Frequency Hz 480i 15 8 kHz 60 Hz 480p 31 5 kHz 60 Hz 576i 15 6 kHz 50 Hz 576p 31 3 kHz 50 Hz 720p 45 0 kHz 60 Hz 720p 37 5 kHz 50 Hz 1080i 33 8 kHz 60 Hz 1080i 28 1 kHz 50 Hz Not...

Page 39: ...or is not turn on The mute function is on The volume setting is minimized The connections have not been set up correctly The connected devices are not functioning properly The input signal is not supp...

Page 40: ...obstructions between the remote control and projector There are some fluorescent or other bright lights shining at the projector s infrared remote sensor Wipe clean with a soft dry cloth or lens paper...

Reviews: