background image

Projector

13

.English.

Many of the above optional items may not be required for your particular installation.

Retain packaging materials in case you need to move or ship the projector in the

future. It should always be transported in its original protective packaging or the

equivalent.

Installation

1. Place the projector on a sturdy, level surface within five feet of the computer or

video source.

Do not hold the projector by the lens. That may damage the lens.

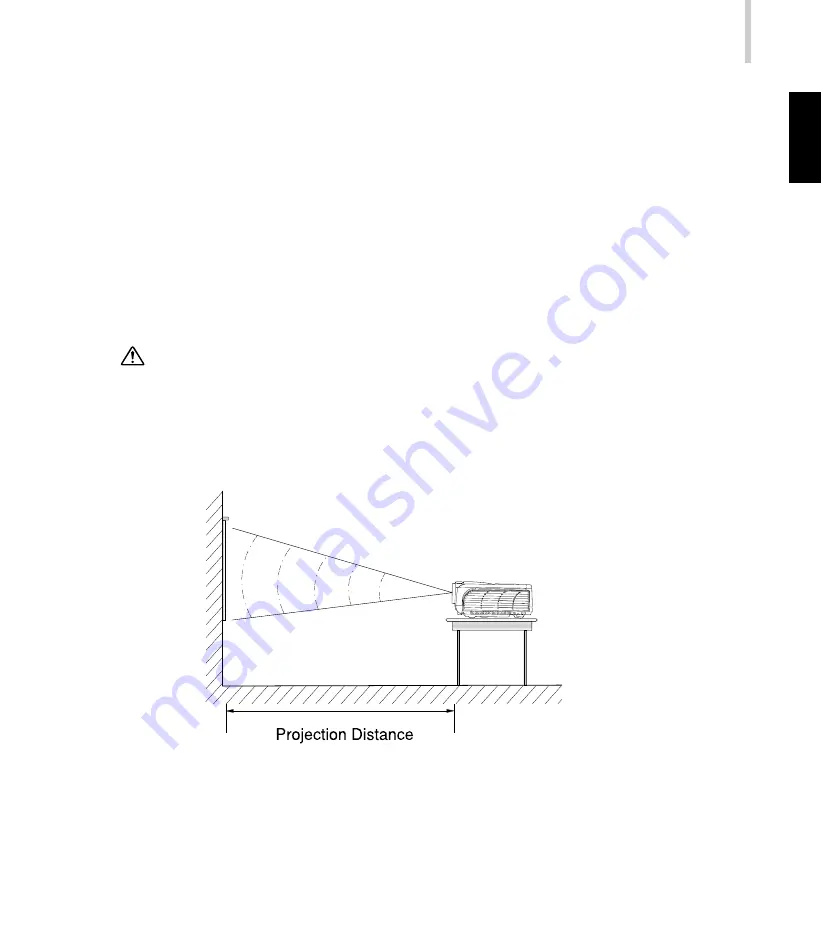
2. Place the projector in correct distance from the screen. The distance between the

projector and the screen determines the actual image size. Use the following

general guidelines to determine the correct distance.

Summary of Contents for 2500X

Page 1: ...lation If this equipment does cause harmful interference to radio or television reception which can be determined by turning the equipment off and on the user is encouraged to try to correct the inter...

Page 2: ...lace the projector where the cord can be stepped on as this may result in fraying or damage to the lead or the plug Be alert to tripping hazards 8 Do not look straight at the projector lens during the...

Page 3: ...onents unless the projector is unplugged 15 Always open the lens shutter or remove the lens cap when the projector lamp is on 16 In some countries the line voltage is NOT stable This projector is desi...

Page 4: ...The invisible residue left by the oil on your hands may shorten the bulb s life spam Use lint free gloves or finger cots are recommended Preventing Internal Heat Build Up After you turn off the power...

Page 5: ...king the Projector 12 Installation 13 Connecting to a Computer 15 Connecting to a Video Source 18 Operation 22 Turning the Audio Visual A V Equipments On and Off 22 Turning the Projector On 22 Turning...

Page 6: ...erties 43 Notes on Factory Default Sub Menu 44 Notes on Lamp Reset Sub Menu 44 Language 45 Maintenance 46 Cleaning the Lens 46 Cleaning the Projector Case 46 Lamp Replacement 47 Product s Specificatio...

Page 7: ...Ventilation Grill 4 Focus Ring 5 Projection Lens 6 Adjustment Feet 7 Speaker 8 Front IR Remote Sensor 9 AC IN Socket 10 Power Switch 11 Audio OUT Connector 12 Audio IN Connector 13 PC IN Connector 14...

Page 8: ...sed as a navigation controller to navigate the projector menus Scrolls up through the menu choices Scrolls down through the menu choices Increases the value setting on the selected sub menus or confir...

Page 9: ...rolls up through the menu choices Scrolls down through the menu choices Decreases the value setting on the selected sub menus Increases the value setting on the selected sub menus or confirms a menu s...

Page 10: ...eezes the current graphics and video image on the screen BLANK Cuts off the screen temporarily Note During the on screen display OSD menu is inactive the and buttons will function as a remote mouse fo...

Page 11: ...nd immediate control of the most commonly used features including source selection keystone adjustment volume control image freeze frame zoom screen blanking audio muting and power control Remote Cont...

Page 12: ...ource can be the computer video source or another device such as a stereo Unpacking the Projector The projector is shipped with the necessary cables required for standard PC or laptop computer connect...

Page 13: ...original protective packaging or the equivalent Installation 1 Place the projector on a sturdy level surface within five feet of the computer or video source Do not hold the projector by the lens Tha...

Page 14: ...3 When replacing batteries take the following precautions Do not recharge used batteries or expose batteries to fire or water Replace batteries as soon as they run out If the batteries leak wipe away...

Page 15: ...projector to a computer source capable of displaying VGA 640 x 480 SVGA 800 x 600 XGA or SXGA 1280 x 1024 resolutions The projector will resize VGA SVGA and SXGA inputs for XGA projection The types of...

Page 16: ...16 DLP ConnectingOneComputer data...

Page 17: ...Projector 17 English Connecting T wo Computers data...

Page 18: ...CbCr is less common and features three RCA type video jacks typically colored green blue and red S Video is readily identified by a single connector with four small pins You can connect the projector...

Page 19: ...deo and S Video cables are normally provided with the projector If not they are readily available at electronics stores and are commonly included with each video source device For component video YCbC...

Page 20: ...20 DLP Connecting to Composite V ideo Source Connecting to S V ideo Source...

Page 21: ...Projector 21 English Connecting to Component V ideo Source...

Page 22: ...e Projector On 1 Plug the power cord into the side of the projector 2 Insert the power plug into an electrical outlet 3 Remove the projector lens cap 4 Turn on the power switch on the side of the proj...

Page 23: ...ng on the screen To cancel the power OFF and resume projector s operation please wait until the message disappears from the screen 3 After the fan has turned off automatically you may turn off the Pow...

Page 24: ...two times If the lamp still cannot be turned on at last wait for 30 seconds for cooling LED indicator flashes red When the LED indicator turns red press the Power button again to light up the lamp LAM...

Page 25: ...lashes red around 1 minute The lamp will continue to operate until it fails Change the lamp and reset the lamp time counter Orange Solid In Standby mode the projector s 15 pin D SUB acts as a system c...

Page 26: ...elect the input Source Auto Composite Video S Video and Component Video YCbCr Without interfering with the main setting of the projection screen PIP menu enables you to adjust the PIP picture separate...

Page 27: ...Remote Control To display the Main Menu press the MENU button The Main Menu appears Note This Main Menu interface with PIP option will only appear if there is two input sources For the main frame PIP...

Page 28: ...em 4 To change the option setting press the button 5 Press the MENU button to exit the current menu Note If the Menu status is ON use the button for adjustment If your projector is equipped with an op...

Page 29: ...brightness contrast position horizontal vertical saturation phase frequency sharpness auto image screen size and space in YPbPr input only The menu interface will be different depending on the input s...

Page 30: ...ress the or button b To exit from the current menu toggle the MENU button The following table provides details of the available sub menus choices Sub menu Option Description Brightness The higher the...

Page 31: ...ion Color Adjusts a projected image from black and white to fully saturated color Tint Adjusts the red green color balance in the projected image except PAL Auto Image The projector automatically adju...

Page 32: ...rojected onto a 16 9 screen area When 4 3 images are being projected black bands appear on the sides Wide Displays the projected image in the wide screen 16 9 format Zoom In Zoom mode image output in...

Page 33: ...2 Press the or button to select Color Adjust menu 3 To enter the sub menu setting press the button 4 Press the or button to select the sub menu item 5 Press the or button to adjust the value of desire...

Page 34: ...correction curve Text Photo Graphics Cinema Apple Note Custom red green and blue will only appear if Color Temp selection is User PIP This menu allows you to display additional image window on screen...

Page 35: ...ater the contrast The lower the setting the lower of contrast 1 Press the MENU button to display OSD menu 2 Press the or button to select PIP menu 3 To enter the sub menu setting press the button 4 Pr...

Page 36: ...een color Sharpness The higher the setting the sharper the picture The lower the setting the softer the picture PIP MORE Sub menu Option Description H Position Adjusts the additional image window hori...

Page 37: ...ing either the Projector Control Panel or the Remote Control 1 Press the MENU button to display OSD menu 2 Press the or button to select Source menu 3 To enter the sub menu setting press the button 4...

Page 38: ...og DVI Analog signal from DVI Digital Visual Interface device DVI Digital DVI Digital signal from DVI Digital Visual Interface device Composite Video Composite Video signal S Video S Video signal Comp...

Page 39: ...he value of desired sub menu item On the Mute sub menu press the or button to select the desired setting 6 After you have done with the adjustment of a sub menu item a To resume changing another sub m...

Page 40: ...setting press the button 4 Press the or button to select the sub menu item 5 Press the or button to adjust the value of desired sub menu item 6 After you have done with the adjustment of a sub menu it...

Page 41: ...or button to select System menu 3 To enter the sub menu setting press the button 4 Press the or button to select the sub menu item 5 Press the or button to adjust the value of desired sub menu item or...

Page 42: ...from behind a translucent screen with ceiling mounted projection Blank Blanks the screen temporarily ON Blank function is active OFF Blank function is inactive Freeze Frame Freezes the screen ON Free...

Page 43: ...D Timeout 5 60 Automatically turns off the projector lamp after a seconds specified time period even if a source is present OSD Background Selects the OSD background color Opaque Sets OSD background t...

Page 44: ...reen Press the button to reset the lamp life count or press the Menu key to cancel the action Notes on Factory Default Sub Menu After you select the Factory Default sub menu and press the button a con...

Page 45: ...he Projector Control Panel or the Remote Control 1 Press the MENU button to display OSD menu 2 Press the or button to select Language menu 3 To enter the sub menu setting press the button 4 Press the...

Page 46: ...ecifically indicated in this Instruction Manual do not attempt to service this product yourself Refer all servicing to qualified service personnel Cleaning the Lens Clean the lens whenever you notice...

Page 47: ...r 2 Loosen the screw and remove the lamp cover If the lamp is hot avoid burns by waiting 60 minutes until the lamp has cooled 3 Loosen the 3 screws It is strongly recommended you use a magnetic headed...

Page 48: ...q 10 degrees Vertical 20 degrees PIP Video window on Graphics Analogue RGB Input input signal D Sub DVI Connector HDTV Display YPbPr 480p 720p 1080i YCbCr 480i Integrated Speaker 2 Watts x 1 Stereo Sp...

Page 49: ...832 640 x 400 VGA 50 Hz 31 469 50 030 H V 800 VGA 60 Hz 31 469 59 941 H V 800 PC 9801 Normal 24 823 56 416 H V 848 720 x 400 VGA mode 2 31 500 70 087 H V 900 VGA VESA 85 Hz 37 927 85 038 H V 936 640 x...

Page 50: ...1376 1152 x 864 SXGA VESA 70 Hz 63 995 70 016 H V 1472 SXGA VESA 75 Hz 67 500 75 000 H V 1600 SXGA VESA 85 Hz 77 487 85 057 H V 1568 1152 x 870 Macintosh 21 68 681 75 062 H V 1456 1152 x 900 Sunmicro...

Page 51: ...Projector 51 English HDTV Preset Timings PresetSignals Horizontal Vertical fH kHz fV Hz ActivePixel ActivePixel 480p 720 480 31 469 59 940 720p 1280 720 45 000 60 000 1080i 1920 1080 33 716 29 970...

Reviews: