background image

Capability of this Unit

This laminator selects the side of the card to be laminated 
by the presence of the film cassette. Refer to the following 
table and load the film cassette to the side of the card to 
be laminated.

Side to Be Laminated

Film Cassette Status

Top side  

film cassette

Bottom side 

film cassette

Double-sided lamination

Load

Load

Top side lamination

Load

Remove

Bottom side lamination

Remove

Load

Cautions:

An error will occur if a film cassette that is not loaded 
with laminate film is attached to the side that is not to be 
laminated. Remove the film cassette from the side that is 
not to be laminated.
For double-sided lamination, ensure that both the top side 
and bottom side film cassettes are attached. The absence 
of film cassette on either side will result in single-sided 
lamination.
For double-sided lamination, use the same type of laminate 
film for the top side and bottom side. Using different types 
of laminate film may result in card jam or error.
Please store the removed film cassette properly.

Name and Functions of 
Parts

Front

B

C

D

E

F

A

LED display (red)

Blinks or lights up in red, and combines with the 

B

 LED 

display (blue) to indicate the status of the laminator.

(

A

 page 15 “Laminator Status, LED Display and Card 

Printer’s Operation Panel Display”)

LED display (blue)

Blinks or lights up in blue, and combines with the 

A

 LED 

display (red) to indicate the status of the laminator.

(

A

 page 15 “Laminator Status, LED Display and Card 

Printer’s Operation Panel Display”)

Operation button

Pressing this button when the laminate film is loaded will 
reset the laminator settings.
When no film cassette is loaded, pressing the button for two 
seconds or longer starts the cleaning operation. (The cleaning 
operation does not start if the heating roller is still hot.)

Sliding knob

Opens/closes the laminator door.

Laminator door

Closing the door when the laminate film is loaded will 
reset the laminator settings.
This door can be locked by operating in conjunction with 
the card printer unit through the security lock function.

Power switch

Turns the power on/off.
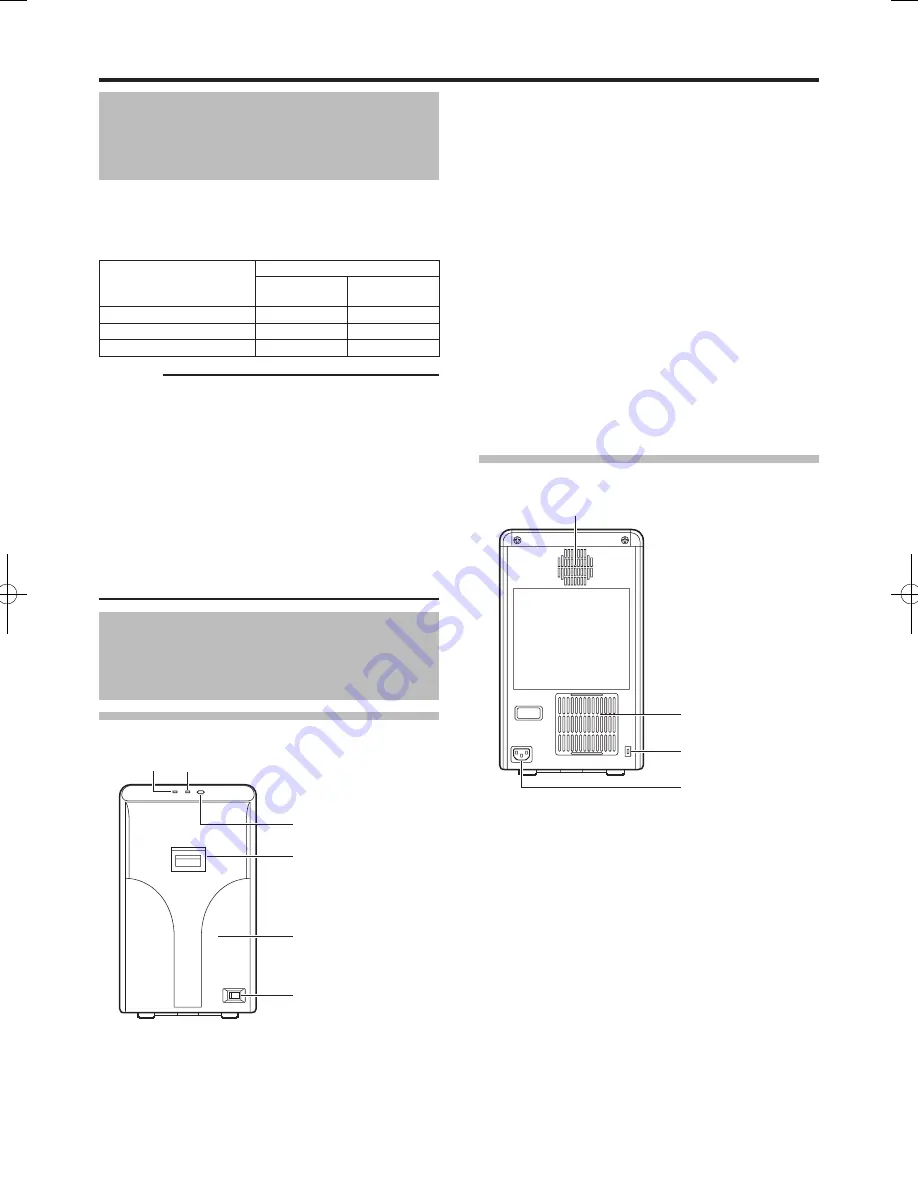
Rear

OPTION

INLET

B

C

D

A

Exhaust fan

Discharges heat accumulated inside the laminator unit.

Air suction fan opening

Air inlet of the internal cooling fan.

Security slot

An anti-theft device that supports Kensington locks can be 
attached.

AC inlet

For connecting the power cord.

Summary of Contents for Prima 4

Page 1: ...User Manual Prima500 Doc No 1385 Issue 1 03 Ultra Electronics Card Systems www magicard com Double sided inline laminator...

Page 2: ...law and regulations in your country Contents Before Use Characteristics of this Unit 2 Contents 2 Safety Precautions 4 About this Manual 6 Precautions During Use 6 Capability of this Unit 7 Name and...

Page 3: ...mercial environment This equipment generates uses and can radiate radio frequency energy and if not installed and used in accordance with the instruction manual may cause harmful interference to radio...

Page 4: ...Before Use Safety Precautions...

Page 5: ......

Page 6: ...installing or moving the laminator Make sure to turn off the power before moving the laminator Carry the laminator at the bottom of the two sides handle to prevent your hands or fingers from being ca...

Page 7: ...ed Blinks or lights up in red and combines with the B LED display blue to indicate the status of the laminator A page 15 Laminator Status LED Display and Card Printer s Operation Panel Display A LED d...

Page 8: ...assette buttons Press the buttons to remove the film cassette Top side film cassette orange For attaching the laminate film Jog dial attachment slot For discharging the card during a card jam by attac...

Page 9: ...d lamination position sensor Inlet sensor Card feeder unit Card feed motor Bottom side laminate film position sensor A B C D E F G H I J K Bottom side laminate film supply motor Bottom supply side lam...

Page 10: ...mm W x H x D Outline Dimensional Drawing Front View 210 360 Side View 316 333 Accessories Products Sold Separately Accessories Please check to ensure that the laminator accessories are in place when u...

Page 11: ...he supplied unit connection adapter 2 Fit the laminator to the supplied unit connection adapter Card Printer Connection Cautions Do not hold the rear filter cover when installing or moving the laminat...

Page 12: ...e laminated Cautions If the security lock of the card printer is on deactivate it After work is complete activate the security lock again For details on locking unlocking the security lock refer to th...

Page 13: ...tte Bottom Side Film Cassette Insert the supply side of the film into the bobbin holders patch position adjustment mechanism attached Unwind the laminate film along the film guides and insert the take...

Page 14: ...cedures for Laminator Status Display Status icon display A laminator icon is displayed once the card printer recognizes the laminator Operation button For selecting a button function displayed on the...

Page 15: ...ng is in progress Returns to the original state if a cleaning card is not inserted after a specific time interval Download mode On On Download Awaiting download data or process has ended Downloading B...

Page 16: ...ion of the bottom side HR T Temp 90 degC to 180 degC in increments of 5 degC For setting the top side heating roller temperature The temperature may be 185 degC or higher depending on the firmware ver...

Page 17: ...ettings Closing the Laminator Door Closing the laminator door when the laminate film is loaded will reset the laminator settings Loading a patch film will forward the laminate film by one image and re...

Page 18: ...ize the laminator Do not interrupt the laminator when laminating is in progress Doing so may cause cards to adhere to the interior of the laminator thus causing it to malfunction Make sure to observe...

Page 19: ...dy to download data from the computer Exit Next Enter D o w n l o a d Exit D o w n l o a d R e a d y 6 Data download from the computer starts A Downloading message appears D o w n l o a d i n g K e e...

Page 20: ...s Display Messages Status Display Message Description Laminator is not found The power of the laminator is not turned on or the laminator is not properly connected to the card printer Ready The lamina...

Page 21: ...ff the power and turn it on again If the same problem occurs consult our authorized dealers or servicing personnel 05000061 The temperature of the top side Heat Roller is too high 05000062 The tempera...

Page 22: ...e state Film Type Select the film type for the bottom side and top side film For double sided lamination use the same type of laminate film for the top side and bottom side Match the loaded laminate f...

Page 23: ...minate film with the Film Type setting If the laminate film and the setting do not coincide film detection error occurs after the laminate film has been forwarded for a certain length In the case of s...

Page 24: ...oaded Cautions Make sure to insert the film cassette all the way in until a click sound is heard Failure to do so may result in defective patch or card jam If the film cassette is inserted upside down...

Page 25: ...void doing so on a floor as dust attached to the film may cause poor adhesion or malfunction A film cassette that has laminate film attached on it is heavy Hold the film cassette with both hands to av...

Page 26: ...s heard and close the laminator door Cautions Make sure to insert the film cassette all the way in until a click sound is heard Failure to do so may result in defective patch or card jam If the film c...

Page 27: ...Press the operation button again for two seconds or longer reverse the adhesive face of the cleaning card and insert it into the card outlet The cleaning card is discharged from the card outlet of th...

Page 28: ...h film residues at the back of the laminate film may be attached to the film guide of the film cassette Residues on the adhesive face of the laminate film may result in poor adhesion When replacing th...

Page 29: ...cleaning at a location away from the laminator so that residues do not enter the unit 7 Install the laminate film on the film cassette 8 Remove any slack in the laminate film 9 Insert the film casset...

Page 30: ...For details on locking unlocking the security lock refer to the manual of the card printer Stand the film cassette on a flat surface Avoid doing so on a floor as dust attached to the film may cause po...

Page 31: ...it to wipe the guide rail x2 in front 7 Remove any slack in the laminate film 8 Insert the film cassette all the way in along the guide rail until a click sound is heard and close the laminator door...

Page 32: ...identify the position from the operation panel display of the card printer or the status monitor of the computer that is connected to the card printer In the case of Jam In the card is automatically d...

Page 33: ...s Entangled 10 Insert the film cassette all the way in along the guide rail until a click sound is heard and close the laminator door Cautions Make sure to insert the film cassette all the way in unti...

Page 34: ...tte with both hands to avoid dropping when working with it If the laminate film is not damaged 1 Install the new laminate film to the film cassette Install while referring to the indication on the lab...

Page 35: ...left right Left Right You can adjust the setting on the status monitor of the computer that is connected to the card printer The maximum displacement of the patch position is 7 steps from the standard...

Page 36: ...rd warpage For more information about the card please consult our authorized dealers and evaluate the settings Setting example for double sided printing and double sided lamination Heat resistant PET...

Page 37: ...Temperature Level 2 2 2 Speed Front 0 0 0 Speed Back 2 2 2 Bend Remedy Temperature Level Off Off Off Setting example for single sided printing and bottom side lamination Heat resistant PET G card Fil...

Page 38: ...the laminate film is correctly set Check to ensure that the type of laminate film in use and the settings are appropriate Film B Search 56 The bottom side laminate film cannot be detected Film T Sear...

Page 39: ...isalignment in the positions of the laminator and the card printer and thus communication cannot take place Turn on the power for the laminator Or fit the laminator and card printer to the unit connec...

Page 40: ...40...

Page 41: ...100 Fax 44 0 1305 777 904 Email info magicard com Ultra Electronics Card Systems Inc North American Sales Support Center 6711 176th Avenue NE Redmond WA 98052 Toll free 877 236 0933 Tel 1 425 556 9708...

Reviews: