background image

17

Figure 20

Figure 19

Figure 18


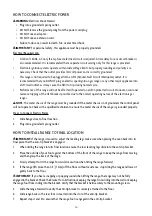
CAUTION

: Failure to follow instructions could result in serious injury�  

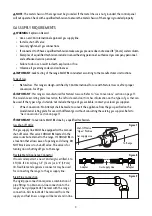
Shut-Off the Range
1� 

Turn the manual shut-off valve to the 
closed position�

2� 

 Unplug range or disconnect power�

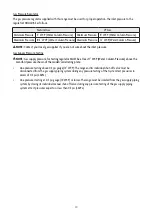
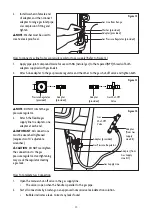
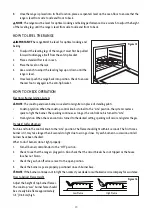
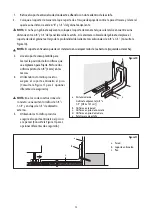
How to Convert Gas Pressure Regulator (Natural Gas to LP Gas)

Manual Shut-Off Valve 

“Closed” Position

To Range

Gas Supply Line

b

c

a

a

d

d

e

e

e

e

1� 

Remove plastic cover from gas pressure regulator cap�

2� 

Turn gas pressure regulator cap counter-clockwise with a 5/8” wrench to remove�


NOTE

: DO NOT remove the spring beneath the cap�

3� 

Remove the retainer pin that is currently positioned for use with Natural Gas�

4� 

Turn the retainer pin upside down and re-install into the regulator cap� It is now positioned for use with LP Gas�

5� 

Screw the regulator cap back into the regulator and reattach the regulator to the nipple and flare union�

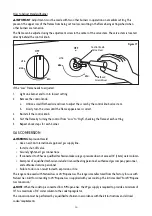
How to Convert Gas Pressure Regulator (Natural Gas to LP Gas)

a� 

Plastic cover

b� 

Gas pressure regulator 
cap with solid end 
facing out

c� 

Gas pressure regulator 
cap with hollow end 
facing out

d� Washer
e� 

Gas pressure regulator 
cap

Section 
View

Section 
View

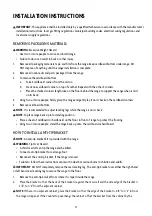
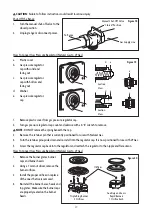
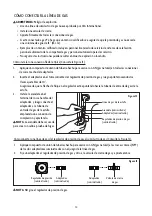
1� 

Remove the burner grates, burner 
caps and burner heads�

2� 

Using a 7 mm nut driver, remove the 
burner orifices�

3� 

Install the proper orifices in replace 
of the ones that were removed�

4� 

Re-install the burner bases, heads and 
top grates� Make sure the burner caps 
are properly seated on the burner 
heads�

Orifices

Triple

-

Ring Burner 

5 Orifices

Auxiliary and Semi-

Rapid Burners 

1  Orifice Each

Summary of Contents for MCSBRG24W

Page 1: ...1 PLEASE READ THIS MANUAL CAREFULLY BEFORE USING YOUR GAS RANGE AND KEEP IT FOR FUTURE REFERENCE Model MCSBRG24W MCSBRG24B 24 Inch Freestanding Gas Range Installation Manual...

Page 2: ...as Supply Requirements 9 INSTALLATION INSTRUCTIONS 11 Removing Packaging Materials 11 How to Install Backsplash 11 How to Install Anti Tip Bracket 11 How to Connect Gas Line 12 How to Connect Electric...

Page 3: ...killed The range can tip if you apply too much force or weight on the oven door without the anti tip bracket being installed properly Do not step lean or sit on the door or drawer doing this may resul...

Page 4: ...call your gas supplier from a phone outside of the home Ex Go to a neighbor s home to call your gas supplier or fire department If the gas supplier cannot be reached call the fire department Installa...

Page 5: ...sking Tape Pipe Joint Compound resistant to LP NG 3 16 Carbide Tipped Masonry Drill Bit Concrete Ceramic Floors Non Corrosive Leak Detection Solution Parts Supplied Check that all parts are included 1...

Page 6: ...s All openings in the wall or floor where the range is to be installed must be sealed The anti tip bracket must be installed to the floor Refer to How to Install Anti Tip Bracket section on page 12 Gr...

Page 7: ...red by not less than 1 4 0 64cm flame retardant millboard covered with not less than No 28 MSG sheet steel 0 015 0 4 mm stainless steel 0 024 0 6mm aluminum or 0 020 0 5 mm copper 30 76 2 cm minimum c...

Page 8: ...d to make the connection note This range is equipped with an electrical ignition system that will not operate if plugged into an outlet that is not properly polarized If codes permit and a separate gr...

Page 9: ...nge must be conducted according to the manufacturer s instructions Type of Gas Natural Gas This range is design certified by CSA International for use with Natural Gas or after proper conversion for L...

Page 10: ...13 WCP Water Column Pressure Line pressure testing above 0 5 psi gauge 14 WCP The range and its individual shut off valve must be disconnected from the gas supply piping system during any pressure tes...

Page 11: ...dboard or hardboard on the floor in front of range to protect the flooring Using two or more people stand the range back up onto the cardboard or hardboard nstall note An anti tip bracket kit is provi...

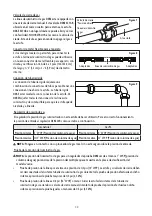
Page 12: ...r to Figure 12 1 Apply pipe joint compound made for use with NG natural gas to the male threads of the adapter 2 Insert adapter into outlet of the gas pressure regulator and then tighten using two 10...

Page 13: ...ete Gas Connection 1 Open the manual shut off valve in the gas supply line The valve is open when the handle is parallel to the gas pipe 2 Test all connections by brushing on an approved noncorrosive...

Page 14: ...etal chassis is not grounded the control panel will not operate Check with a qualified technician to ensure the metal chassis of the range is grounded properly Steps to Connect Electric Power 1 Slide...

Page 15: ...nob is turned to the Lite position the system creates a spark to light the burner The sparking continues as long as the control knob is turned to Lite Oven Ignition When the oven control is turned to...

Page 16: ...e steps for each burner Control Knob Valve Stem Flathead Screwdriver Gas Conversion warning Use a new CSA International approved gas supply line Install a shut off valve Securely tighten all gas conne...

Page 17: ...pin upside down and re install into the regulator cap It is now positioned for use with LP Gas 5 Screw the regulator cap back into the regulator and reattach the regulator to the nipple and flare unio...

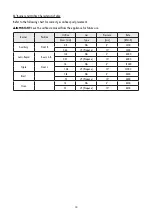
Page 18: ...i w c BTU h Auxiliary Front R 0 9 NG 4 3500 0 56 LP Propane 10 3500 Semi Rapid Rear L R 1 18 NG 4 6000 0 72 LP Propane 10 6000 Triple Front L 1 8 NG 4 13000 1 08 LP Propane 10 13000 Broil NG 4 5800 L...

Page 19: ...19 CNA International Inc d b a MC Appliance Corporation All rights reserved Magic Chef logo is a registered trademark of CNA International Inc www mcappliance com Printed in China...

Page 20: ...1 LEA CUIDADOSAMENTE ESTE MANUAL ANTES DE USAR LA ESTUFA A GAS Y CONS RVELO PARA FUTURAS REFERENCIAS Modelo MCSBRG24W MCSBRG24B Estufa a gas independiente de 24 pulgadas Manual de instalaci n...

Page 21: ...os del suministro de gas 28 INSTRUCCIONES DE INSTALACI N 30 Retiro del material de embalaje 30 C mo instalar el soporte antivuelco 30 C mo conectar la l nea de gas 32 C mo conectar la energ a el ctric...

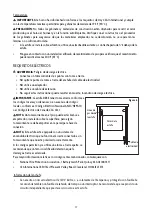
Page 22: ...22 PRECAUCIONES planation ADVERTENCIA Peligro de volcamiento...

Page 23: ...23...

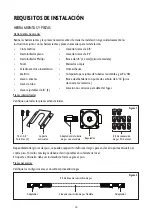
Page 24: ...rca de 1 4 Broca de 1 8 3 2 mm pisos de madera Marcador o l piz Cinta adhesiva Compuesto para juntas de tuber as resistente a gas PL GN Broca de alba iler a con punta de carburo de 3 16 pisos de concr...

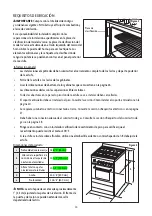
Page 25: ...nsiones dadas son las separaciones libres m nimas Todas las aberturas en la pared o piso donde la estufa se va a instalar deben ser selladas El soporte antivuelco debe ser instalado al piso Consulte l...

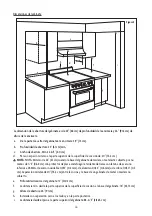
Page 26: ...cubierta por no menos de 1 4 0 64 cm con protector de placa cortafuego retardante de llama con l mina de acero no inferior a 28 MSG de acero inoxidable 0 015 0 4 mm de aluminio 0 024 0 6 mm o de cobre...

Page 27: ...ernational 8501 East Pleasant Valley Road Cleveland OH 44131 5575 L nea de gas desde la estufa Cable de electricidad Atr s de la estufa Informaci n del enchufe Se necesita un circuito el ctrico de 120...

Page 28: ...priete firmemente todas las conexiones de gas Si est conectado a gas PL haga que un t cnico calificado se asegure de que la presi n de gas no exceda una columna de agua de 14 36 cm Ejemplos de un t cn...

Page 29: ...eguro sobre la presi n de entrada Prueba de la presi n del suministro de gas NOTA La presi n del suministro de gas para un regulador de prueba DEBE ser de al menos 1 WCP presi n de columna de agua por...

Page 30: ...vertical 30 C MO INSTALAR EL SOPORTE ANTIVUELCO NOTA Se suministra un juego de soporte antivuelco con la estufa ADVERTENCIA Peligro de volcamiento Un ni o o adulto puede inclinar la estufa y morir Co...

Page 31: ...la pared c Orificios en piso de concreto d Orificios en piso de madera e Pata trasera de estufa 5 Utilizando los tornillos provistos NOTA En el caso de construcciones de concreto se necesitan tornill...

Page 32: ...A La arandela debe ser usada para crear un sello a prueba de fugas L nea de gas de la estufa Arandela suministrada Adaptador suministrado Regulador de presi n de gas suministrado Figura 13 C mo conect...

Page 33: ...Hz c a solamente de 15 amperios y protegido con fusible Se recomienda tambi n un fusible de retardo de tiempo o un interruptor Se recomienda que sea provisto un circuito independiente que preste servi...

Page 34: ...sde adelante hacia atr s C MO NIVELAR LA ESTUFA IMPORTANTE La estufa DEBE estar nivelada para ptima cocci n y horneado 1 Para ajustar las patas niveladoras primero hale la estufa hacia adelante para d...

Page 35: ...a fundido 3 Verifique que las v lvulas de cierre de gas est n fijadas a la posici n abierta 4 Compruebe que las tapas de los quemadores est n correctamente posicionadas en cada base de quemador NOTA S...

Page 36: ...su superficie de cocci n El juego est marcado Para conversi n a gas propano PL NOTA Cuando la superficie de cocci n es convertida a gas propano PL se requiere un suministro de gas PL para proveer un m...

Page 37: ...de gas de gas natural a gas PL C mo convertir el regulador de presi n de gas de gas natural a gas PL a Protector pl stico b Tapa de regulador de presi n de gas con extremo s lido hacia afuera c Tapa...

Page 38: ...o i w c BTU h Auxiliar Adelante R 0 9 NG 4 3500 0 56 LP Propano 10 3500 Semirr pido Atr s L R 1 18 NG 4 6000 0 72 LP Propano 10 6000 Triple Adelante L 1 8 NG 4 13000 1 08 LP Propano 10 13000 Asador NG...

Page 39: ...International Inc realiza negocios bajo el nombre de MC Appliance Corporation Derechos reservados El logotipo Magic Chef es una marca registrada de CNA International Inc www mcappliance com Impreso en...

Reviews: