background image

27

Traffic

Glossary

RDS: Radio Data System. Infrastructure that broadcasts digital information on the FM band.

TMC: Traffic Message Channel, one of the types of information that a Radio Data System can broadcast.

Public TMC Service: In some countries, there is at least one TMC service provider that broadcasts Traffic 
information free of charge. The Magellan RoadMate automatically receives public TMC services, whichever 
country you are in. For the updated list of countries and providers, please, check www.magellanGPS.com.

Traffic Message: A message received by the Magellan RoadMate that contains the description of a Traffic event.

Traffic Event: An event liable to disturb the flow of traffic.

Traffic Incidents

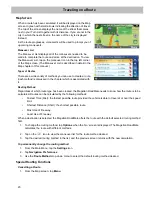
When routing, if a traffic incident(s), slow traffic or stopped traffic 
will delay your arrival, the traffic icon on the 

Map

 screen will 

display the computed delay due to traffic in the red box below the 
traffic icon. Across the top of the display is the banner for coupons 
and offers that are available for Traffic Link users.

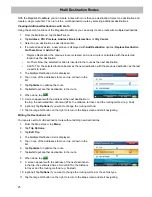
Avoiding a Traffic Incidents

When the traffic icon indicates a delay, you can select to avoid 
any or all of the traffic incidents along your route.

1.

Tap on the red traffic icon while traveling on a route. A list of 
traffic incidents, slow traffic and stopped traffic along your 
route are displayed.  

2.

Tap on the checkbox to the left of the traffic delay you want 
to avoid.

3.

Tap 

Avoid

.

4.

A comparison list of the time for the current route as well as the newly computed route are displayed.  Tap 
on 

Current

 or 

New

 to select which route you wish to use.

Tapping on the maneuver icon to the right of each line will display the Maneuver List for each route.

Tapping on the Map icon at the bottom of the display shows a graphical representation of the current vs. 
the new route.

5.

The 

Map

 screen is displayed and routing instructions are provided for the route you selected.

Coupons and Offers

Along the top of the POI Search Results and the Map display you will see a banner that displays coupons and 
offers from various merchants.  (If during a search, the coupon will be pertinent to the category you are searching 
on.)

Coupons From POI Searches

When you have the Traffic Link installed you can also get a coupon that applies to the POI search you are 
performing.  For example, while doing a POI search for a coffee shop you will get special offers from a coffee 
shop merchant at the top of the search list results.  Tap on the offer displayed to get additional information on the 
offer.

Viewing a Coupon Offer

1.

Tap on the coupon banner.

2.

Information about the coupon is displayed.

Summary of Contents for RoadMate 2035

Page 1: ...471 El Camino Real Santa Clara CA 95050 Magellan RoadMate 2035T GPS Receiver User Manual...

Page 2: ...ns special events traffic congestion It is your responsibility to disregard any unsafe hazardous or illegal route suggestions Keep the Magellan RoadMate receiver safe from extreme temperature conditio...

Page 3: ...This device may not cause harmful interference and 2 this device must accept any interference received including interference that may cause undesired operation FCC Caution Any changes or modification...

Page 4: ...formation 2010 MiTAC International Corporation The Magellan logo Magellan RoadMate and Quickspell are registered trademarks of MiTAC International Corporation SmartDetour and OneTouch are trademarks o...

Page 5: ...iv...

Page 6: ...ng the Location 8 Attach the Power Cable to the Car Cradle 8 Securing the Car Cradle 8 Attaching the Magellan RoadMate receiver to the Car Cradle 9 Adjusting the Mount for Optimum Viewing 9 Connecting...

Page 7: ...g the Address or Search of a OneTouch Icon 18 Saving a POI Search Criteria to a OneTouch Icon 18 Setting a Route to a OneTouch Icon 19 Points of Interest POI 20 Creating a Route to a POI by Category 2...

Page 8: ...D Mode 30 Assigning Visible POIs 3 0 Setting Auto Zoom on Turns 30 Sound 31 Setting Volume from Settings 31 Muting the Sound 31 Turning off Button Sounds 31 Navigation Preferences 31 Setting The Defau...

Page 9: ...he user interface for the Magellan RoadMate receiver is easy and simple to follow once you understand the basics You may never need to refer to this manual but if you do we have tried to present it in...

Page 10: ...2 Magellan RoadMate A Power Switch B Power input from vehicle power adapter cable or optional AC power adapter A B...

Page 11: ...e Menu button 2 The battery level indicator is located in the upper right corner of the Menu screen just below the satellite signal indicator Green bars indicate battery level The Magellan RoadMate ca...

Page 12: ...have not used the touch screen for a few seconds This prolongs the battery life between charges Main Menu The Main Menu contains large easy to access icons for all the major functions Accessing the M...

Page 13: ...osition including the street name names of streets forward and behind you as well as the Lat Long information for your position Button Name Description Data Field Top of the display where the characte...

Page 14: ...s using only standard characters Smart City Search The Magellan RoadMate receiver utilizes a feature known as Smart City Search Smart City Search attempts to predict the city you are looking for This...

Page 15: ...uickSpell In the example to the right CE has been entered for a street name in Chicago IL The Magellan RoadMate receiver has predicted that the street name may be Cedar Ave Also it has greyed out any...

Page 16: ...tricting the mounting of any device on the windshield Attach the Power Cable to the Car Cradle Attach the USB connector to the cradle as shown The USB connector will snap in place when it is fully sea...

Page 17: ...ags Note Some vehicles apply power to the vehicle power receptacle only when the ignition is on Checking Connection and Final Adjustments If the power indicator light on the vehicle power adaptor is o...

Page 18: ...E Access Main Menu F Access Highway POIs displayed only while on a highway G Access volume controls H Access OneTouch Menu OneTouch Menu gives you instant access to your saved search criteria and fav...

Page 19: ...ap 1 While viewing the Map screen slide your finger or a stylus across the map 2 The map screen changes to Pan mode 3 When finished tap and the map returns to your current position Routing to a Panned...

Page 20: ...ry 6 If you have selected to save this point to the OneTouch menu you need to select a button for the entry Maneuver List Itinerary This screen is accessed from the Map screen and is available only wh...

Page 21: ...13 Changing the Volume from the Map Screen 1 Tap the speaker icon Additional controls appear 2 Tap on the Mute button to mute the volume or tap the or icons to change the volume levels 3 Tap...

Page 22: ...the first few characters of any significant word in the street name and tap the or continue entering characters until the list of streets is displayed Tap on the street name from the list 4 Enter Stre...

Page 23: ...selected location the estimated time of arrival ETA the distance to travel and the routing method e g Fastest Time 6 optional Tap Options if you want to change the routing method 7 Tap the large GO bu...

Page 24: ...t of categories you have created for your address book If the category you want isn t there you can create one by tapping the Add button at the bottom of the screen 6 When the details for this address...

Page 25: ...tap the 5 If you have selected to save this to the OneTouch menu you asked to select a the OneTouch button you want it assigned too Creating a New Entry in Your Address Book from a POI 1 From the Mai...

Page 26: ...n the top right corner of the Map screen The OneTouch menu appears 2 Tap the Edit button 3 Tap on the OneTouch button you want to edit 4 Tap on the Re assign button 5 Tap Yes to confirm 6 Follow the i...

Page 27: ...te if you are already on a route you will be asked if you want to Replace Destination this cancels the previous route and replaces it with a new route to this destination Go There Now this inserts the...

Page 28: ...t Distance Mostly Freeways or Least Use of Freeways 9 Tap the large Go button on the right to return to the Map screen and begin navigating to the POI selected Creating a Route to a POI by Name 1 From...

Page 29: ...4 Tap any of the symbols to get a list of related POIs near the exit 5 Select one POI from the list and tap 6 The Go screen appears with the address of the selected POI the estimated time of arrival E...

Page 30: ...want to store your home address using the GPS location 4 Using the keyboard enter the desired address city street and number Changing the Home Address These instructions only apply if a home address...

Page 31: ...ted with it Routing Method Regardless of which route type has been created the Magellan RoadMate needs to know how the route is to be calculated Routes can be calculated by the following methods Faste...

Page 32: ...routes is displayed 4 optional You can check the Maneuver List of an alternate route if you tap the button on the right 5 Tap the desired alternate route SmartDetour on Freeways When you slow down un...

Page 33: ...stination List is displayed 6 Tap on one of the addresses to move it up or down in the list 7 Tap Optimize to optimize the route 8 Tap Add to put another destination in the route 9 When done tap 10 A...

Page 34: ...the address book 1 From the Map screen tap Menu 2 Tap Trip Options 3 Tap Edit Trip 4 The Multiple Destination List is displayed 5 Make changes as needed 6 Tap 7 Tap Save 8 Tap Yes to save the route t...

Page 35: ...ffic icon while traveling on a route A list of traffic incidents slow traffic and stopped traffic along your route are displayed 2 Tap on the checkbox to the left of the traffic delay you want to avoi...

Page 36: ...tination you have the option of viewing the most recent coupons and offers 2 On the You Have Arrived screen tap the left and right arrows to step through the coupons presented 3 Tap on the coupon name...

Page 37: ...fore turning off automatically 1 Access the System Settings menu above 2 Tap Auto Power 3 Tap on the desired duration 4 Tap the back arrow Setting Brightness 1 Access the System Settings menu above 2...

Page 38: ...Settings icon 2 Tap Map Options 3 Tap Night Mode to select Automatic for the timed adjustment on always or off always Setting Heading Up or North Up in 2D Mode 1 From the Main Menu screen tap the Sett...

Page 39: ...rop down menu to select the default routing method Setting The Turn Warning Alert Sounds 1 From the Main Menu screen tap the Settings icon 2 Tap Navigation Preferences 3 Use the drop down menu to sele...

Page 40: ...allows the receiver to display popup traffic information Setting Audible Traffic Warnings 1 From the Main Menu screen tap the Settings icon 2 Tap Traffic 3 Checking Autdible Traffic Warnings allows th...

Page 41: ...n RoadMate receiver When the data has been backed up it can be restored at any time Please note that when you restore from backed up data address book and other data will be replaced with the restored...

Reviews: