background image

4

Attaching the Magellan RoadMate receiver to the Car Cradle

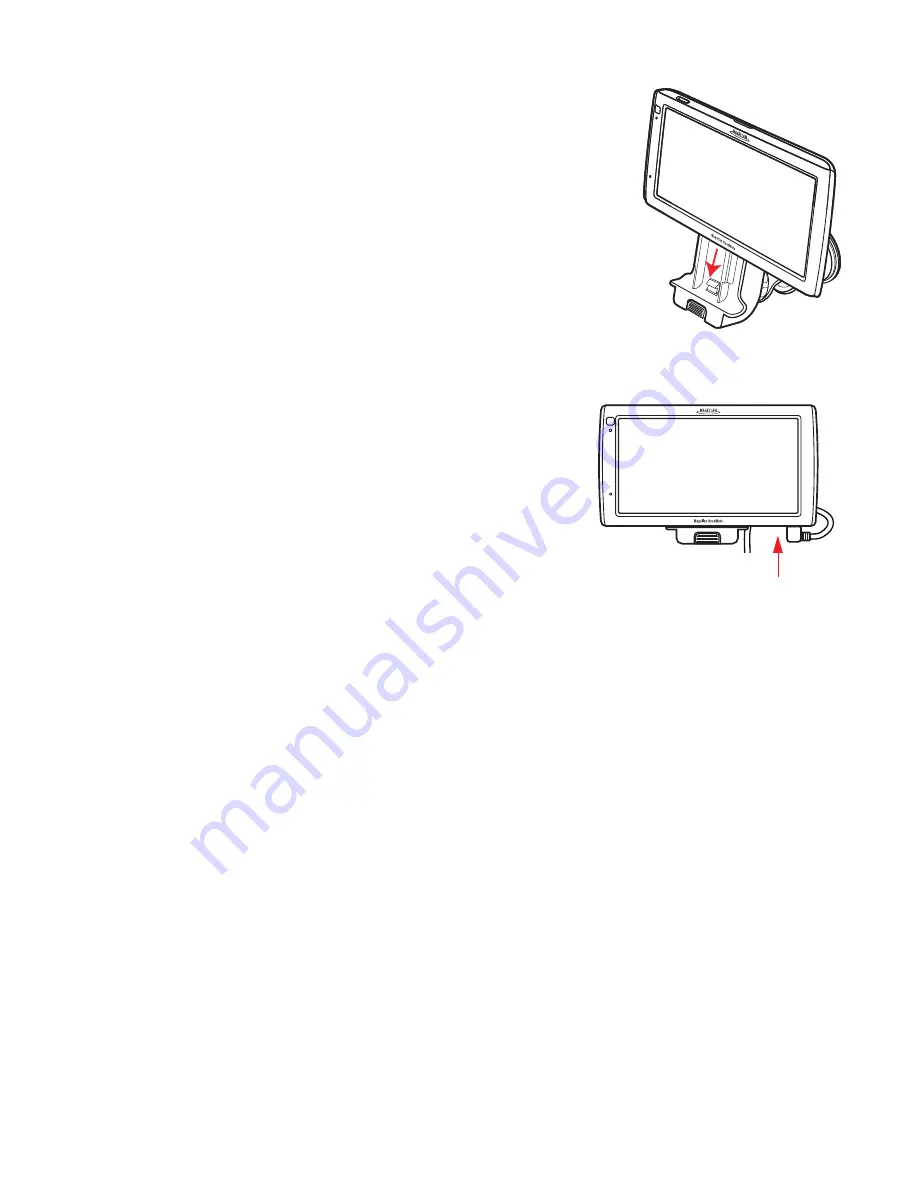
Slide the Magellan RoadMate receiver on the car cradle so that the slot on the 
Magellan RoadMate receiver aligns with the tab on the car cradle.  Slide the 
Magellan RoadMate receiver all the way down until it rests on the 'feet'. You should 
notice a click when the receiver is fully mounted in the cradle.

Adjusting the Mount for Optimum Viewing

Loosen the adjustment locking knobs and position the Magellan RoadMate receiver 
for optimum viewing. Once set, tighten the locking knobs. (Never attempt to adjust 
the mount while driving.)

Connecting Power

Plug the end of the vehicle power adapter into a 12VDC vehicle power 
receptacle. Connect the other end of the cable to the Magellan RoadMate 
receiver's power connector as shown.

Note: 

Some vehicles apply power to the vehicle power receptacle only 

when the ignition is on.

Routing the Cable

Route the cable behind the Magellan RoadMate receiver as shown.  Lock the cable into the cable retainer. 

Checking Connection and Final Adjustments

If the power indicator light on the vehicle power adaptor is on, power is being supplied to the Magellan RoadMate 
receiver. If it is not on, check the cable connection to the vehicle power receptacle. If the light is still not on, turn 
the vehicle's ignition on.

Slide the power switch (located at the top right side of the Magellan RoadMate receiver) to the left.  Sit in a 
normal driving position and make any final adjustments to the car cradle for optimum viewing. Make sure the 
adjusting knobs on the car cradle are firmly in place.

Slide the power switch again to the right to turn the Magellan RoadMate receiver off and turn the ignition switch 
of the vehicle to off. The Magellan RoadMate receiver is connected and ready for use.

Summary of Contents for RoadMate 1700-LM

Page 1: ...960 Overland Court San Dimas CA 91773 Magellan RoadMate 1700 GPS Receiver User Manual...

Page 2: ...nlight for an extended period of time Take care when mounting the Magellan RoadMate receiver in your vehicle whether using the windshield mount or other mounts that it does not obstruct the driver s v...

Page 3: ...modifications not expressly approved by the party responsible for compliance could void the user s authority to operate this equipment IMPORTANT NOTE FCC Radiation Exposure Statement This equipment co...

Page 4: ...International Corporation Magellan RoadMate QuickSpell SmartDetour and OneTouch are trademarks of MiTAC International Corporation and are used under license by MiTAC International Corporation All righ...

Page 5: ...ghtness 7 Main Menu 7 Keypad 8 Selecting QWERTY or ABC Keyboard 9 Notes on Entering Data 9 Smart City Search 9 QuickSpell 10 Map Screen 11 Current Location Screen 13 Accessing the Current Location Scr...

Page 6: ...hway Exit POI 23 Home Address 24 Saving the Home Address 24 Changing the Home Address 24 Creating a Route to the Home Address 24 Traveling on a Route 25 Map Screen 25 Maneuver List 25 Types of Routes...

Page 7: ...he Sound 31 Turning off Button Sounds 31 Setting Volume Levels 31 Navigation Preferences 31 Setting The Default Route Method 31 Setting The Turn Warning Alert Sounds 31 Enabling U Turn Guidance 31 Avo...

Page 8: ...rstate Customize your Magellan RoadMate receiver to meet your needs using the Settings menu The user interface for the Magellan RoadMate receiver is easy and simple to follow once you understand the b...

Page 9: ...adMate A Power Switch B Micro SD card slot A micro SD card is optional and is used for backing up and restoring data C USB connector D AV Input Audio and video input Requires 3 5mm AV cable E Power In...

Page 10: ...s Using the Adhesive Disk If you plan on using the adhesive disk you will first need to attach it to the dashboard and allow it to cure for 24 hours before continuing Find a smooth flat surface and cl...

Page 11: ...Note Some vehicles apply power to the vehicle power receptacle only when the ignition is on Routing the Cable Route the cable behind the Magellan RoadMate receiver as shown Lock the cable into the cab...

Page 12: ...is not left in plain view while unattended for reasons of theft Please note that the Magellan RoadMate receiver is a receiver only and does not transmit GPS location signals Neither the receiver nor...

Page 13: ...ne If for any reason you need to turn the power off manually slide the power switch to the center position Checking Battery Level The Magellan RoadMate receiver has an internal battery that permits us...

Page 14: ...tness 6 Tap to save and exit On the Brightness screen there is a Dim on Battery Power option When Dim on Battery Power is checked the Magellan RoadMate receiver will reduce the brightness when operati...

Page 15: ...eTouch menu with easy access bookmarks of your favorite places or searches such as routing to your Home address or the list of emergency services nearest to your current position Button Name Descripti...

Page 16: ...s using only standard characters Smart City Search The Magellan RoadMate receiver utilizes a feature known as Smart City Search Smart City Search attempts to predict the city you are looking for This...

Page 17: ...uickSpell In the example to the right CE has been entered for a street name in Chicago IL The Magellan RoadMate receiver has predicted that the street name may be Cedar Ave Also it has greyed out any...

Page 18: ...u gives you instant access to your saved search criteria and favorite destinations In routing mode additional information is displayed providing detailed information about the route you have selected...

Page 19: ...he map screen changes to Pan mode 3 When finished tap and the map returns to your current position Routing to a Panned Position 1 Pan the map until the location you wish to route to is displayed 2 Tap...

Page 20: ...for the address book entry 6 When the details for this address are acceptable tap Note entering a Name is compulsory before saving the Address Book entry 7 If you have selected to save this point to t...

Page 21: ...e Map screen The volume can also be adjusted from Settings Sound Changing the Volume from the Map Screen 1 Tap the speaker icon Additional controls appear 2 Tap on the Mute button to mute the volume o...

Page 22: ...d tap the Zip Code button to switch to the numeric keypad Enter the ZIP code Tap to bring up a list of cities with the zip code entered Tap to select the city from the list 4 Enter Street name With th...

Page 23: ...se the keypad to enter the street name It is not necessary to enter accented characters for ease of use you need to use only the basic keyboard Enter the first few characters of any significant word i...

Page 24: ...ears with the address of the selected location the estimated time of arrival ETA the distance to travel and the routing method e g Fastest 5 optional Tap Options if you want to change the routing meth...

Page 25: ...and start navigating Creating a New Entry in Your Address Book by Entering an Address 1 From the Main Menu tap the Go To icon 2 Tap the Address icon and enter an address as described in Entering an Ad...

Page 26: ...e is described in detail in chapter Map Screen optional Tap Work Cell or Home Phone Number to specify a phone number for the address book entry 7 When the details for this address are acceptable tap t...

Page 27: ...have already assigned a function to the OneTouch button 1 Tap the button in the top right corner The OneTouch menu appears 2 Tap the Edit button 3 Tap on the OneTouch button you want to edit 4 Tap on...

Page 28: ...21...

Page 29: ...ed from the list of POIs 9 A screen appears with the address of the selected location the estimated time of arrival ETA the distance to travel and the routing method e g Fast 10 optional Tap Options i...

Page 30: ...he routing method 12 Tap the large GO button on the right to return to the Map screen and start navigating Creating a Route to a Highway Exit POI The Highway Exit POIs function provides a way of acces...

Page 31: ...appears 2 Tap the Home button 3 Tap Yes 4 Using the keypad enter the desired address city street and number 5 The OneTouch Menu returns Changing the Home Address These instructions only apply if a ho...

Page 32: ...been created the Magellan RoadMate needs to know how the route is to be calculated Routes can be calculated by the following methods Fastest Time Fast the fastest possible route provided the vehicle i...

Page 33: ...s displayed 5 optional You can check the Maneuver List of an alternate route if you tap the button on the right 6 Tap the desired alternate route SmartDetour on Freeways When you slow down under 20 of...

Page 34: ...stination List is displayed 6 Tap on one of the addresses to move it up or down in the list 7 Tap Optimize to optimize the route 8 Tap Add to put another destination in the route 9 When done tap 10 A...

Page 35: ...the address book 1 From the Map screen tap Menu 2 Tap Trip Options 3 Tap Edit Trip 4 The Multiple Destination List is displayed 5 Make changes as needed 6 Tap 7 Tap Save 8 Tap Yes to save the route t...

Page 36: ...uto power is the duration of time that the Magellan RoadMate receiver remains idle before turning off automatically 1 Access the System Settings menu above 2 Tap Auto Power 3 Tap on the desired durati...

Page 37: ...Mode 1 From the Main Menu screen tap the Settings icon 2 Tap Map Options 3 Tap 2D Heading Up or 2D North Up to toggle between settings Assigning Visible POIs To avoid cluttering of the map the POI ico...

Page 38: ...the Main Menu screen tap the Settings icon 2 Tap Navigation Preferences 3 Use the drop down menu to select the default routing method Setting The Turn Warning Alert Sounds 1 From the Main Menu screen...

Page 39: ...you were selecting a destination Viewing the GPS Status 1 From the Main Menu screen tap the Settings icon 2 Tap GPS Options 3 Tap Status Optionally you can tap on the satellite signal indicator in the...

Page 40: ...33 Viewing Product Information 1 From the Main Menu screen tap the Settings icon 2 Tap Product Information Note Scroll down the page to view the Serial Number and Software Version...

Reviews: