4
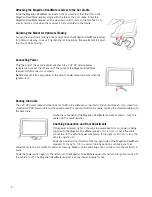
Attaching the Magellan RoadMate receiver to the Car Cradle
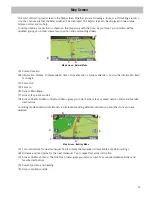
Slide the Magellan RoadMate receiver on the car cradle so that the slot on the
Magellan RoadMate receiver aligns with the tab on the car cradle. Slide the
Magellan RoadMate receiver all the way down until it rests on the two 'feet'. You
should notice a click when the receiver is fully mounted in the cradle.
Adjusting the Mount for Optimum Viewing
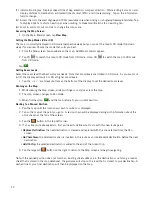
Loosen the adjustment locking knobs and position the Magellan RoadMate receiver
for optimum viewing. Once set, tighten the locking knobs. (Never attempt to adjust
the mount while driving.)
Connecting Power
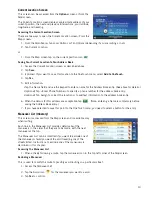
Plug the end of the vehicle power adapter into a 12V DC vehicle power
receptacle. Connect the other end of the cable to the Magellan RoadMate
receiver's USB connector as shown.
Note:
Some vehicles apply power to the vehicle power receptacle only when the
ignition is on.
Routing the Cable
The 12V DC power cable and the optional Traffic Link cable are connected in the same manner. If you have the
standard 12V DC power cable and have purchased the optional Traffic Link cable, replace the standard cable with
the new cable.
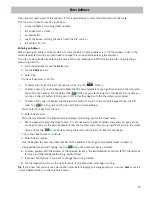
Route the cable behind the Magellan RoadMate receiver as shown. Lock the
cable into the cable retainer.
Checking Connection and Final Adjustments
If the power indicator light on the vehicle power adaptor is on, power is being
supplied to the Magellan RoadMate receiver. If it is not on, check the cable
connection to the vehicle power receptacle. If the light is still not on, turn the
vehicle's ignition on.
Slide the power switch (located at the top right side of the Magellan RoadMate
receiver) to the right. Sit in a normal driving position and make any final
adjustments to the car cradle for optimum viewing. Make sure the adjusting knobs on the car cradle are firmly in
place.
Slide the power switch again to the left to turn the Magellan RoadMate receiver off and turn the ignition switch of
the vehicle to off. The Magellan RoadMate receiver is connected and ready for use.


