


Assembly Instructions
Page 5 of 9
IMPORTANT NOTES BEFORE YOU BEGIN:
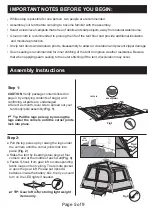
Step 1:
CAUTION
:
Verify package contents listed on
page 3 by emptying contents of bag(s) and
confirming all parts are undamaged.
● Select a smooth, level site to spread out your
tent body/pole assembly
(Fig. 1)
.
Tip
:
Pull the legs pole up by raising the
legs under the corners until the corner joints
lock into place.
HUB ASSEMBLY
Fig.1
FRP POLE
Step 2:
● Pull the leg poles up by raising the legs under
the corners until the corner joints lock into
place
(Fig. 2)
.
● Stake the tent by inserting steel pegs at four
corners and at the middle of each wall
(Fig. 3)
.
● Fasten S-hook from gear loft to corresponding
fabric loops on tent ceiling. The remote pocket
is upon the gear loft. Please put 3pcs AA
batteries inside the battery box, then you could
turn on the LED lights if needed.
Fig.3
LOCKING
BUTTON
Fig.2
TIP: Gear loft is for storing light weight
items only.
FRP
POLE
•
Assemble your tent before camping to become familiar with the assembly.
•
While setup is possible for one person, two people are recommended.
• Select a clean level campsite that is free of debris and sharp objects, away from natural watercourse.
• Ground cloth is recommended to prolong the life of the tent floor and provide additional insulation
and moisture protection.
• Unzip tent doors and windows prior to disassembly to allow air circulation and prevent zipper damage
• Seam sealing is recommended for inner stitching of the tent to improve weather resistance. Beware
that when applying seam sealing to the outer stitching of the tent, discoloration may occur.


