background image

Page 7 of 9

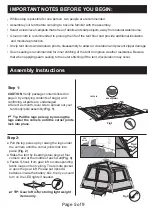
Slide battery pack into

the pocket located inside

the tent.

Close up the pouch, then plug in the battery 

pack cord into the lighting connector.

To turn on/off the lighting

press the buttons on 

the switch box.  

AA

AA

AA

Add 3AA batteries to

the empty battery pack.

(Batteries not included)

Lighting Component For Gear Loft

TAKE-DOWN TIP* 

● 

After collapsing the tent and gathering hub style frame together, spread excess tent material away 

from the frame and place it on it’s side. Start at the frame and roll it with pressure until it has reduced 

in size. Fold the rainfly and wrap the folded rainfly around the rolled tent. This will keep the tent tight 

and make it easier to place back into the carry bag.

● Remove all floor nails and store them in a small floor nail bag.
● Take out the plastic D-hook at the bottom of the inner curtain.
● Take off the external account and fold it into a 3 fold or 4 fold strip;
● Push the silver locking button and telescope in the 4 leg poles to closed position. 
● Push down on the arm joints then fold over leg poles.
● Rotate the 4 corners of tent up from the hub assembly. 
● Lay the tent down on it’s side and roll out the excess air.
● The tent is folded vertically 4-5 times to make the width of the tent consistent with the outer bag.
● Place the folded outer account over the folded inner account.
● Put the nailing bag on the inside and outside of the tent, then roll up the whole tent with the pole 

   bag as the axis and tie it up with the bandage.

● Put the rolled tent in the outer bag together with the nail bag.

Disassembly Instructions

NOTE

Ensure to remove batteries from the compartment when storing 

             or not in use, and unplug the USB when taking down the tent.

Summary of Contents for SwiftRise 6P

Page 1: ...e 6P Instant Tent Customer Service 888 922 2336 7 00 am to 12 00 am CST daily Live Chat at www academy com Email customerservice academy com 877 579 1550 8 30am to 5 30pm Monday thru Friday EST Made i...

Page 2: ...nformation 8 Page 2 of 9 Note Before assembling the product make sure all parts are present Compare product parts with package content list and hardware content list If any part is missing or damaged...

Page 3: ...are recommended During assembly poles are under tension If not held in place during assembly poles could break or up possibly causing serious injury Safety glasses may be worn throughout the assembly...

Page 4: ...y bag Plastic mold Tent body with pre attached poles Tent rainfly Fiberglass awning pole 1 1 1 1 1 1 1 4 4 9 Guyline Steel stake G H I J Page 4 of 9 Lighted gear loft Gear loft battery compartment Det...

Page 5: ...The remote pocket is upon the gear loft Please put 3pcs AA batteries inside the battery box then you could turn on the LED lights if needed Fig 3 LOCKING BUTTON Fig 2 TIP Gear loft is for storing ligh...

Page 6: ...ver tent as shown Unfold and position the fly on the tent as shown below Fasten the velcro on the fly to the frame roof Fig 6 Clip S hook attached to shockcord of rainfly onto Pl base connector on ten...

Page 7: ...them in a small floor nail bag Take out the plastic D hook at the bottom of the inner curtain Take off the external account and fold it into a 3 fold or 4 fold strip Push the silver locking button and...

Page 8: ...stant to the sun s Ultraviolet UV light However no fabric can withstand prolonged exposure to sunlight Do not leave your tent set up for weeks at a time Exposure to ultraviolet rays from the sun can d...

Page 9: ...use of other than genuine parts are not covered by this warranty This warranty shall be effective from the date of purchase as shown in the purchaser receipt This warranty is valid for the original co...

Reviews: