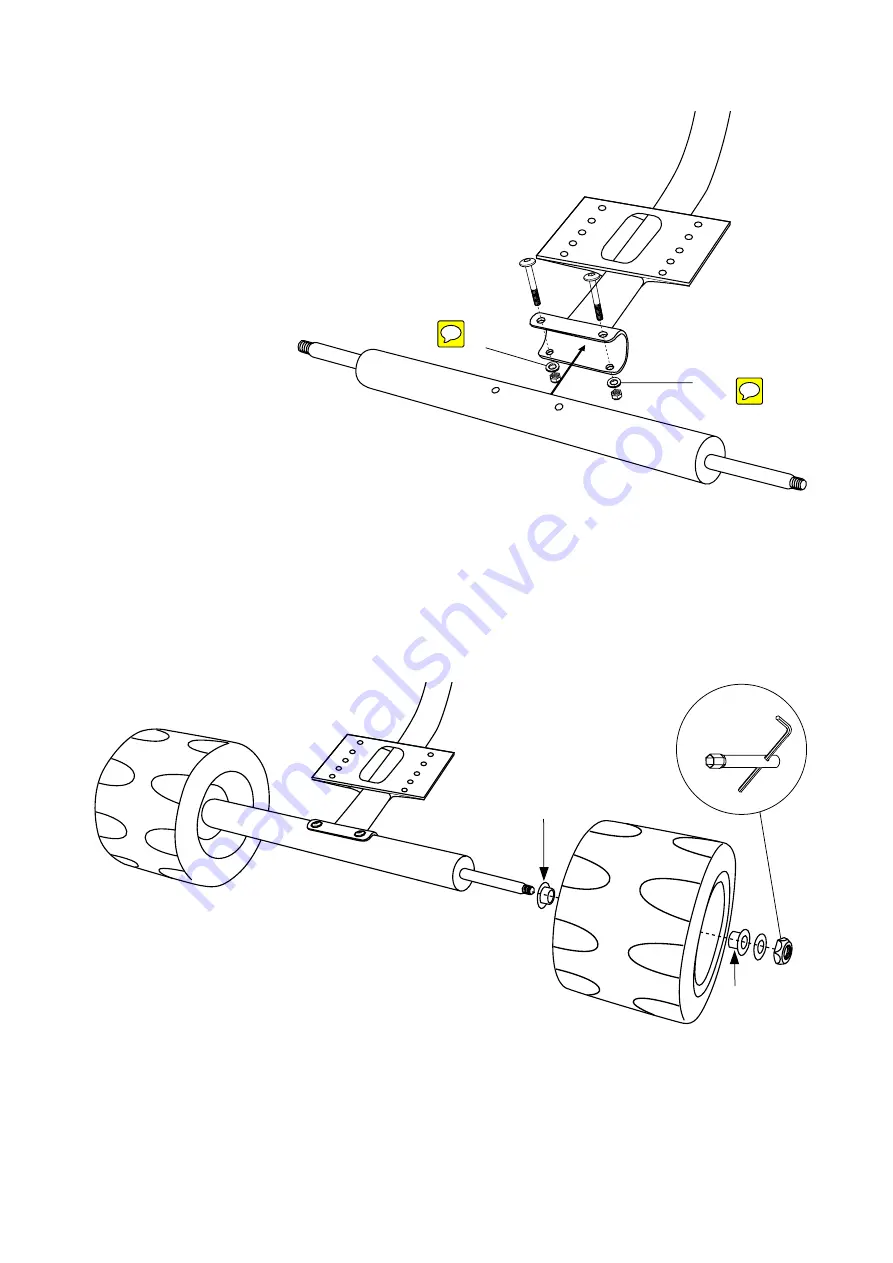
MINI DRIFTER MONTAGE / MINI DRIFTER ASSEMBLY
MONTAGE DU MINI-DRIFTER / MONTAGGIO MINI DRIFTER
DE: Montage der Hinterachse
• Hinterachse in die Rahmenhalterung schieben.
• Sicherstellen, dass die Löcher der Hinterachse mit den Löchern in der Rahmenhalterung übereinstimmen.
• Achsschraube vollständig durch die Rahmenhalterung und Hinterachse schieben.
• Inbus- Schlüssel und Steckschlüssel zum sicheren Festziehen benutzen.
EN: Rear axle rod installation
• Slide the axle rod into the frame bracket.
• Make sure the holes in the axle rod are aligned with the holes in the frame bracket.
• Slide the axle bolts all the way through the frame braket and axle rod.
• Use an allen key and socket wrench to securely tighten in place.
FR: Montage de l’essieu arrière
• Insérer l’essieu arrière dans le support du cadre.
• S’assurer que les trous de l’essieu arrière coïncident avec ceux du support du cadre.
• Insérer complètement la vis axiale à travers le support du cadre et l’essieu arrière.
• Utiliser la clé Allen et la clé à pipe pour un vissage sûr.
IT: Montaggio dell’asse posteriore
• Spingere l’asse posteriore nel supporto del telaio.
• Assicurarsi che i fori dell’asse posteriore corrispondano ai fori nel supporto del telaio.
• Spingere fino in fondo la vite dell’asse attraverso il supporto del telaio e l’asse posteriore.
• Utilizzare la chiave a brugola e la chiave a tubo per un fissaggio sicuro.
DE: Hinterradmontage
• Die Achsdurchführung an jedem Hinterrad durch beide Seiten der Räder einfügen. Es gibt 2 Achsdurchführungshülsen für jedes Rad, insgesamt 4.
• Hinterräder durch die Hinterachse schieben.
• Mutterscheiben und Schrauben auf das Rad auf die Hinterachse drehen.
• Schrauben mit der Kombination des Inbus- Schlüssels und des Steckschlüssels ( siehe Schraubenschlüssel- Kombination #1 )festziehen, sicherstellen, dass sie festgezogen sind, jedoch nicht zu feste.
EN: Back wheels installation
• On each rear wheel insert the axle bushes into both sides of the wheel. There are 2 axle bushes for each wheel, 4 in total.
• Slide the rear wheels onto the axle rod.
• Slide the washers and bolts onto the wheel screwing them onto the axle rod.
• Tighten the bolts with the combination of allen and socket wrench (see wrench combo #1), make sure they are tight but avoid overtightening.
FR: Montage de la roue arrière
• Ajouter le canal d’axe sur chaque roue arrière à travers les deux côtés des roues. Chaque roue dispose de 2 douilles de traversée de l’axe, 4 au total.
• Insérer les roues arrière à travers l’essieu arrière.
• Visser les rondelles et les vis sur la roue sur l’essieu arrière.
• Serrer les vis à l’aide de la clé Allen et de la clé à pipe (voir combinaison de clés à vis n° 1), s’assurer qu’elles sont bien vissées, pas trop toutefois.
IT: Montaggio ruota posteriore
• Inserire il mandrino dell’asse su ognuna delle ruote posteriori attraverso entrambi i lati della ruota. Ci sono 2 bussole per il mandrino dell’asse per ciascuna ruota, per un totale di 4.
• Spingere le ruote posteriori attraverso l’asse posteriore.
• Girare rondelle a dado e viti sulla ruota sull’asse posteriore.
• Serrare le viti con la combinazione di chiave a brugola e chiave a tubo (vedi combinazione -chiavi #1 ), assicurarsi che siano ben strette, ma non troppo.
DE:
Stellen Sie sicher, dass die Reifen nach
folgenden Schritten montiert werden:
1. Achsdurchführung in das Rad einfügen
2. Rad auf die Achse stecken
3. Andere Achsdurchführung in das andere Ende
des Rads einfügen
4. Unterlegescheibe einsetzen
5. Mutter auf das Achsgewinde setzen und
festziehen
EN:
Make sure the wheels are put on in the
following steps:
1. Insert axle bushing into wheel
2. Put wheel onto axle
3. Insert other axle bushing into other side of
wheel
4. Put washer on
5. Put bolt on
6. Put wheel cap on
FR:
S’assurer que les pneus sont montés selon
les étapes suivantes.
1. Insérer le canal d’axe dans la roue
2. Placer la roue sur l’essieu
3. Insérer l’autre canal d’axe dans l’autre extrémité
de la roue
4. Poser la rondelle
5. Poser l’écrou sur le filetage de l’axe et serrer
IT:
Assicurarsi che gli pneumatici vengano
montati secondo le seguenti fasi.
1. Inserire il mandrino dell’asse nella ruota
2. Infilare la ruota nell’asse
3. Inserire l’altro mandrino dell’asse nell’altra
estremità della ruota
4. Inserire la rondella
5. Posizionare e serrare il dado sulla filettatura
dell’asse
DE:
Die Achsmutter müssen stets fest angezogen sein. Fehler beim Festziehen oder Montieren könnten einen Kontrollverlust und Sturz zur Folge haben. Falls Probleme bei der Montage auftreten, kontaktieren Sie bitte zu Ihrer
eigenen Sicherheit einen Mechaniker, der Ihnen beim Aufbau hilft. /
EN:
Failure to tighten or install properly may cause loss of control and a fall. Failure to understand instructions or concept of tighten securely seek assistance of a
qualified mechanic. /
FR:
Les écrous de l’axe doivent toujours être bien serrés. Une erreur de serrage ou de montage peut engendrer une perte de contrôle et une chute. En cas de problèmes pendant le montage, veuillez contacter,
pour votre propre sécurité, un mécanicien qui vous aidera pour le montage. /
IT:
I dadi dell’asse devono essere sempre ben serrati. Errori nel serrare o nel montare potrebbero avere come conseguenza una perdita di controllo e
una caduta. Se si presentano problemi nel montaggio, si prega di contattare per la propria sicurezza un meccanico che vi aiuti nell’assemblaggio.
Unterlegscheibe / Washer
Rondelle / Rondella
Unterlegscheibe / Washer
Rondelle / Rondella
Achsdurchführungshülsen / Axle Bushing
/ Douilles de traversée de l’axe / Bussole
per mandrino dell’asse
Schraubenschlüssel- Kombination #1
/ Wrench Combo #1
/ Combinaison de clés à vis n° 1
/ Combinazione -chiavi #1
Achsdurchführungshülsen
/ Axle Bushing
/ Douilles de traversée de l’axe
/ Bussole per mandrino dell’asse


