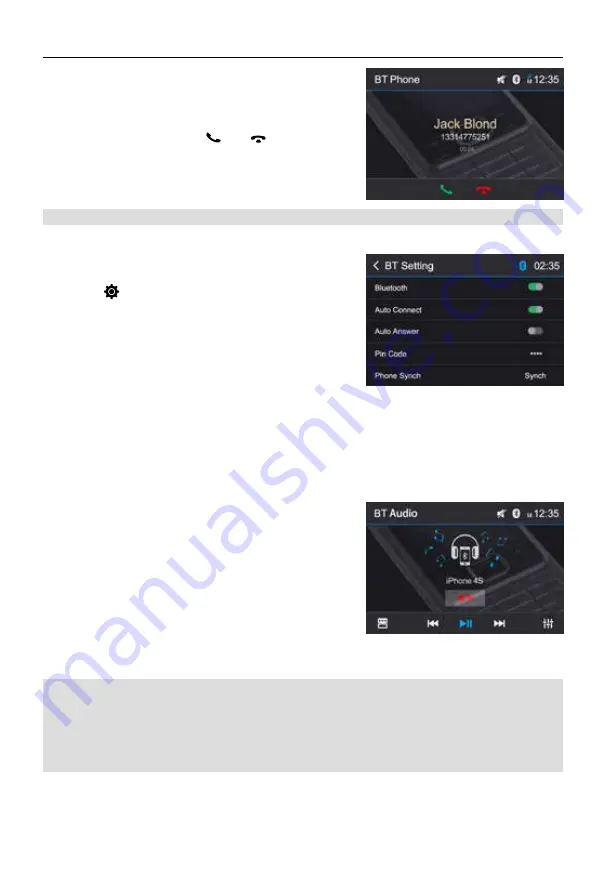
background image

- 14 - 

Receive a Call

By default, all incoming calls are received automaticaly.

1.   If there is an incoming call, the screen will display 

incoming call number. 

2.  Touch the screen to select [   ] or [   ].

  Speak into the Bluetooth microphone.

Bluetooth Mode

Adjust Bluetooth Settings

In the options menu for Bluetooth, you can make the basic 

settings for the Bluetooth mode.
Touch the [ 

 ] icon.

The options menu is displayed.

 Bluetooth: 

  To turn the “Bluetooth” function ON or OFF.

  Auto Connect:

  To turn the “Auto Connect” function ON or OFF.

  Auto Answer:

  To turn the “Auto Answer” function ON or OFF.

NOTE:

•   You can select to receive calls manually by setting [Auto Answer] to [OFF]

  Pin Code:

  To set the paring code.

  Phone Synch:

  To synchronize phone book, touch [ OK ] on the sub-menu  

  Phonebook Synch may take seve ral minute s to load on initial setup.

Bluetooth Music Function

Bluetooth provides an Advanced Audio Distribution Profile 

(A2DP) profile for streaming music from a mobile phone, 

sometimes referred to as a MP3 player. The unit allows 

you to play back audio files from your mobile phoneusing a 

Bluetooth connection.

1.   Shortcut.

2.   Previous  track.

3.   Pause playback and continue playback.

4.   Disconnect connection with current device.

5.   Next  track.

6.   Display  equalizer.

NOTE: 

When playing music via Bluetooth, if you want to make a call, you can press the number buttons on 

your phone. From that moment on, the music player stops. The TFT screen will display “Connection” 

during the call, audio will be transferred to the unit. At the end of the call, the screen will display 

the music playback menu.

If there is an incoming call, the music player stops, and the screen will show “Incoming Call”. At 

the end of the call, the screen will display the music playback menu.

Summary of Contents for M-DVD4000

Page 1: ...USER MANUAL M DVD4000...

Page 2: ...ack Mode 8 Load a Disc 8 Eject a Disc 8 Touch Screen Controls 8 Controlling Playback 8 Connect a USB SD Device 8 Remove a USB SD Device 8 Play Pause 8 Previous Next 8 DVD movie playback 9 Audio Playba...

Page 3: ...wer supply with negative grounding Never install this unit where the operation condition for safe driving is impaired Never use the video display function in the front when driving to prevent the viol...

Page 4: ...o prevent damage to the screen avoid touching it with sharp objects 8 To provide a clear demonstration and an alternative for easy understanding to the operation of this unit graphic illustrations are...

Page 5: ...w Notice The graphic in this manual is for reference only and may be different from the actual unit 3 2 1 4 5 6 7 8 9 5 Rotary pushbutton Rotate to adjust volume Press briefly to activate the MUTE fun...

Page 6: ...romote the sustainable reuse of material resources To return your used device please use the return and collection systems or contact the retailer where the product was purchased They can take this pr...

Page 7: ...or using any of the audio setup features cancels the mute function Power On Off Press the VOL knob on the unit to turn the unit on The buttons on the front of the unit light up for a moment and the cu...

Page 8: ...rest 1 Enter the EQ setup mode Touch the icon in the user interface and the EQ setup interface will display on the screen 2 Adjust subwoofer volume Touch or drag to adjust subwoofer volume from 8 to 8...

Page 9: ...ration to change step by step Method 2 1 Touch the numeric keypad icon Numeric keyboard is displayed touch number to input frequency 2 Touch to delete the input number step by step 3 Touch OK to enter...

Page 10: ...ng Using this information the radio can automatically search out another frequency of the same station Note During auto switching radio frequency some interference may be heard Turning off AF function...

Page 11: ...creen control menu Controlling Playback To access the on screen controls touch the screen except upper left corner and touch again to cancel display Touch to view all function icons Connect a USB SD c...

Page 12: ...source and the playback starts 1 Shortcut 2 Stop playback call up home menu 3 Select previous chapter 4 Pause playback and continue playback 5 Select next chapter Tap on to display additional operatin...

Page 13: ...DVD CD USB or SD Select the desired source via the main menu The device changes to the desired source and the playback starts If the playback does not start with the video playback touch the icon to c...

Page 14: ...k does not start with the image playback touch the icon to change to the folder file list Touch the icon to display all the folders and files of the data carrier Or Touch the icon to display all the i...

Page 15: ...a Bluetooth device can reduce the operational range Keep this unit away from any other electronic device that may cause interference Disconnect Bluetooth Device To disconnect one device touch After pr...

Page 16: ...ay take seve ral minute s to load on initial setup Bluetooth Music Function Bluetooth provides an Advanced Audio Distribution Profile A2DP profile for streaming music from a mobile phone sometimes ref...

Page 17: ...olor Change the color of the UI Settings Audio Settings 1 Touch 2 Touch an option repeatedly to select Audio Settings Options Description Subwoofer On Turn On the subwoofer Off Turn Off the subwoofer...

Page 18: ...ting 1 Kid Safe Acceptable for children 2 G Acceptable for general viewers 3 PG Parental guidance suggested 4 PG13 Unsuitable for children under age 13 5 PG R Recommend parents to restrict viewing for...

Page 19: ...e Not all functions may be supported for each vehicle 1 Before programming you need to clear reset the SWC interface by pressing the Reset icon 2 Define the functions of the steering wheel controls by...

Page 20: ...NOTES 1 Audio Video device must be connected to the unit using an audio video adapter cable that is available separately 2 Video will only play when the vehicle parking brake is engaged The parking b...

Page 21: ...620KHz BT Frequency 2 480 GHz EIRP power 3 90 dbm LCD Screen size 6 2 inches 16 9 Display resolution 800X480dots DVD Player Signal Noise Ratio 75dB Dynamic Range 80dB Power output Distortion line out...

Page 22: ...rate Supported Video Formats DVD MPEG RMVB Region Code According to DVD sale region the whole world is divided into six regions A DVD disc can be played back only when its region code is compatible wi...

Page 23: ...engine is off Incorrect connection between ACC and BATT Check wiring and correct TFT monitor Warning information is shown at all times Parking break wiring is not correct Check wiring and correct Flas...

Page 24: ...FR FR FL FL RL RL GND GND REVERSE VIDEO OUT SWC 1 SWC 2 BRAKE MIC SUB Output 1 SUB Output 2 VIDEO Input LINE Output RL LINE Output RR LINE Output FL LINE Output FR AV Input Left AV Input Rght ACC Igni...

Page 25: ...declares that the type of radio equipment Multimedia Navigation Receiver model M DVD4000 brand Macrom complies with the 2014 53 EU Directive The full text of the EU Declaration of conformity is availa...

Reviews: