3
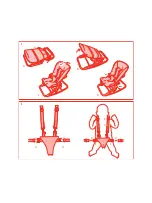
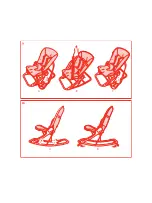
1 TO OPEN AND ADJUST THE SEAT POSITION
A Open both side adjustment latches.
B Grasp the top of the seat and open.
C Move the seat to the required position.
D Secure the seat in position by closing BOTH side adjustment latches.
2 SAFETY HARNESS OPERATION
WARNING:
Avoid serious injury
from falling or sliding out. Always use the crotch
strap in combination with the waist belt and
shoulder straps. Always use the safety harness
even when the child is sleeping.
A Open the safety harness by squeezing the fastener prongs.
B Place the child in the seat making sure that the crotch strap goes
between the legs.
C Make sure that the shoulder straps are correctly positioned to secure the
child’s torso.
D Insert the fastener into the clasp to secure the harness.
E Adjust strap lengths by using the sliding buckles on waist and shoulder
straps. The harness should be snug around the child.
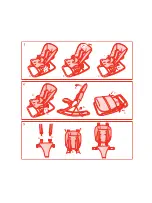
3 TO ADJUST THE SEAT RECLINE POSITION
A Open both side adjustment latches.
B Move the seat to the required position.
C Secure the seat in position by closing BOTH side adjustment latches.
IMPORTANT -
support the seat at all times while making adjustments with the
infant in the seat.
4 TO FOLD
A Open both side adjustment latches by pulling them outward.
B Close the seat.
C Secure the seat in the folded position by closing both side
adjustment latches.
5 USING THE HEAD HUGGER
A Unclip the shoulder harness straps from the padded jockey.
B Thread the shoulder harness straps through the head hugger from the back
using the set of holes in the head hugger to suit the size of your child.
C Reattach them to the rings on the padded jockey.
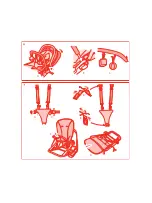
6 ATTACHING THE CANOPY/TOY BAR AND TOY SET
WARNING:
Do not lift the
product and child using the toy bar - use the carry
straps provided - see 9
A Place the canopy fabric over the back of the seat. Then snap each canopy
clip onto the side bars of the frame, above the side adjustment latches.
Open the hood to the desired position.
B Attach the toy bar by pushing the exposed ends of the toy bar into the
holes at the top of each of the plastic side members.
C Each toy is attached by a tab to the toy bar cover. Pass the tab through the
loop of each toy to secure it to the toy bar cover.
SAFETY NOTE -
The toy bar has been designed to detach from the product if an
attempt is made to use it as a handle to lift either the child or the product.
NOTE -
Actual designs may differ.
NOTE -
The canopy and toy bar must be removed before the Rocker can be folded.
When the Rocker is folded the canopy can be stowed between the seat
and the frame.
7 REMOVING THE SEAT AND SAFETY HARNESS
A Unclip the waist harness.
B Detach the shoulder straps and padded crotch strap by twisting the end
buckles at the back of the seat and feeding them through the holes in the
seat fabric.
C Partially fold the Rocker and slide the fabric from the front of the frame.
D Remove the cover from the seat back frame.
Reverse this procedure to attach the seat fabric and safety harness ensuring
the rear seat support strap is threaded and adjusted.
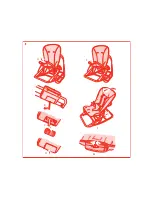
8 USING THE VIBRATING SOOTHER
A Remove the fabric seat from the front of the seat base frame of the Rocker
as instructed in 7C above.
B Use a flat head screwdriver to remove the battery door.
C Insert 1 x “C” (LR14) sized battery (not supplied) into battery
compartment. Note the orientation of the battery shown on the rear
of the battery compartment.
D Replace the battery door, making sure it is closed completely.
E Reinstall the seat fabric onto the Rocker frame.
F Adjust Rocker seat (see 3) to desired position and engage side
adjustment latches.
G Operate switch on the front of the vibrating soother to turn on and off.
Battery Care
• Do not recharge non-rechargeable batteries
• Only the recommended battery or equivalent is to be used
• Ensure the battery is inserted with the correct polarity
• Always remove exhausted battery from the product
• Do not short circuit supply terminals
• Do not use rechargeable batteries in this product
9 USING THE CARRYING HANDLES
As always, the child must be secured by the safety harness when seated
in the Rocker.
A Free the carry handles from behind the seat back by opening the
adjustable pad.
B Carefully and slowly pick up the Rocker using both carry straps.
C Stow the carry handles behind the seat back and secure with the
adjustable pad.
CAUTION
- Do not lift the product and child using the toy bar - use the carry straps
provided - see 9
10 SELECTING BETWEEN ROCKING MOVEMENT AND STABILISED SEAT
A To allow the Rocker to rock, swing stabiliser legs up and inward.
B Stabilise the seat by swinging stabiliser legs out and downward, so that
they rest on the ground.
Instructions
EN
Summary of Contents for Rocker
Page 1: ...rocker...
Page 2: ...A B C D A A C E E E E B D D C...
Page 3: ...B A C C C A A B B A A B C...
Page 4: ...A B C A A B B C D...
Page 5: ...A B C D E F G...
Page 6: ...C B A B A...


