SP260 2x6 Spe
ak
er Pr
oc
es
sor
18
SP260 2x6 Speaker Processor
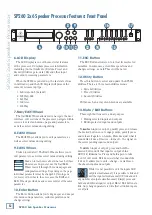
Outputs 1-6:
Engaging Edit on Output(s) 1-6 allows you the
opportunity to edit the following:
• Name
• Source
• Polarity
• Gain
• EQ Bypass
• 7-Band EQ
• Delay
• High Pass Filter
• Low Pass Filter
• Limiter
• VU Meter
We will go through each of these sub-menus, one-by-
one (and in order), but know that...
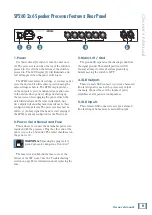
(1) The Nav/Edit1 Wheel [7] is used to navigate
between Name, Source, Polarity, Gain, EQ Bypass,
7-Band EQ, Delay, High Pass Filter, Low Pass Filter,
Limiter and the VU Meter.
(2) The ESC button [11] is used to disengage Editing
and return to the previous menu.
(3) The Enter Button [10] is used to enter and edit
the chosen feature.
Without further ado, press the Enter Button [10] to
enter Name.
An arrow –> will appear next to “Name” indicating
that it is ready to be edited.
The aforementioned arrow –> will appear next
to whatever setting is ready to be edited: Name,
Source, Polarity, Gain, EQ Bypass, 7-Band
EQ, Delay, High Pass Filter, Low Pass Filter,
Limiter and the VU Meter.
Name
Here is where the name of the selected output(s) may
be changed. The Nav/Edit1 Wheel [7] moves the cursor
left and right while the Edit2 [8] and Edit3 [9] Wheels
change the text.
Press the Enter button [10] to accept the new name
and return to the Edit menu. Pressing the ESC button
leaves the name as-is and returns you to the output edit
menu.
EQ Bypass
EQ Bypass flattens the 5-Band EQ on the input so
you may hear exactly how it is affecting the system.
By toggling the EQ Bypass on and off, you may quickly
compare the sound with and without EQ.
Turn the Edit2 [8] or Edit3 [9] Wheel to scroll
between
Bypass = Off
[default] and
Bypass = On
.
Press the ESC button [11] to accept the new EQ
Bypass mode and exit the EQ Bypass editing mode.
5-Band EQ
Editing input EQ on the SP260 is useful for
adjusting the response of the entire PA, particularly
when correcting anomalies caused by the venue.
Press the Enter button [10] to enter and edit
the EQ bands. An arrow –> will appear next to “EQ”
indicating that it is ready to be edited.
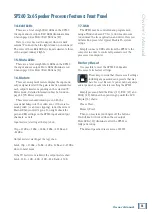
Use the Nav/Edit1 [7] Wheel to change the
frequency by ~±1/24 octave per click. Turning this
wheel clockwise increases the frequency, while
turning it counter-clockwise decreases the frequency.
The frequency ranges from 20.0 Hz to 20.0 kHz.
Use the Edit2 [8] Wheel to change the bandwidth
by ~±0.05 per click. Turning this wheel clockwise
increases the bandwidth, while turning it counter-
clockwise decreases the bandwidth. The EQ band may
be configured as high or low shelf by turning it all the
way counter-clockwise.
These are the EQ choices from the furthest counter-
clockwise option to the furthest clockwise option:
• –12 High Shelving
• –6 High Shelving
• –12 Low Shelving
• –6 Low Shelving
• 0.05 – 3.00 [Parametric]
To change the EQ between shelving and
parametric, the gain must first be set to 0.0 dB.
Use the Edit3 [9] Wheel to change the gain by
~±0.5 dB per click. Turning this wheel clockwise
increases the gain, while turning it counter-clockwise
decreases the gain. The gain ranges from –15.0 dB to
+15.0 dB.
Press the ESC button [11] to exit the EQ editing
mode.

