23
Owner
’s Manual
Owner’s Manual
FX Section
The Onyx FX engine is incredibly powerful and packed
with a ton of features. There are 12 effects to choose
from, but each one of those may be manipulated and
tweaked to your inclination.
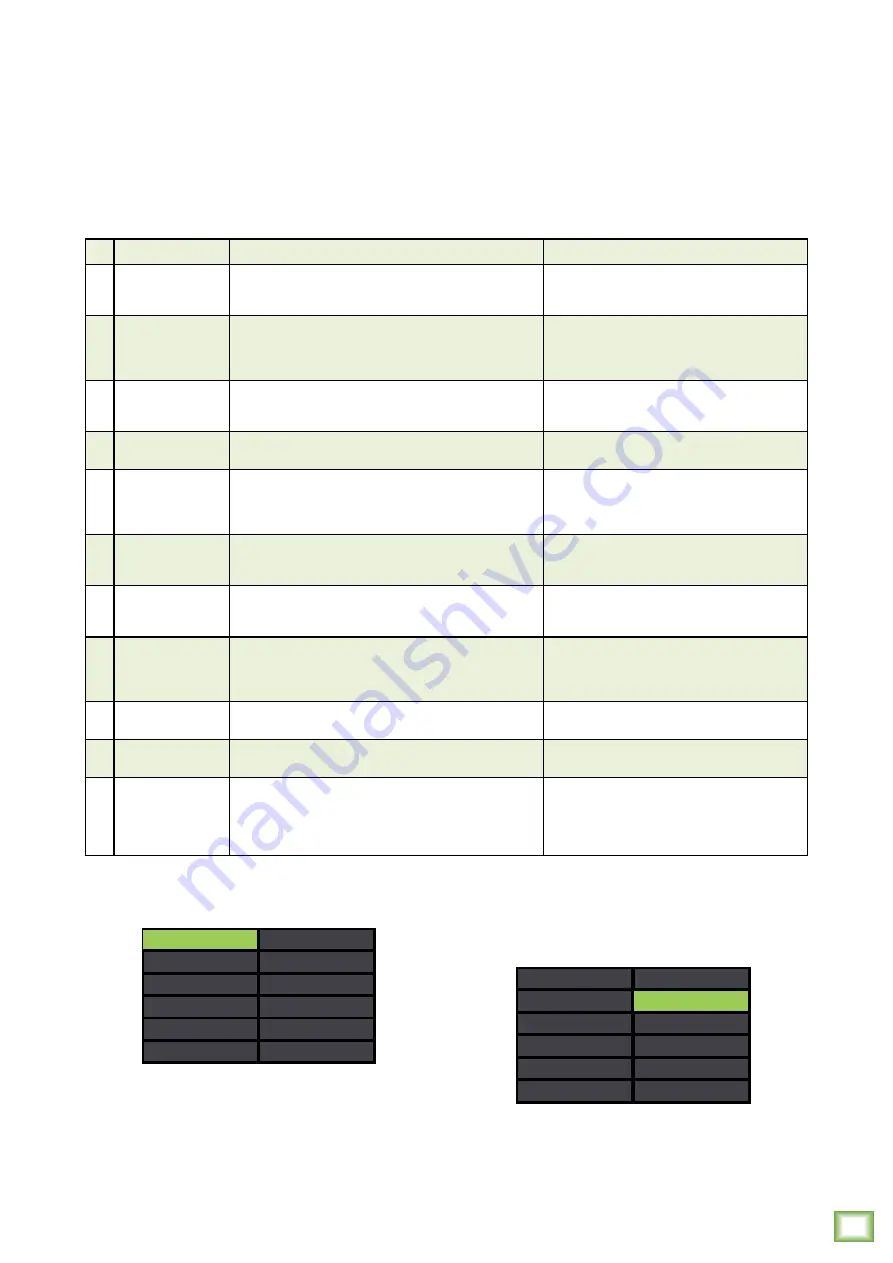
Before diving in, though, let's take a look at a table
of the 12 effect types with a description of each preset
and some examples.
Notice below that ‘CHO 2’ is highlighted, but ‘DELAY’
is still in green text. This is because delay is still the
currently selected effect. The chorus won't go into
effect until the Studio Command Control Knob is
pressed in to select.
For the time being, though, we will go through the
effects one by one, starting with delay. You can either
(1) rotate the knob back to delay and push in to select,
or (2) push the back button since delay is already
selected. Both work!
DELAY
ECHO
SLAPBCK
HALL RVB
RM RVB
PLT RVB
CHO 1
FLANGER
DLY + RVB
DLY + CHO
RVB + CHO
CHO 2
Note that the effects are presented in four sets
of three:
• Effects 1-3 – Delays – Virtual Knob Color = blue
• Effects 4-6 – Reverbs – VKC = red
• Effects 7-9 – Modulations – VKC = purple
• Effects 10-12 – Multi-purpose – VKC = orange
No. Title
Description
Example of its use
1
Delay
This effect repeats the source signal in even increments,
later in time, defined by the time setting. The feedback
control increases / decreases the amount of repeats.
This works best with full, up-beat music like rock
where the delay needs to cut through the mix.
2
Echo
This type of delay effect repeats the source signal twice.
It has a characteristic of a double repeat like a voice
reflecting off the walls of a canyon. The timing and amount
of repeats are defined by the time and feedback settings.
Also known as Slap Back Echo, use it to make a vocal
or guitar stand out in the mix without extra volume.
3
Slapback
This effect provides a single or double, relatively rapid
delay of the original signal with minimal repeats through
the feedback setting.
Slapback is generally used to mimic vocals – and
sometimes drums – on ’50s-era rock ’n roll.
4
Hall Reverb
This reverb is characterized by its large, spacious sound,
long pre-delay and vibrant tone.
Adds life to acoustic instruments and vocals
from solos to full-on symphonies and choirs.
5
Room Reverb
This preset features a medium sized room sound, with just
enough enhancement of the lower mids to produce a warm tone.
Useful for any instrument or vocal source to sound
like it’s in an acoustic space that is like a recording
studio. Try running the snare, horn section,
or acoustic guitar on this one!
6
Plate Reverb
Plate reverbs emulate vintage mechanical reverberation
that is generated with a metal plate. Its sound is characterized
by lots of early reflections and no pre-delay.
Perfect for adding a long sustain to percussion
like tambourine, hand-claps, and backup vocals.
7
8
Chorus 1
Chorus 2
These presets provide a soft, ethereal sweeping effect
that is useful for thickening and for making a particular
sound pop out of the mix.
Perfect for enhancement of electric and acoustic
guitar and bass, or to add a dramatic effect to vocals,
particularly group harmonies and choirs.
9
Flanger
The flange effect is a modulated delay with feedback
(and shorter delay times than a chorus), which creates
the characteristic “whooshing” sound often used to describe
the flange sound.
Check out the electric rhythm guitar on the song
“Barracuda” by Heart.
10
Delay + Reverb
Don’t choose delay, don’t choose reverb!
Get the best of both worlds with effects preset #10!
Useful for bands that employ the alternative rock,
shoegaze and/or experimental rock sound.
11
Delay + Chorus
Don’t choose delay, don’t choose chorus!
Get the best of both worlds with effects preset #11!
Pink Floyd guitarist, David Gilmour, often used
this effect in his setup.
12
Chorus
Don’t choose reverb, don’t choose chorus!
Get the best of both worlds with effects preset #12!
Really thicken things up with this preset.
The chorus creates a slightly detuned version
of the signal blended with the normal signal, while
the reverb emulates the bouncing of sound waves
across different-sized venues.
Let's start with choosing an effect and then we can
go on from there. Press the FX button until the screen
looks something like this:
Rotate the Studio Command Control Knob to switch
between effects, then press in to select the highlighted
effect you desire.
ECHO
SLAPBCK
HALL RVB
RM RVB
PLT RVB
CHO 1
CHO 2
FLANGER
DLY + RVB
DLY + CHO
RVB + CHO
DELAY


