background image


60

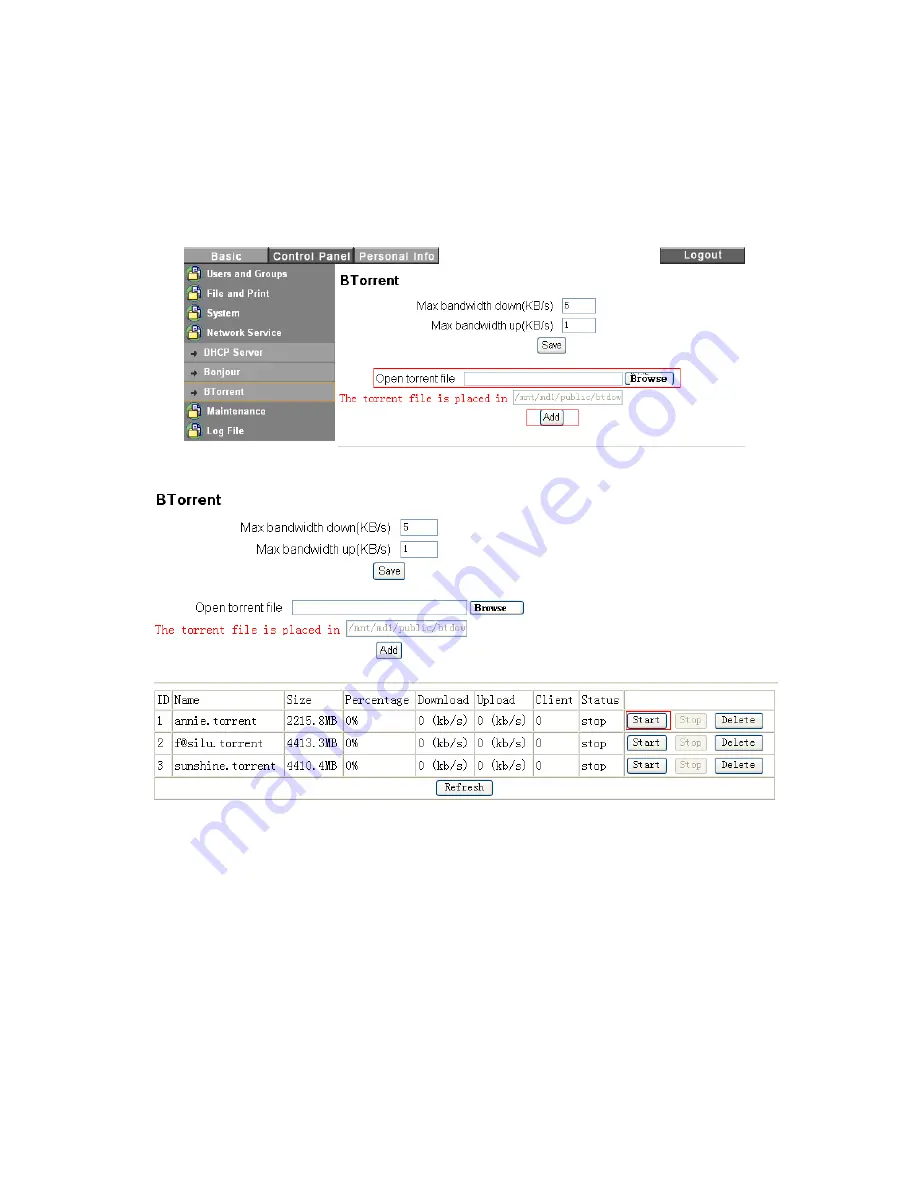
BTorrent 


When BitTorrent server is enabled, the NAS can share file(s) directly through the Internet unattended 
from the host computer. This feature reduces the wear and tear of your computer by having the NAS 
independently run the BitTorrent function. To download or upload BitTorrent file(s) from Internet, follow 
the steps below. 
1, Login the NAS administrator, click “Control Panel” then “Network Service” and then “BTorrent”. 
3, Click the “Browse” button to find previously saved BitTorrent meta-seed file.   


4, Finally, click the “Add” button. 


5, Once the “Start” button is pressed, the NAS will automatically download the file from Internet to the 
NAS. The file “download status” can be viewed by clicking the “Refresh” button.   

Summary of Contents for G-S350UN

Page 1: ...1 Network Attached Storage And USB2 0 Enclosure for 3 5 Serial ATA Hard Drive G S350UN User s Manual...

Page 2: ...iguring a Fixed IP address to the NAS in PC 10 Configuring a Fixed IP address to the NAS in Mac 13 Administration of the NAS 17 Finding the NAS with DHCP IP address 17 Managing the NAS 20 Network Stor...

Page 3: ...ly web based Network Administrator GUI to let you configure manage and maintain the enclosure As a NAS G S350UN is compatible with the current OS and computers to feature support of SMB CIFS FTP UPnP...

Page 4: ...er and printer server functions Centralized Music Server for iTunes and BTorrent download for media play About This Guide Before you begin using the G S350UN be sure to read this manual in its entiret...

Page 5: ...ace without proper support z Do not expose the unit to direct sunlight or hot air where the temperature may exceed 45 or very cold locations where the temperature is below 0 z Keep the power cord away...

Page 6: ...your computer chassis and that your hands are dry 1 Back Panel 2 2 x 6mm Screws 3 Enclosure Sleeve 4 Base Tray bridge 5 6 x 5mm Screws 6 8 x 4mm Screws 7 Front Panel 8 Base Tray 9 Power on off button...

Page 7: ...Installation Note The diagrams below use the G S350U Enclosure as an example 1 On a flat desk surface unscrew to loosen the Enclosure back panel Remove the back panel 2 Use your fingers to push the Ba...

Page 8: ...the hard drive to the black female SATA connector on the Base Tray bridge board and then push the drive completely into the connector Carefully seat the whole drive on the Base plate 5 Secure the HDD...

Page 9: ...office network Lastly plug the AC DC adapter into the enclosure and then press the power button in the front to turn it on USB Connection If the G S350UN is going to be used as a USB2 0 drive with a s...

Page 10: ...t most likely it won t fit there are ways to help you to configure the NAS through a PC and Mac computer Please follow the steps below to manually configure a fixed IP address to G S350UN Configuring...

Page 11: ...lect the option Set IP configuration manually and fill in an unique IP address for the NAS enclosure and Subnet Mask suitable to your network this is the fixed IP address for the NAS you will use to a...

Page 12: ...6 Set the date and time and then click the Next button to proceed Click on Save button to finish the setup 7 Click OK button to close the window 8 Please proceed to the section Administration of the N...

Page 13: ...c s Ethernet port directly using the Ethernet cable included in G S350UN package Turn on both G S350UN and your Mac Open System Preferences in your MacOS X and then click the Network icon From the scr...

Page 14: ...14 Please enter admin as Username and Password...

Page 15: ...es to enable Bonjour and iTunes support Then go to Control Panel button System LAN Settings as shown below Check option Use following IP Address and Use following DNS Server Address enter all info suc...

Page 16: ...ences Disconnect the NAS from your Mac s Ethernet port connect the NAS and your Mac into your LAN respectively Please be sure your Mac is able to use the network and internet before trying to access t...

Page 17: ...dynamic IP address from your local DHCP server if available However you generally do not know the dynamic IP address it obtains You have to find this specific dynamic IP address in order to administra...

Page 18: ...o launch the NAS login screen for administration Proceed to the subsection Managing the NAS In MacOS X Under MacOS X 10 3 to 10 5 please follow the procedures below to find out the dynamic IP address...

Page 19: ...GBNAS as shown below Please write it down and close the Terminal window 5 Enter the known IP address in the web browser login to the NAS administration home page Input default Username and Password a...

Page 20: ...Storage Administrator login screen Please note the login screen can also be accessed through Windows My Network Places and UPnP After the NAS hard drive is formatted and the Bonjour is enabled Bonjour...

Page 21: ...going to be strictly used as NAS in the network then format the drive in either ext2 ext3 or NTFS format at your preference If it will be used in both network and USB connection then you must format...

Page 22: ...z Add User z Add Group z Add Share Control Panel Users and Groups z User Management z Group Management File and Print z File Server z Share Management z Printer Server System z LAN Settings z Time Se...

Page 23: ...n the new password In case you forgot the new password while the NAS is running please press and hold down the reset button for 5 seconds in the back panel of G S350UN then shut down and power to rest...

Page 24: ...and Password choose to create a Private Folder and enable Quota 2 Set up Management option 3 Add Share Read Write Permission to the current folder for the new user Add Group You can group different u...

Page 25: ...in this interface Click Clear Form before you input new user name and password Fill in optional description to help administrator identify the folder The new user folder can be set to private folder a...

Page 26: ...r Character set English is the default language in this NAS system Other language can be chosen from this box if there are other languages expressions in your folder Windows Setting Set workgroup name...

Page 27: ...nter Server Check Enable box to enable Print Server function When a USB printer is connected to the NAS s USB port and powered on it will appear in the Printer Name Description and becomes ready to us...

Page 28: ...fields of the GUI Obtain DNS server address automatically The system gets DNS server addresses from DHCP server if available Select this option when Obtain IP Address automatically is selected Use sta...

Page 29: ...e NAS information below Product Name GBNAS Firmware Version 2 6 3 Product Vendor IP Address Current IP address Disk Usage Display the NAS drive usage summary and user s quota information Error Notific...

Page 30: ...ator if DHCP Server task has problem Check Interval The NAS s notification message interval can be set to hourly or daily Email Notification Setting Enable Enable Error notification sent by email Erro...

Page 31: ...NAS hard drive being formatted you are allowed to enable the NAS to support Apple Bonjour protocol and iTunes Check Enable box to enable Bonjour protocol Check iTunes Enable box to enable iTunes serve...

Page 32: ...e same network and powered on 2 Open Safari click Show All Bookmarks as following 3 Click on the Book symbol circled in red below locate and select Bonjour or Rendezvous in the left pane Then double c...

Page 33: ...download function You can download the seed to the NAS by opening up the torrent file in Open torrent file box through the GUI Set Max bandwidth download rate limit Set Max bandwidth upload or outward...

Page 34: ...fore using or changing any settings because most of the settings and changes in Administration are saved in the formatted hard drive due to limited RAM space in the NAS controller and reloaded to the...

Page 35: ...e and then click Start Upgrade to start the process During firmware upgrade process all NAS s network services will be temporary disable It will take 10 20 minutes for the upgrade process to complete...

Page 36: ...process Factory Reset Like the hardware Reset button located in the back panel of the NAS enclosure this software option resets the system configuration to factory default configuration All users netw...

Page 37: ...37 FTP Log DHCP Server Log System Log Administration Log...

Page 38: ...on such as password language can be changed for admin account This section also displays the share list system disk quota and the percentage of disk used To secure your NAS from unauthorized access it...

Page 39: ...he NAS user account you choose to login in the FTP client Windows Access Open My Computer in the address line input 192 168 1 202 assuming 192 168 1 202 is the IP address for the NAS All accessible fo...

Page 40: ...and choose Map Network Drive option in the pop down menu assign a drive letter then click Finish button to complete From now on when you start the windows OS the network NAS drive will be mounted auto...

Page 41: ...r smb 192 168 0 185 assuming 192 168 0 185 is the IP address for the NAS in Server Address line then click on Connect button 3 Once connected the screen below shows Select the folder you want to acces...

Page 42: ...lease follow the steps below After step 4 above you will see the NAS volume ADMIN for example appearing in the Finder 6 Next open System Preferences then Accounts select the user account click on Logi...

Page 43: ...d by default which allows you to use a FTP client software to transfer file between your Mac and the NAS The NAS folder accessible depends upon the NAS user account you choose to login in the FTP clie...

Page 44: ...n find the Serial Number label starting YUMYFTP on the Software CD or its envelope You may download Yummy FTP software from the following link case sensitive http www yummysoftware com macally YummyFT...

Page 45: ...ter and the NAS are both powered on then connect the USB printer to the NAS using a USB cable 2 Open the Printer Server in the NAS administrator make sure to check Enable option and click Save button...

Page 46: ...inter below GBNAS click Next to install printer driver In the Add Printer Wizard select the manufacturer and printer model to match your printer If your model is not in the list you should click on Ha...

Page 47: ...oth powered on then connect the USB printer to the NAS using a USB cable 2 Open the Printer Server in the NAS administrator make sure to check Enable option and click Save button You will see the prin...

Page 48: ...48 Step1 click on Set Up Printers button Step 2 click on Add button...

Page 49: ...49 Step 3 Select Windows Printing WORKGROUP and choose GBNAS Step 4 Enter password for admin and check Remember this password in my keychain click OK...

Page 50: ...50 Step 5 Highlight lp then click on Add button After installation the network printer will appear in the printer list it is ready to use For MacOS 10 4 Step 1 Click on button...

Page 51: ...51 Step2 Select IP Printer then click on More Printers button Step 3 Select Windows Printing...

Page 52: ...52 Step 4 Choose GBNAS under the Workgroup Step 5 Enter password check Remember this password in my keychain then click OK...

Page 53: ...53 Step 6 Select lp and choose the printer model then click on Add button Step 7 lp printer is added to the printer list successfully...

Page 54: ...54 Step 8 Example printing choose lp as printer Step 9 Print job is executed For MacOS 10 5...

Page 55: ...55 Step 1 Click on button Step2 Select Windows then click on workgroup...

Page 56: ...56 Step 3 Find gbnas in the list and click on it Step 4 Enter password for admin click on Connect button...

Page 57: ...57 Step 5 Select lp then go to Please select a driver or printer model menu Step 6 Click on Select a driver to use...

Page 58: ...58 Step 7 Select your printer model from the list then click on Add button Step 8 The lp printer is added successfully...

Page 59: ...59 Step 9 Example printing select lp as the printer Step 10 The print job is executed successfully...

Page 60: ...To download or upload BitTorrent file s from Internet follow the steps below 1 Login the NAS administrator click Control Panel then Network Service and then BTorrent 3 Click the Browse button to find...

Page 61: ...when download is completed or if you no longer wish to share the files Deleting the meta seed files from the list does not permanently delete the downloaded file from the NAS All the downloaded files...

Page 62: ...the beginning by using the NAS Disk Utility Please refer to the section Administrating the NAS for instructions Connect an USB cable between G S350UN and the computer first power on the G S350UN enclo...

Page 63: ...using efficiency FAT32 is suit for all universal OS NTFS NTFS is a format with secure and robust feature for management of network disk allocation and file encrypt in Window NT operating system Data...

Page 64: ...and uses the Internet s TCP IP protocols to enable data transfer FTP is most commonly used to transfer Web page files from their creator to the computer that serves the pages to everyone on the Intern...

Page 65: ...computer ask me to format my NAS drive using USB connection after I ve formatted the disk through NAS Administrator Why doesn t my NAS drive mount in the Windows system under USB connection A These pr...

Page 66: ...small group preferably 50 files at a time this way will ensure that the NAS has enough time to build its database successfully Q Why do I get a corrupted file message when accessing the files from th...

Reviews: