


MACTOOLS.COM
8
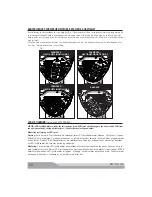
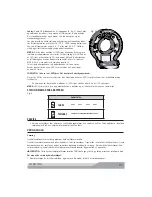
FORWARD/REVERSE AND SPEED CONTROL
The forward/reverse and speed control switch (Fig. 1) determines the direction of the tool and also serves as the
variable speed control. To select full speed forward rotation, turn the switch to the far right side of the tool as shown.
To select reverse, turn the switch to the far left side of the tool as shown. Please note, reverse is always full power.
Forward rotation can be adjusted for variable speed by turning the lever between the three settings as shown in
Fig 1, switch will detent in each position.
FORWARD - SPEED SETTING 1
Fig. 1
FORWARD - SPEED SETTING 3
REVERSE
FORWARD - SPEED SETTING 2
LED LIGHT ACCESSORY
(included with MPF990501)
ATTENTION: LED light accessory must be charged before fi rst use. LED light will not function until charged.
LED light is shipped in sleep mode, charging activates light function. (see charging section below)
Installation and Removal of LED Light
Removal:
To remove LED light accessory from tool, rotate the LED light accessory counter clockwise, the LED
light will make a ‘snap’ noise as it rotates. At the top of the nose cone, the unlock symbol will line up with the
hash mark when fully unlocked. Pull the LED light accessory straight away from the tool to remove. Charging
port is located on the back side of LED light accessory (see charging section below).
Install:
To install LED light accessory onto tool, line up the hash mark on top of the nose cone with the unlock
symbol. Place LED light accessory onto nose cone toward back of tool until it stops. THEN rotate clockwise, the
LED light accessory will make a ‘snap’ noise as it rotates and locks in place. The hash mark on top of the nose
cone will now be lined up with the lock symbol.


