VAN DER GRAAF M
K
II
VERY LOW NOISE POWER SUPPLY
REVISION P
R
B – AUGUST 2017
Copyright © 2017, M2Tech Srl
13
M2Tech
www.m2tech.biz
4. Connecting and Powering the Unit
WARNING: All connections between the
VAN DER GRAAF M
k
II
and other equipment
must be made when all units are turned off and completely powered down or
unplugged. Failing to do so may cause damage to the
VAN DER GRAAF M
k
II
and/or
other units.
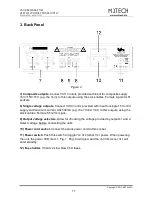
Please refer to chapter 3, “Back Panel”.
Connect one or two units with +15V or +9V single supply input to
VAN DER GRAAF M
k
II
output 1 and 2 (Fig. 2, 8), using the stock cable, after selecting the right output voltage for
each powered unit. For example, when powering a
Young MkIII
with output 1, the voltage
selector closest to the output socket (Fig. 2, 9) must be set to the upper position. On the
other hand, when output 2 is used to power an old
hi
F
ace
E
vo
, then the voltage selector
closest to it must be set to the lower position.
Connect one or two units with composite supply input (+5V/+15V/-15V) to
VAN DER GRAAF
M
k
II
output 3 and 4 (Fig. 2, 7), using the stock cables. One such unit is, for example the
NASH
.
WARNING:
VAN DER GRAAF M
k
II
total maximum current capability on +15V e -15V rails
of outputs 3 and 4 is set to 1.5A.
Connect the stock power cord to
VAN DER GRAAF M
k
II
power socket (Fig. 2, 10) and to a wall
outlet.
Push the power switch on the back panel (Fig. 2, 11) to turn the
VAN DER GRAAF M
k
II
on.
The power LED on the front panel (Fig. 1, 1) will glow. The
VAN DER GRAAF M
k
II
will enter
standby, waiting for enabling by the user.
Push the global enable button (Fig. 1, 2). At first enable, this action will have no effect on
outputs. At following enables, if the user has previously enabled one or more outputs, they
will activate in the same order as the user manually enabled them.
5. Cleaning the Unit
The
VAN DER GRAAF M
k
II
should be cleaned with a soft, slightly damp cloth. Do not use
alcohol or any other types of cleaning fluids as they could damage the unit.
Avoid fluids from dropping or leaking inside the unit. Fluids of any type poured into the unit
will void your warranty.
Be careful not to scratch the Plexiglas front screen.


