background image

Energy Butler Hybrid Series

User Manual

36

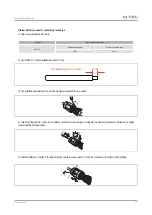
5) Insert the assembled AC connector to the corresponding AC port in the inverter.

6) Lock the AC connector cover to the inverter with screws.

4) Lock the well-pressed cord end terminals into the AC connector in the accessory bag and make sure the cables sequence is in 
line with the mark on the connector.

ON-GRID

BACK-UP

Caution: Please distinguish the on-grid and back-up port, and don’t mix up the on-grid port and back-up port when making 
the connection.

Summary of Contents for Energy Butler Series

Page 1: ...Energy Butler Hybrid Series User Manual 1 Energy Butler Series USER MANUAL September 2021...

Page 2: ...hts of M TEC GmbH and its licensors This material may not be modified reproduced or copied in whole or in part without the prior written permission of M TEC GmbH and its licensors Additional informati...

Page 3: ...neral installation steps 24 4 3 Cables Connection 27 2 2 Appearance Introduction 12 3 1 Appearance Introduction 18 2 3 Display Interface 14 2 5 Standard Packing List 17 8 Troubleshooting 47 7 General...

Page 4: ...this document Danger Warning Caution Attention Note This manual uses the following symbols to highlight important information Used to warn of urgent dangerous situations if not avoided it could resul...

Page 5: ...erter nameplate The inverter cannot be disposed of with household waste Please read the instructions carefully before installation TUV certification Danger Risk of electric shock The surface is hot du...

Page 6: ...for the installation Warning Do not attempt to open disassemble repair tamper with or modify M TEC LFP Battery M TEC LFP Battery is not user serviceable LFP Cells in M TEC Battery are not replaceable...

Page 7: ...han those specified in this manual including use of non genuine M TEC parts or accessories or parts or accessories not purchased directly from M TEC or a M TEC certified party Caution Do not place M T...

Page 8: ...y lithium battery loads and power grid to realize intelligent power management and dispatching Applicable Grid Type The applicable grid types of the M TEC 10kW are TN S TN C TN C S and TT When applied...

Page 9: ...arge to supply loads and the grid will join in if the battery power is not enough Setting Step General Mode Pmax In this working mode the customer can set the maximum allowable power from grid Pmax th...

Page 10: ...as the grid is there the battery won t discharge When the grid is cut off power from PV and battery will suppy real time loading connected to inverter back up port immediately within 10ms Inverter wil...

Page 11: ...its original packaging 2 The storage temperature should be in the range of 30 C and 60 C and the relative humidity stored is less than 90 3 If a batch of inverters needs to be stored the height of ea...

Page 12: ...GRID ON GRID BAK UP BAK UP Inverter in all in one kit Display Handle Inverter positioner Reserved connection hole DC Switch PV DC Input Terminal PV Battery Input Terminal Back Rail WIFI LAN Port Com...

Page 13: ...Energy Butler Hybrid Series User Manual 13 Inverter 550mm 175mm 410mm Front Bottom Back Right side PV1 ON OFF PV2B AT WiFi GPRS METER BMS COM ON GRID ON GRID BAK UP BAK UP...

Page 14: ...in on grid mode 4 Alarm Indicator Off The inverter is running normally Slow flashing The monitoring device is not connected to the router or is not connected to the base station Quick flashing The mon...

Page 15: ...13 13 Max Short circuit Current A 18 18 18 18 18 18 18 18 Battery Battery Type Lithium Battery with BMS Battery Communication Mode CAN RS485 Battery Voltage Range V 180 750 Max Charge Discharge Curren...

Page 16: ...ated Residual Current Protection Integrated Islanding Protection Frequency Shift Integrated AC Over voltage Protection Integrated Overload Protection Integrated AC Short circuit Protection Integrated...

Page 17: ...heck whether the accessories in the packing box are complete at the first time when receiving the goods Inverter in all in one kit 1 AC Cover Screw BAT Plug Monitoring Device optional PV Terminal PE T...

Page 18: ...1 Appearance Introduction Sub Master BMS Inverter positioner Top Front Bottom Left side Inverter COM Service COM Earth point Battery DC Output Battery DC Output DC Isolator Indicator light Battery pos...

Page 19: ...dule Battery positioner plug Top Front Right side Bottom Terminal positioner plug Earth cable BMU Power Supply BMU Power Supply CAN L CAN H Battery Positive B Negative pole Handle Battery positioner s...

Page 20: ...Hybrid Series User Manual 20 356mm 698mm Base module Battery positioner plug Terminal positioner plug Earth cable CAN COM Resistor Pre installed CAN COM Resistor Pre installed Battery Positive B Batte...

Page 21: ...n order Dimension W H D mm 698 356 137 Weight 11kg Operating Temperature 20 55 Ingress Protection IP21 Optional IP65 need to be confirmed upon order Installation Method Stackable Warranty 10 years Nom...

Page 22: ...d Sub Master BMS BCU 300MM Positive Power Cables from Battery to Inverter 300MM Negative Power Cables from Battery to Inverter M6 Plastic Expansion Pipe and Self tapping Screw 3 84KWH Li HV LFP Batter...

Page 23: ...f the inverter installation location should be between 30 C and 60 C The surface temperature of the inverter may reach up to 75 C To avoid risk of burns do not touch the inverter while it s operating...

Page 24: ...ll the base 2 Install the battery module and Sub Master BMS 3 Install the inverter 4 Cables connection 5 Install the cables cover and wall mounting support Installation procedure summary System compon...

Page 25: ...the installation environment to ensure ground level Place the base on the ground and make sure it is level and stable After the base is installed the remaining battery and Sub Master BMS are then plac...

Page 26: ...e Kit put the All in One Kit to the stacked battery and Sub Master BMS Monuting the kit for wall mounted and tighten them with M6 plastic expansion pipes and self tapping screws and screws Connet the...

Page 27: ...BMS need to be connected The picture on this page shows the cables connection Please follow the instruction and make sure all the cables are connected correctly 4 3 Cables Connection Warning Please m...

Page 28: ...cause damage to the electronic components of the inverter Anti static measures should be taken during the repairing or installation Attention Do not use other brands or other types of PV terminals ot...

Page 29: ...J45 BMS RJ45 Meter B B Battery M TEC Hybrid Inverter Meter Danger Do not connect the N wire as a protective ground wire to the inverter casing Otherwise it may cause electric shock Attention Good grou...

Page 30: ...grounding hole in the lower right side of the inverter Inverter PV string connection The following principles must be considered when making electrical connections to the inverter 1 Disconnect the AC...

Page 31: ...sional crimping plier pull back the cable with some power to check if it s tight enough 5 Insert the positive and negative cables into the corresponding positive and negative connectors pull back the...

Page 32: ...the grid side 2 Disconnect the breaker on the battery side 3 Turn the inverter DC switch to the OFF position 4 Make sure the maximum input voltage of battery is within the inverter limitation 180 750V...

Page 33: ...ver to open the clamping bracket in the connector 4 Insert the stripped DC cable to the battery connector deep enough and toggle the clamping bracket to make sure it tightly locked with the stripped c...

Page 34: ...any loads cannot be connected with inverter directly 2 Before making the connection of AC cable please confirm all DC AC power source are disconnected from the inverter 3 The M TEC Energy Butler three...

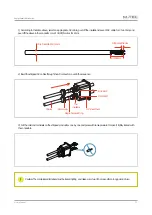
Page 35: ...ed AC cables through the AC connector cover in the sequence 3 Put the cord end terminals on the stripped conductors one by one and press with some pressure to make it tightly locked with the conductor...

Page 36: ...cover to the inverter with screws 4 Lock the well pressed cord end terminals into the AC connector in the accessory bag and make sure the cables sequence is in line with the mark on the connector ON...

Page 37: ...al otherwise the inverter may not be working normally Attention The CT has to be corresponding with the port in the meter and the connection between CT and Meter needs to be reliable otherwise the CT...

Page 38: ...detect current 6 L1 S2 7 L2 S1 8 L2 S2 9 L3 S1 10 L3 S2 12 L Power supplied from 220V grid 13 N RS485 RS485 Communicate with inverter House Grid 9 10 21 22 23 RS485 5678 1 2 3 4 12 13 Meter terminals...

Page 39: ...face RLYOUT Dry contact output a group of normally open contact passive dry contact PARCAN EMS RLYOUT Cables BMS COM Cable Screw cap The insulator Screw Com sheet cover Single hole seal ring 2 4 6 1 3...

Page 40: ...erface cable A 10M length meter communication cable is already attached to the inverter when you received it and this cable could be extended up to 100M Insert the RJ45 heads into the meter RS485 port...

Page 41: ...to insert it to the BMS interface of the inverter and Sub Master BMS 1 The EMS communication between inverter and battery should be connected through the RJ45 cable that is attached to the inverter wh...

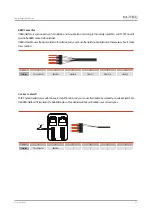
Page 42: ...regulation and M TEC doesn t provide the DRED device for the customer DRED connection uses the 6pin terminal on the left side and you can use the matching 6pin terminal in the accessory box to make t...

Page 43: ...rding to your preference Plug the WiFi or LAN module into the WiFi GPRS port in the bottom of inverter by following the direction the side with indicator is up A slight click sound during the installa...

Page 44: ...which you set on the App The inverter display and indicators will show relative parameters and status Turn on the DC Switch on the Sub Master BMS When the indicator light on the Sub Master BMS flashi...

Page 45: ...General Settings Fault Info Modbus Addr Power Factor Product Model RSSI Time Set Feed in Grid xxx H Total Safty Set Safty Code Language Set Export Limit Meter E Total WorkMode Set Battery_ID Set Batt...

Page 46: ...3 Remote set as 0 Local set as 1 then the test order is 59 S1 59 S2 27 S1 81 S2 81 S2 Connect the AC cable auto test will start after the inverter connected to the grid see the operation steps below...

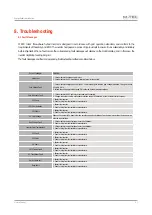
Page 47: ...electricity company DCI Fault 1 Restart the inverter 2 Seek for help from the installer or manufacture ISO Over Limitation 1 Restart the inverter 2 Seek for help from the installer or manufacture GFC...

Page 48: ...least 5 minutes for inner capacitors to discharge completely 3 Verify that there is no voltage or current before pulling any connector Caution Keep non related persons away Caution A temporary warnin...

Page 49: ...Energy Butler Hybrid Series User Manual 49 Tel 43 7612 20805 Website http www mtec wp com Address Aum hlweg 20 4812 Pinsdorf...

Reviews: