background image

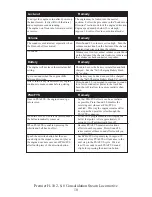
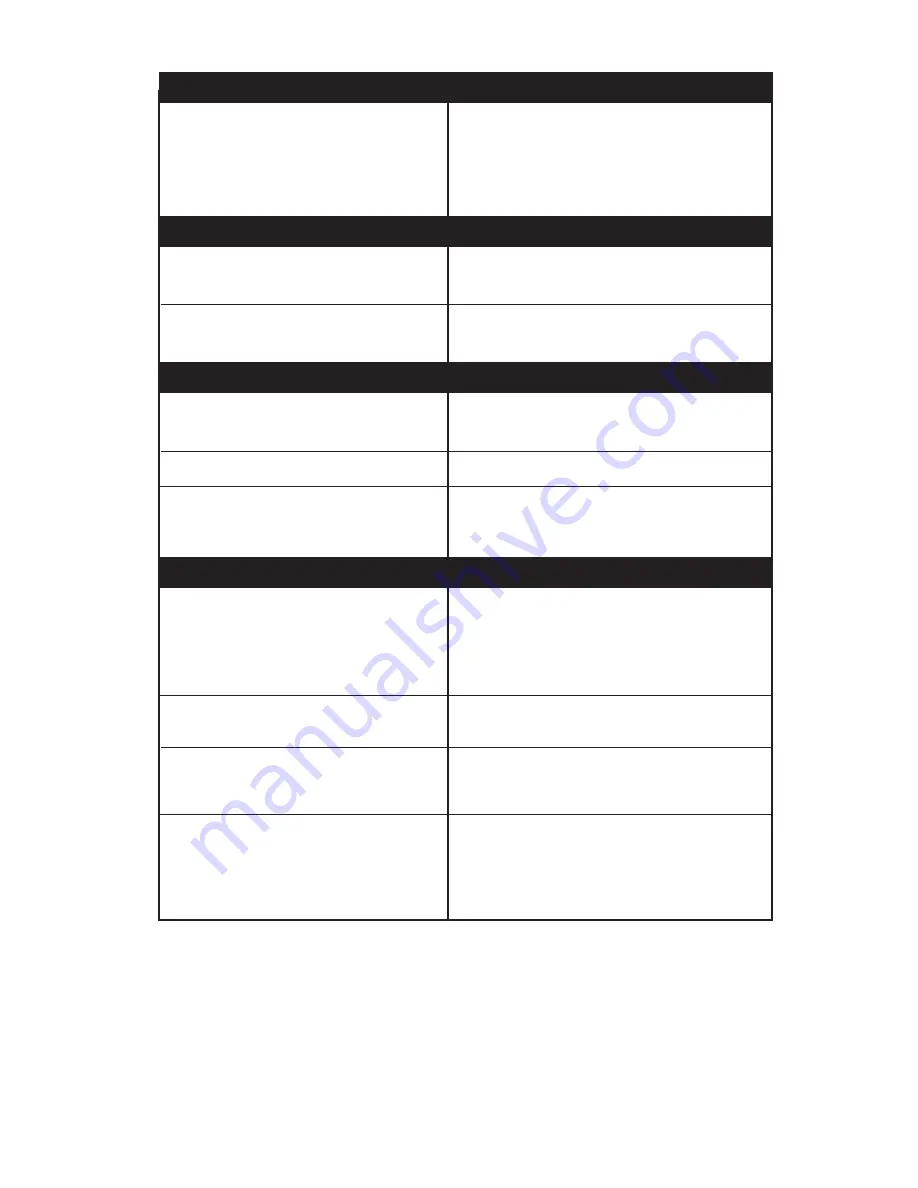
Volume

Remedy

The sounds seem distorted, especially when 
the Horn or bell is activated.

No Sound

Proto-Sound 2.0 volume is set too high.  Turn the 
volume control knob on the bottom of the chassis 
counter-clockwise to reduce the volume.
Volume is set too low, adjust volume control knob 
on the bottom of the chassis clockwise to increase 
the volume or check connector to speaker.

Battery

Remedy

The engine will not leave the initial neutral 
setting.

I get no sounds when the engine shifts 
between directions. 
After I turn off my transformer, my engine 
continues to make sounds before quitting.

Check to be sure the battery is installed and fully 
charged.  See the "Self-Charging Battery Back-
Up" section.
The battery may be dead or need to be charged.  
See the "Self-Charging Battery Back-Up" section.
Proto-Sound 2.0 is designed to continue to sound 
for a few seconds after power to the track has 
been shut off to allow for a more realistic shut-
down.

Lock-out

Remedy

I can't get the engine to run after I power up 
the transformer.  It sits still with the diesel 
and compressor sounds running.
The engine won't lock into forward, neutral, 
or reverse.

The engine maybe locked into the neutral 
position.  Follow the procedure in the "Lock into a 
Direction" section to unlock the engine's direction.
Engine speed must be below 10 scale mph 
(approx. 10 volts or less in conventional mode). 

PSA/FYS

Remedy

Once in PSA/FYS, the engine doesn’t go 
into reverse.

When the PSA/FYS enters its last sequence 
the bell automatically comes on

When PSA/FYS is enabled, pressing the 
whistle and bell has no effect

I push the direction button but the next 
sound clip in the sequence does not play or 
the engine does not come out of PSA/FYS 
after fourth press of the direction button.

So that PSA/FYS effects can be as realistic 
as possible, Proto-Sound 2.0 disables the 
reversing unit whenever PSA/FYS is 
enabled.  This way the engine remains still at 
its stop as the operator cycles through the 
PSA/FYS sequences.
PSA/FYS is programmed to start ringing the 
bell at that point.  After approximately 12 
seconds, it will automatically turn off.
Because PSA/FYS must control various 
effects in each sequence, Proto-Sound 2.0 
takes control of these sound effects until you 
exit PSA/FYS 
Each PSA/FYS clip must play for aprox. 30 
seconds before PSA/FYS will advance to the 
next step in the PSA/FYS cycle.  Wait at 
least 30 seconds in each PSA/FYS sound 
clip before pressing the direction button.

Premier H-10 2-8-0 Consolidation Steam Locomotive

18

Summary of Contents for Premier H10

Page 1: ... page 20 and is compatible with most other 3 rail locomotives rolling stock and accessories This locomotive is equipped with Proto Sound 2 0 with Digital Command System DCS This new system will allow you to operate your locomotive in Command mode when used with the DCS Remote Control System sold separately or Conventional mode Conventional operating features are described in the following pages wh...

Page 2: ...ol 8 Lock into a Direction 9 Reset to Factory Defaults 9 Automatic Sounds 9 Maintenance 10 ProtoSmoke Unit Operation 10 Lubrication and Greasing Instructions 12 Traction Tire Replacement 13 Light Replacement Instructions 14 Self Charging Battery Back Up 16 Troubleshooting 17 Compatibility 19 Transformer Compatibility Chart 20 Additional Features with DCS Remote Control System 21 Safety Precautions...

Page 3: ...on see Fig 4 on pg 10 Running the engine without a primed smoke unit may cause damage See the ProtoSmoke Unit Operation section of this book for more information on smoke unit maintenance 4 Place the engine on the track then insert the reverse unit plug that extends out of the tender into the receptacle at the back of the boiler cab Figure 1a WARNING DO NOT CONNECT THIS ENGINE TOA TENDER FROMANOTH...

Page 4: ...ou turn it on until you press and release the button again to turn it off Direction Your train is programmed to start in neutral The first direction after neutral upon start up is forward Firmly press and release the Direction button to allow the engine to move forward Just as you must stop your automobile between forward and reverse this engine will not go directly from forward to reverse it goes...

Page 5: ...w the horn or ring the bell you should tap the buttons very quickly with a second pause between button presses You may need to practice your timing to make this work smoothly Timing Chart Total Time Lapse 1 Seconds Press Horn Short Firm Sec Pause Sec Pause Press Bell Short Firm Press Bell Short Firm Feature to Be Activated Button Code Freight Yard or Passenger Station Sounds Fire the Rear Coupler ...

Page 6: ...equence is complete After waiting about 30 seconds for that sequence to run press the Direction button again to trigger the second sequence of PSA FYS After about 30 seconds press the Direction button again to trigger the third PSA FYS sequence Again after allowing about 30 seconds for that sequence to run press the Direction button one more time to trigger the fourth and final PSA FYS sequence Th...

Page 7: ... Horn Fire Front Coupler Horn Horn Bell Tips on Using PSA FYS You can terminate PSA FYS at any time by turning off power to the track for 15 seconds You do not have to be in Forward to use PSA FYS At the conclusion of the full sequence the train will pull away from the station in whatever direction you were going when you activated the feature You can use PSA FYS even if you are double heading wit...

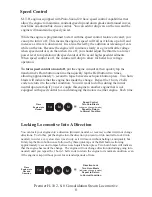
Page 8: ...epeat the 1 horn 2 bells code to return it to the other condition You will want to do this during the initial neutral upon start up if you ever couple this engine to another engine that is not equipped with speed control to avoid damaging the motors in either engine Each time Speed Control Horn Place Engine into Neutral Bell Bell Speed Control Two Horn Blasts indicates change is made Repeat to Ret...

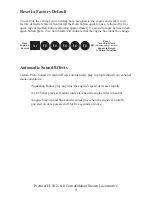
Page 9: ...ve seconds or more Reset to Factory Default To override the settings you currently have assigned to the engine and reset it to its factory defaults while in Neutral tap the Horn button quickly once followed by five quick taps of the Bell button allowing approximately second to lapse between each quick button press Two horn blasts will indicate that the engine has made the change Reset Two Horn Bla...

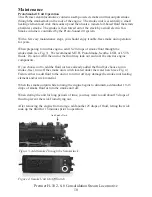
Page 10: ... the unit or the fluid may leak out and coat the interior engine components If you choose not to add the fluid or have already added the fluid but choose to run smoke free turn off the smoke unit switch located under the water hatch see Fig 4 Failure either to add fluid to the unit or to turn it off may damage the smoke unit heating element and or wick material When the smoke output while running ...

Page 11: ... a small screwdriver 3 With the board free of the bracket use a phillips head screwdriver to remove the bracket from the inside of the boiler shell see figure 5a 4 Set the board and the bracket aside unscrew the one screw holding the smoke unit assembly from the boiler shell Slide the smoke unit assembly all the way towards the back of the boiler to free it Once the unit is freed remove the inspec...

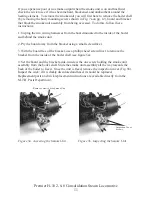
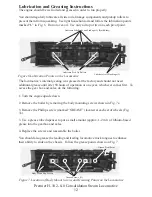
Page 12: ... Remove the boiler by removing the body mounting screws shown in Fig 7a 3 Remove the Phillips screw marked GREASE located at each set of wheels Fig 7a 3 Use a grease tube dispenser to put a small amount approx 1 2 ml of lithium based grease into the gearbox and axles 4 Replace the screws and reassemble the boiler You should also grease the leading and trailing locomotive truck tongues to enhance t...

Page 13: ...the drive wheel using a razor blade or small flathead screwdriver to pry away any remains 3 Slip the new tire onto the wheel You may find it useful to use two small flathead screwdrivers to stretch the tire over the wheel 4 If you twist the tire while stretching it over the wheel you will need to remove and reinstall the tire Otherwise your engine will wobble while operating 5 Make sure the tire i...

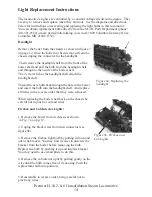
Page 14: ...ach the headlight shell Thread the new bulb back through the hole in the boiler and insert the bulb into the headlight shell And replace all items in the reverse order that they were removed When replacing the boiler shell back on the chassis be careful not to pinch or cut and wires Firebox and Cab Interior Lights 1 Remove the boiler from its chassis as shown in Fig 7a on pg 12 2 Unplug the black ...

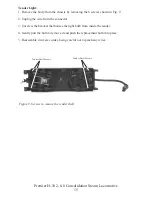
Page 15: ... bracket that houses the light bulb from inside the tender 4 Gently pull the bulb to remove it and push the replacement bulb into place 5 Reassemble in reverse order being careful not to pinch any wires Figure 9 Screws to remove the tender shell Tender Shell Screws Tender Shell Screws Premier H 10 2 8 0 Consolidation Steam Locomotive 15 ...

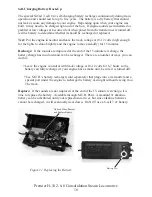
Page 16: ...end of the 15 minute test charge the battery charge has run down and can be recharged There are a number of ways you can do this Leave the engine in neutral with track voltage at 10 12 volts for 6 7 hours so the battery can fully recharge if your engine has a smoke unit be sure it is turned off Use M T H s battery recharger sold separately that plugs into a wall outlet and a special port under the...

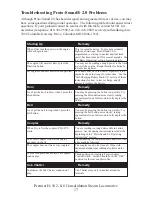
Page 17: ...tructions for how to test recharge and if necessary replace the battery Coupler Remedy When I try to fire the coupler PSA FYS starts The Proto Coupler won t let the engine uncouple on the fly The coupler does not fire or stay coupled The rear coupler does not fire but coupler sounds play You are waiting too long between Horn button presses See the timing instructions located at the beginning of th...

Page 18: ...maybe locked into the neutral position Follow the procedure in the Lock into a Direction section to unlock the engine s direction Engine speed must be below 10 scale mph approx 10 volts or less in conventional mode PSA FYS Remedy Once in PSA FYS the engine doesn t go into reverse When the PSA FYS enters its last sequence the bell automatically comes on When PSA FYS is enabled pressing the whistle ...

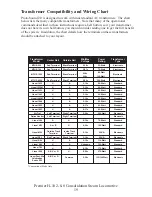
Page 19: ...dard Lionel 1053 U A 8 17v 60 Watt Standard Lionel 1063 U A 8 17v 60 Watt Standard All Trol Left Terminal Right Terminal 0 24v 300 Watt Electronic Dallee Hostler Left Terminal Right Terminal Electronic Lionel LW A U 8 18v 75 Watt Standard Lionel KW A or B U 6 20v 190 Watt Standard Lionel MW Outside Track Terminal Inside Track Terminal 5 16v 50V A Electronic Lionel RS 1 Red Terminal Black Terminal ...

Page 20: ... locomotives user defined actions including sound lights and smoke Proto Dispatch Operation Public Address like feature allows users to speak through locomotive speaker during operation Proto Cast Allows users to play audio recordings through locomotive speaker during operation Proto Doppler Sound Effects Set Up Users can configure locomotive for Doppler Operation including setting distance points...

Page 21: ...her you discussed the problem with a service technician when contacting the Service Center for your Return Authorization Please make sure you have followed the instructions carefully before returning any merchandise for service Authorized M T H Service Centers are independently owned and operated and are not agents or representatives of M T H Electric Trains M T H assumes no responsibility financi...

Reviews: