background image

  11

Once the installer has finished, you can shut down your computer. Plug the FireWire SOLO into your computer’s FireWire Port. When the FireWire 
SOLO is connected, turn the computer back on. Once the operating system has loaded, go to “System Preferences” in the Apple Menu. Select the 
“Sound” preference panel, and click the “Output” tab. Select “M-Audio FireWire SOLO” to choose the FireWire SOLO as your default output device.

Your FireWire Solo is now installed ready to use.

Hardware Connections

Audio

Connect the FireWire Solo’s Line Outputs 1 & 2 to your amplifier, powered monitors, or mixer. 

Connect your headphones to the FireWire Solo’s headphone outputs.

Connect your microphone to the FireWire Solo’s front panel Mic Input.

Connect your guitar or bass to the FireWire Solo’s front panel Guitar input.

<   

Alternatively, you can connect your line-level sources to the FireWire Solo’s rear panel line inputs. Remember to select the REAR position on 
the front panel’s FRONT/REAR selector.

Connect your S/PDIF digital devices to the FireWire Solo’s coaxial digital I/O. 

Software Control Panel 

The FireWire Solo’s driver software provides a simple yet powerful interface with your computer and Digital Audio Workstation software. The control 
panel gives you a four-channel software mixer, allowing you to route any of the FireWire Solo’s four inputs (two analog and two S/PDIF) to any of 
the four outputs (two analog and two S/PDIF).

The FireWire Solo control panel is installed in your system when you complete the driver installation procedure. To open the control panel:

In Windows – A tiny red logo will be placed in the system tray, generally located at the bottom of your Windows desktop. Double-click this icon to 
open the control panel.

On the Mac – The FireWire Solo control panel can be found in the system preferences.

NOTE: 

The FireWire Solo control panel can also be opened from an ASIO-compliant music program’s audio setup page.
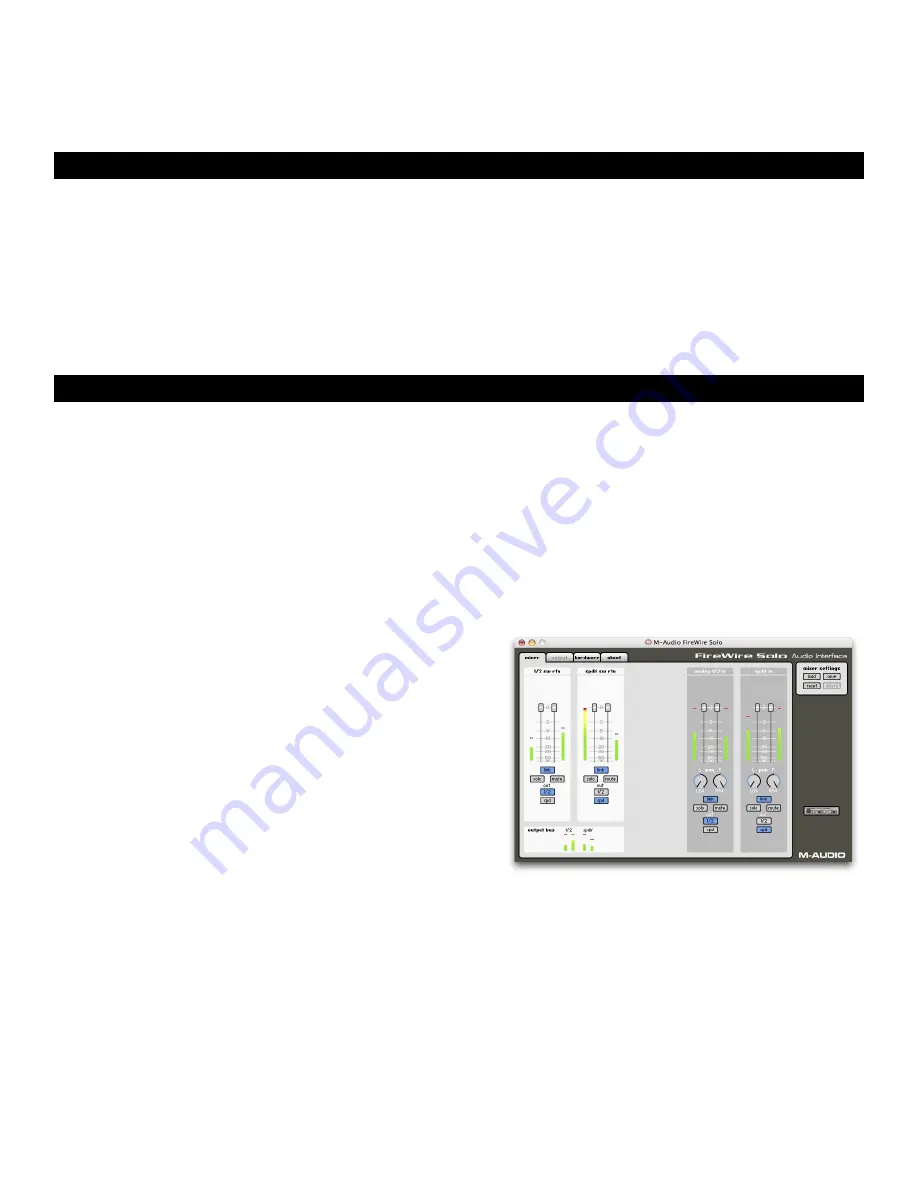
Mixer Page

The 

Mixer 

page  provides  output  routing  and  control  of  the  FireWire  Solo’s 

analog and digital inputs, as well as the four virtual channels returning from 
your Digital Audio Workstation software. It also provides input and output level 
meters, level controls, stereo linking, solo and mute functions.

Mixer Settings

These four buttons allow you to save and recall mixer settings as needed.

Reset Button

This button returns the control panel settings to their default values. These 
default values can be found in the section on product specifications.

Load, Save, Delete Buttons

These buttons will open a Windows or Mac file dialog box within your audio 
application, with the corresponding load, save or delete function selected.

Channel Returns

The Mixer page provides you with control over the FireWire Solo’s audio routing. On this page you will find metering and faders for four stereo 
pairs:

Software Returns (1/2 SW RTN, S/PDIF SW RTN)

The Mixer


page provides access to four virtual audio “returns” from your audio application. These returns are available in two stereo pairs, and 

are labeled 

1/2 sw rtn

 and

 spdif sw rtn

. These returns will appear in your DAW program’s output mixer settings as available audio outputs.

Most likely, you will control the output monitor levels from your audio program’s mixer, and will want to keep its faders at their maximum level. 
However, you may find it convenient to adjust them here in the mixer page, if you are, for example, setting up a balance between input levels 
and

 sw rtn

 levels.

Summary of Contents for FireWire Solo

Page 1: ...User s Guide Guide de l utilisateur Benutzerhandbuch Manual del usuario Manuale dell utente...

Page 2: ...r computer is not equipped with a native FireWire port you may purchase a FireWire PCI card at any computer electronics retailer The FireWire Solo can deliver high quality analog and digital I O in fu...

Page 3: ...rates of 44 1k 48k 88 2k and 96kHz Mounting the device to a rack drawer Holes are located on the left and right of the bottom of the FireWire Solo to allow you to mount this device to a rack tray The...

Page 4: ...signal level exceeds 1 dBFS If the Clip Indicator glows steadily reduce the Guitar Input gain level 8 8 Guitar Input Gain This knob controls the amount of gain at the Guitar Input 6 over a range of 0...

Page 5: ...10 19 Line Inputs Unbalanced analog line inputs on 1 4 phone connectors These connectors are only active when the front panel Front Rear Input Selector 5 is set to Rear IN position Input from these co...

Page 6: ...ing the installation you will be prompted with a message warning that the driver software has not passed Windows Logo testing Select Continue Anyway and proceed with the installation The installer wil...

Page 7: ...on your computer Once Windows has fully loaded the New Hardware Wizard will open Choose the default selection Install the software automatically Click Next Windows will locate and install the FireWir...

Page 8: ...on in your system tray lower right corner of your desktop Click on the icon to open the FireWire Solo control panel Mac OSX Version 10 2 8 Jaguar Insert the M Audio driver CD into your CD ROM drive an...

Page 9: ...ment Click Continue and then click Agree if you agree with the License Agreement Select a destination disk for the installation then click Continue On the Easy Install box click Install On the followi...

Page 10: ...ady to use Mac OS X version 10 3 x Panther Insert the M Audio driver CD into your CD ROM drive and open the CD to view its contents Double click the dmg le which launches the M Audio Installer An M Au...

Page 11: ...OK and then click Install On the following box click Continue Installation You will then see the Connect Device Warning box instructing you to NOT connect your FireWire Solo until the driver installa...

Page 12: ...enerally located at the bottom of your Windows desktop Double click this icon to open the control panel On the Mac The FireWire Solo control panel can be found in the system preferences NOTE The FireW...

Page 13: ...audio output deselecting the solo button will resume audio output on all channels Multiple solo selections are possible Panning Controls The Hardware Input channel pairs also offer virtual Pan pot con...

Page 14: ...is initially too low but be careful that the recording level is not reaching digital clipping going into the red while recording Using the Line Inputs Connect your line level output device to the Fire...

Page 15: ...e type monitoring you can enable it in your DAW s ASIO or audio control panel Please refer to your audio software s documentation for additional information WDM input monitoring If you are running a W...

Page 16: ...e Generally FireWire devices do not suffer from the IRQ con icts sometimes encountered with PCI cards If you are having trouble getting audio into or out of your FireWire Solo please check the followi...

Page 17: ...el Hempstead Herts HP2 7BJ England Sales Information phone 44 0 1442 416590 Sales Information fax 44 0 1442 246832 Sales Information email info maudio co uk Technical Support PC 44 0 1309 671301 Techn...

Page 18: ...dB 48kHz a weighted Dynamic Range min gain 101 dB 48kHz a weighted THD N min gain 0 0079 82 dB 1kHz 1dBFS 48kHz Frequency response min gain 0 25dB 20Hz to 20kHz 48kHz 0 3 dB 20Hz to 40kHz 96kHz Impeda...

Page 19: ...o com warranty for terms and limitations applying to your speci c product Warranty Registration Thank you for registering your new M Audio product Doing so immediately both entitles you to full warran...

Page 20: ...041029_FWSolo_UG_01...

Reviews: