background image

English  

- 55 -

Viewing Photos via USB

When you select Photos from the main options, 
available image 

fi

 les will be 

fi

 ltered and listed on this 

screen.

Jump (Numeric buttons)

:Jump to selected 

fi

 le using 

the numeric buttons.

OK

: Views the selected picture in full screen.

  /   : Navigate menu

Slideshow (  button)

: Starts the slideshow using 

all images.

GREEN button

: Views images in thumbnails.

RED button

: Sorts 

fi

 les by date.

Yellow 

Button: Change viewing style

BLUE:

 Changes media options.

Slideshow Options

Pause (  button)

 : Pauses the slideshow.

Continue (  button)

 : Continues the slideshow.

Loop/Shuf

fl

 e (GREEN button)

: Press once to disable 

Loop. Press again to disable both Loop and Shuf

fl

 e. 

Press once more to enable only Shuf

fl

 e. Press again 

to enable all. You can follow the disabled functions 
with the change of the icons.

Previous/Next (Left/Right buttons)

: Jumps to 

previous or next 

fi

 le on slideshow.

Rotate (Up/Down buttons)

: Rotates the image using 

up/down buttons.

RETURN (Exit):

 Back to 

fi

 le list.

INFO

: Displays help screen.

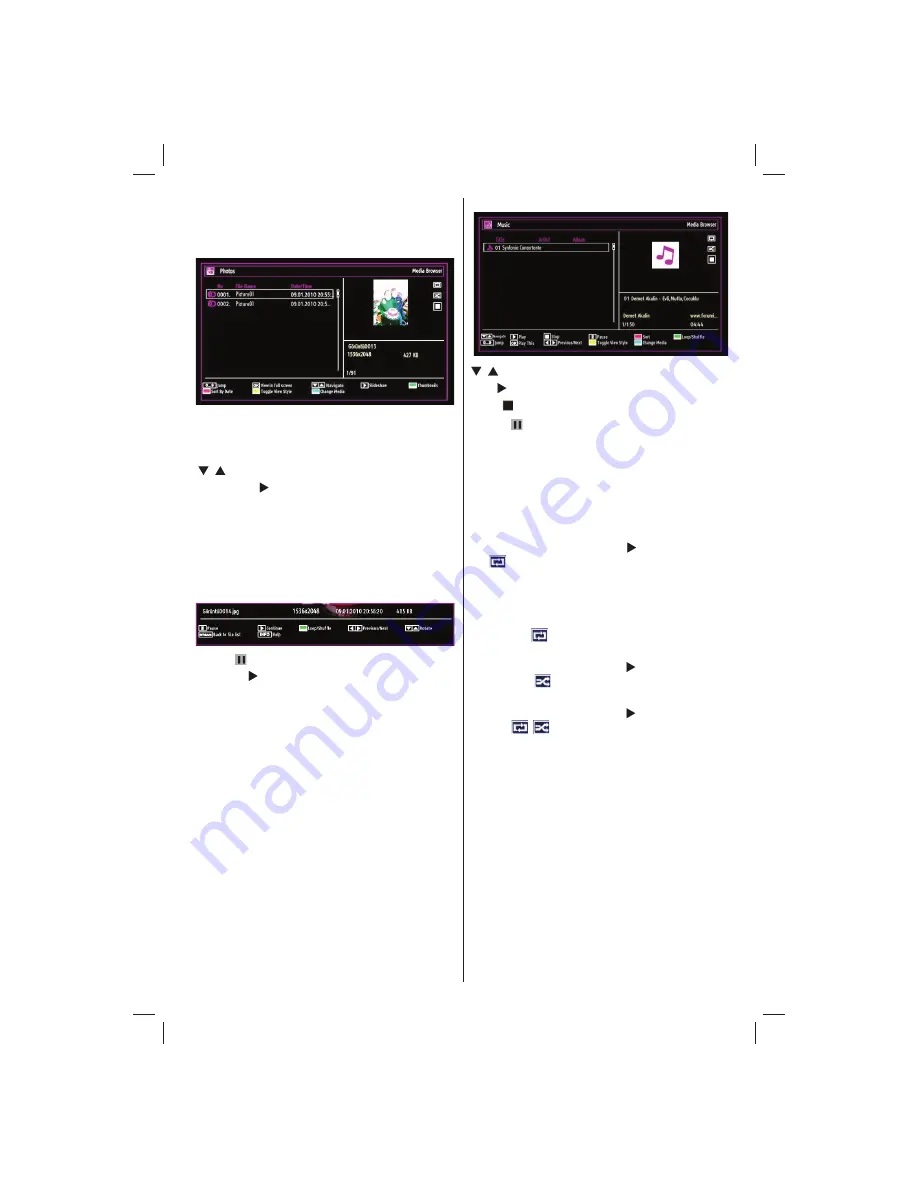
Playing Music via USB 

When you select Music from the main options, 
available audio 

fi

 les will be 

fi

 ltered and listed on this 

screen.

/   : Navigate menu

Play   button): 

Starts the playback.

Stop (  button)

 : Stops playback.

Pause (  button)

 : Pauses the selected playback.

RED  

button: Sorts 

fi

 les by Title,Artist or Album.

Loop/Shuf

fl

 e (GREEN button)

: Press once to disable 

Loop. Press again to disable both Loop and Shuf

fl

 e. 

Press once more to enable only Shuf

fl

 e. Press again 

to enable all. You can follow the disabled functions 
with the change of the icons.
Note:
If you start the playback with the   button and activate 
the 

 symbol, the TV will play the next music/video 

fi

 le. The playback will proceed accordingly and when 

the end of the list is reached, it will be played again 
from the beginning (loop function).
If you start the playback with the OK button and 
activate the 

 symbol, the same music or video 

fi

 le 

will be played in a loop (repeat function).
If you start the playback with   or OK button and 
activate the 

 symbol, music or video 

fi

 le will be 

played in a shuf

fl

 e.

If you start the playback with   or OK button and 
activate 

 symbols, music or video 

fi

 le playback 

will continue randomly and the random playback will 
continue.

0..9 (Numeric buttons):

 The TV will jump to the 

fi

 le starting with the letter you input via the numeric 

buttons on your remote control.

Play This (OK button)

 : Plays the selected 

fi

 le.

Previous/Next (Left/Right buttons)

 : Jumps to 

previous or next 

fi

 le to play.

Yellow 

Button: Change viewing style

BLUE:

 Changes media options.

Note:

 If the Viewing Style is set to Folder in Media 

Browser Settings, Music folder will be displayed as 
sorted and there is no need to sort 

fi

 les again by 

pressing FAV button.

INFO

: Changes 

fi

 lter options.

02_MB62_[GB]_(01-TV)_woypbpr_DVBT_C_PVR_NICKEL17_1910UK_32911W_10078118_50214306.indd   55

02_MB62_[GB]_(01-TV)_woypbpr_DVBT_C_PVR_NICKEL17_1910UK_32911W_10078118_50214306.indd   55

26.03.2012   14:24:15

26.03.2012   14:24:15

Summary of Contents for LCD32LXC

Page 1: ...BRUKSANVISNING F R BRUKSANVISNING OPERATING INSTRUCTIONS F RG TV MED FJ RRKONTROLL FARGE TV MED FJERNKONTROLL COLOUR TELEVISION WITH REMOTE CONTROL LCD32LXC...

Page 2: ...nnel 52 Deleting a Channel 52 Renaming a Channel 53 Locking a Channel 53 Managing Stations Favourites 53 Button Functions 53 Managing Stations Sorting Channel List 53 On Screen Information 53 Viewing...

Page 3: ...at least 10 cm all around the set To prevent any fault and unsafe situations please do not place any objects on top of the set Use this device in moderate climates 10 cm 10 cm 10 cm Safety Precautions...

Page 4: ...tems for recycling in the EU For more information please contact the local authority or the dealer where you purchased the product Disconnecting the Device The mains plug is used to disconnect the TV...

Page 5: ...kaging away from children as there is danger of suffocation The Standby button does not fully switch off this product Moreover the device continues to consume power in standby mode In order to separat...

Page 6: ...the mains plug This will also reduce energy consumption Note that annually using the TV set in Power Save Mode has more power efficiency than disconnecting the TV from the mains plug instead of keepi...

Page 7: ...hedule in EPG Tag 20 Untag All in favourite list Play Slideshow in Media Browser Loop Shuffle in Media Browser Picture mode selection Changes picture mode 21 in Media Browser video mode No function 22...

Page 8: ...ction RF Input 3 connects to an aerial antenna system or a cable Note If you use a decoder or a media recorder you should connect the aerial cable through the device to the television with an appropri...

Page 9: ...e used for connecting audio signals of external devices Connect the audio 4 cable between the AUDIO INPUTS on the TV and the AUDIO OUTPUT jacks on your device Note If you connect a device to the TV vi...

Page 10: ...USB player and especially the USB device itself Do not pull out USB module while playing or recording a file Programme Recording To record a programme you should first connect a USB disk to your TV w...

Page 11: ...ay occur Therefore this type of connection is not recommended You should use VGA connection instead Using Side AV Connectors You can connect a range of optional equipment to your TV using the side con...

Page 12: ...you want to connect a DVD player to your TV you can use the connectors of the TV set DVD players may have different connectors Please refer to your DVD player s instruction book for additional informa...

Page 13: ...o select the next programme Programme Selection Direct Access Press the numeric buttons on the remote control to select programmes between 0 and 9 The TV will switch to the selected programme Viewing...

Page 14: ...TV will start to record the selected progamme You can press again to stop the recording Note Switching to a different broadcast or source is not available during the recording Page left Page right Pr...

Page 15: ...hing on the TV for the first time installation When the TV is operated for the first time installation wizard will guide you through the process First language selection screen will be displayed Use o...

Page 16: ...llation Press MENU button on the remote control and select Installation by using or button Press OK button and the following menu screen will be displayed Select Automatic Channel Scan Retune by using...

Page 17: ...or button to set an option Enter the channel number or frequency using the numeric buttons You can then press OK button to search When the channel is located any new channels that are not on the list...

Page 18: ...by using the Channel List options Press MENU button to view main menu Select Channel List item by using or button Press OK to view menu contents Select Edit Channel List to manage all stored channels...

Page 19: ...ect a channel by using or button Press OK button to add selected channel to favourites list Press OK button again to remove Button Functions OK Add remove a station YELLOW Tag untag a channel GREEN Ta...

Page 20: ...letter you input via the numeric buttons on your remote control Play This OK button Plays the selected file Navigate menu Lang Play Preview Displays selected file in a small preview screen RED Sorts...

Page 21: ...le both Loop and Shuffle Press once more to enable only Shuffle Press again to enable all You can follow the disabled functions with the change of the icons Note If you start the playback with the but...

Page 22: ...le language Subtitle Position Sets subtitle position as up or down Subtitle Font Size Sets subtitle font size max 54pt Timeshift Recording IMPORTANT To record a programme you should first connect a US...

Page 23: ...or button and press OK button to enter Recordings Library will then be displayed IMPORTANT To view recordings library you should first connect a USB disk to your TV while the TV is switched off You s...

Page 24: ...s zooms up the wide picture 16 9 aspect ratio with subtitles to the full screen Note You can shift to screen up or down by pressing buttons while picture zoom is selected as panaromic 14 9 Zoom Cinema...

Page 25: ...tone Setting Cool option gives white colours a slight blue stress For normal colours select Normal option Setting Warm option gives white colours a slight red stress Picture Zoom Sets the picture size...

Page 26: ...s volume level Equalizer Press OK button to view equalizer sub menu In the equalizer menu the preset can be changed to Music Movie Speech Flat Classic and User Press the MENU button to return to the p...

Page 27: ...s inserted No Common Interface module detected message appears on the screen Refer to the module instruction manual for details of the settings Viewing Conditional Access Menu These menu settings may...

Page 28: ...sure you write it down and keep it safe Timers To view Timers menu press MENU button and select Settings icon by using or button Press OK button to view Settings menu Use or button to highlight Timers...

Page 29: ...ored on the USB disk will be lost in such a case Press OK button while the Format Disk option is highlighted A menu will appear on the screen requiring you to enter a pin number If you have not change...

Page 30: ...tware by selecting Scan for upgrade Application version Displays the current application version Hard of Hearing If the broadcaster enables any special signal concerning the audio you can set this set...

Page 31: ...ay be aborted Teletext function buttons are listed below TXT Teletext Mix Activates teletext mode when pressed once Press again to place the teletext screen over the programme mix Pressing again will...

Page 32: ...the aerial If you are in doubt consult your dealer No Picture means that your TV is not receiving a transmission Have you selected the correct button on the remote control Try once more Also make sur...

Page 33: ...920x1080 60 HzB 22 1920x1200 60HzA 23 1920x1200 60Hz Appendix B AV and HDMI Signal Compatibility Input Signal Types Source Supported Signals Available EXT SCART PAL 50 60 O NTSC 60 O RGB 50 O RGB 60 O...

Page 34: ...found it starts to download the upgrade A progress bar indicates the remaining download progress When the download completes successfully a message is displayed for reboot to activate new software Pr...

Page 35: ...x WxH 15360x8640 4147200bytes Progressive JPEG max WxH 1024x768 6291456bytes bmp max WxH 9600x6400 3840000bytes Subtitle sub srt Products Battery Information for Users on Disposal of old Equipment and...

Page 36: ...5818 6 and UK DTT profile Frequency range 474 850 MHz for UK models 170 862 MHz for EU models Transmission standard DVB T MPEG 2 MPEG 4 Demodulation COFDM with 2K 8K FFT mode FEC all DVB modes Video M...

Reviews: