background image

BELT DRIVE ANALOG PLAYER PD-151

17

6.  Lowering the arm lifter allows the tone arm to be lowered 

and playback to start.

Increase sound volume of the amplifier after the tip of 
the stylus contacted a record. When the tip of the stylus 
contacts a record in a state that the volume is in a high 
position, a loud sound will come out from speakers.

7.  When playback ends, raise the arm lifter and put the tone 

arm back on the arm rest, and then press the start/stop 
switch to stop the platter.

To prevent the stylus tip and records from being dam-
aged, be sure to use the arm lifter to raise or lower the 
tone arm.

Safety caution

Caution

Moving 

parts

Be careful not to get your hands, clothing or 
hair closer to the motor pulley section when 
the turntable is rotating.

Please pay attention especially to children when 
they are around.
Please keep in mind that it can result in injury if 
fingers get caught between the motor pulley and 
the belt.

Summary of Contents for PD-151

Page 1: ...BELT DRIVE ANALOG PLAYER PD 151 Owner sManual ...

Page 2: ...Contents Precautions 1 Features of This Unit 2 Before Use 4 Names and Functions 6 How to assemble 10 Connections 14 Operations 16 Block Diagram 18 Specifications 19 Before Asking for Repair Service 20 ...

Page 3: ...stalled is quickly raised with a heater or the like It depends on the condensation state however this unit can be used af ter disappearance of water droplets by turning on the power and leaving the unit as it is for 1 to 2 hours to keep the unit at room temperature Even in summer dew condensation can occur if this unit is directly exposed to cool air from an air conditioner In such a case the inst...

Page 4: ...the rotation speed is matched with the set rotation speed The indicator will flash in green when the rotation speed is slower than the set speed and flash in blue when it is faster than the set speed 33 45 78 rpm selectable In addition to 33 and 45 rpm SP record of 78 rpm is sup ported Tone arm A universal static balance tone arm for simple cartridge re placement is included as standard equipment ...

Page 5: ...ted due to the adopted vibration absorbing rubber Floating mount The power transformer and the motor are installed with the vibration absorbing rubber to prevent vibration transmitted to the top panel Large sized insulator Vibration absorbing rubber absorbs vibration of the chassis and unnecessary outside vibration such as from an audio rack and converts them to heat Magnesium alloy headshell Magn...

Page 6: ... sure that all accessories shown below are in the package No cartridge is included Platter Rubber mat Flathead screwdriver for rotation speed adjustment Headshell Counterweight Rubber belt EP adaptor Platter mount handle 2 pieces 0 0 5 2 5 1 ...

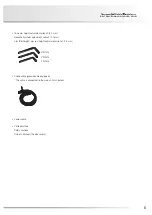
Page 7: ...dshell cylinder adjustment wrench 2 0 mm Arm lifter height arm rest height adjustment wrench 1 5 mm Phono cable ground cable equipped This cable is connected to the main unit at shipment Power cable Printed matters Safety cautions Owner s Manual This document 2 5 mm 2 0 mm 1 5 mm ...

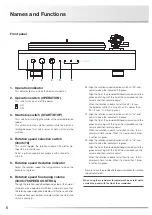
Page 8: ...o keep the indicator lit in green Align the tip of the provided flathead screwdriver to the groove matching with the tip of the screwdriver on the volume and then rotate to adjust When the rotation speed is faster than 33 1 3 rpm the indicator will flash in blue When it is slower than 33 1 3 rpm it will flash in green 45 Align the rotation speed selection switch to 45 and adjust to keep the indica...

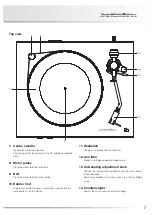
Page 9: ...t Suppresses platter squeaks and brings a record into inti mate contact with the platter 11 Headshell Couples a cartridge with the tone arm 12 Arm lifter Moves a cartridge upward and downward 13 Anti skating adjustment knob Cancels the inward force applied to the tone arm during record playback Adjust in accordance with stylus pressure of the cartridge in use 14 Counterweight Adjusts the stylus pr...

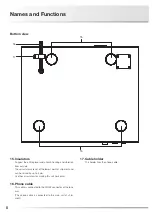
Page 10: ...ulators are set at the lowest point at shipment and can be raised by up to 5 mm Use these insulators for making this unit horizontal 16 Phono cable This cable is connected to the DIN5P connector of the tone arm The phono cable is connected to the main unit at ship ment 17 Cable holder This holder fixes the phono cable 16 15 15 17 ...

Page 11: ...ry power cable to supply the power from the AC outlet on the wall 19 Hinge support bracket mounting sections Mounting sections for an optional dust cover OPPD DSC151 Screws for mounting of the hinge support bracket are at tached When not using a dust cover do not remove the screws 19 19 18 ...

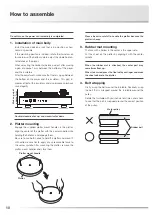
Page 12: ...he center of the platter with the center spindle while holding the handles and engage them Be sure to use both hands to hold the platter and mount it with extreme care not to apply any unreasonable force to the center spindle After mounting the platter remove the platter mount handles and store them Platter mount handle Platter Please be extra careful to handle the platter because the platter is h...

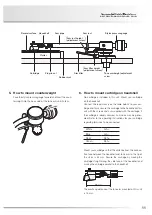
Page 13: ...gener ated Refer to the operating instructions for your cartridge regarding terminals to be connected White Lch Blue Lch Red Rch Green Rch Mount your cartridge so that the distance from the connec tion face between the headshell and tone arm to the tip of the stylus is 52 mm Secure the cartridge by moving the cartridge straight along the side face of the headshell and making the cartridge parallel...

Page 14: ... tighten the tone arm height adjustment screw Make sure that there is a gap between the lifter and the arm pipe when the tip of the stylus contacts the record 9 Adjustment of horizontal balance Take the tone arm out of the arm rest in a state that the anti skating adjustment knob is aligned to 0 and leave it in a free state Rotate the counterweight to minutely adjust the horizontal balance of the ...

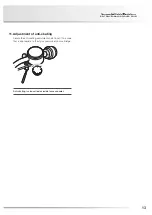
Page 15: ...51 13 11 Adjustment of anti skating Rotate the anti skating adjustment knob to set it to a value that is appropriate to the stylus pressure of your cartridge 0 0 5 2 5 1 0 1 2 3 Anti skating is also called as inside force canceler ...

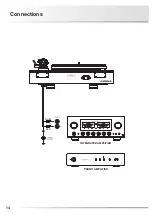
Page 16: ...14 Connections INTEGRATED AMPLIFIER PHONO AMPLIFIER WHITE RED ...

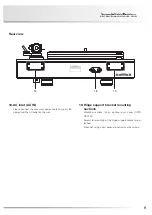
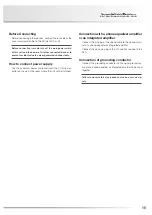
Page 17: ...ssory power cable and insert the AC plug in an outlet on the wall in the room where the unit will be installed Connection with a phone equalizer amplifier or an integrated amplifier Connect the pin plug of the phono cable to the phono termi nal of a phono equalizer or integrated amplifier Connect the white pin plug to the Lch and the red one to the Rch Connection of grounding conductor Connect the...

Page 18: ...h the rotation speed selec tion switch in accordance with a record to be played the platter will start rotating 4 After several seconds the rotation speed deviation indi cator will light When the indicator is flashing adjust the rotation speed finely see page 6 5 Raise the arm lifter disengage the tone arm from the arm rest and move the tone arm to a position where you like to play Rotation speed ...

Page 19: ...ise the arm lifter and put the tone arm back on the arm rest and then press the start stop switch to stop the platter To prevent the stylus tip and records from being dam aged be sure to use the arm lifter to raise or lower the tone arm Safety caution Caution Moving parts Be careful not to get your hands clothing or hair closer to the motor pulley section when the turntable is rotating Please pay ...

Page 20: ...18 Block Diagram SPEED LED regular rotation green lighting fast slow blue green blink PHONO Cable Hall input Speed control 3 phase output Freq generator output ...

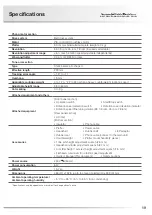
Page 21: ... switch Start Stop switch Rotation speed selection switch Rotation speed deviation indicator Rotation speed fine tuning volume 33 1 3 rpm 45 rpm 78 rpm Rear panel section AC inlet Bottom section Insulator Phono cable Accessories Platter Power cable Headshell Rubber belt EP adaptor Rubber mat Phono cable connect to the main unit Counterweight Platter mount handle 2 pieces Tone arm height adjustment...

Page 22: ...ng The rotation speed is not adjusted Adjust the rotation speed using the rotation speed fine tuning volume speed control 6 No sound is generated Connection between lead wires and the cartridge or between the headshell and tone arm is incom plete Make connections of lead wires firmly Tighten the plug in nut to secure the connection between the head shell and tone arm 11 Connection of the phono cab...

Page 23: ...king sound is induced The stylus pressure is not adjusted appropriately Set the stylus pressure gauge to an appropriate value in accordance with your cartridge 12 A scratch a warp or a stain is present on the record The record is electrostatically charged Do not play a record with a scratch or a warp on this unit Clean the record with a commer cially available cleaner A stain is present on the sty...

Page 24: ...LUXMAN CORPORATION JAPAN AG00987E82A Printed in Japan 1 3 1 Shinyokohama Kouhoku ku Yokohama shi Kanagawa 222 0033 Japan ...

Reviews: