background image

13

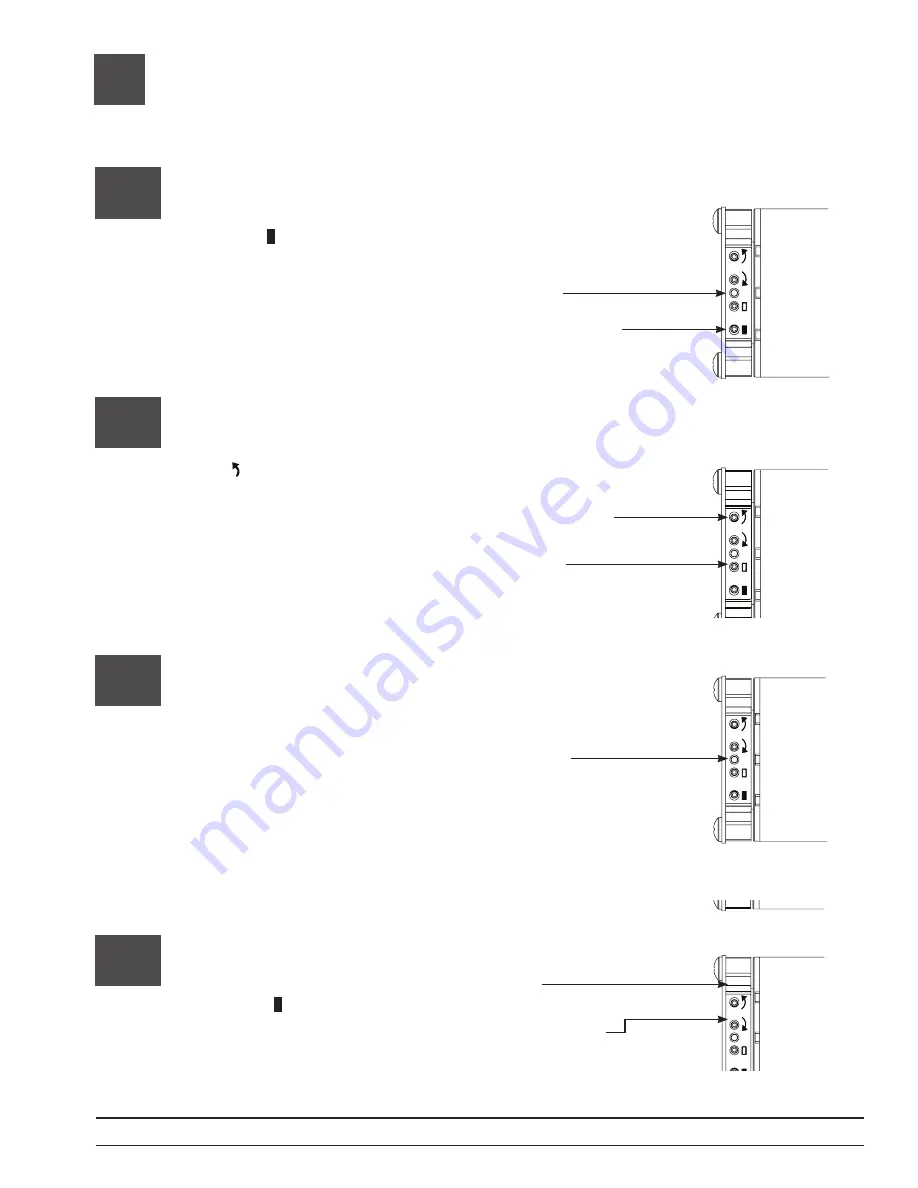
Verify communications

13.1

Enter “link diagnostics mode” by 
pressing and holding the “close 
limit button” (   ) on the EDU for 5 
seconds. The green LED will flash 
quickly for two seconds then turn 
on steady, indicating the EDU  
is ready to begin verifying  
communications with  
other devices.

Green LED
Press and hold the
close limit button 
for 5 seconds

13.2

Initiate “link diagnostics mode” by 
tapping the “counterclockwise 
button” ( ). The green LED will 
begin to flash quickly (8 times per 
second), and the EDU will begin 
to raise and lower a short  
distance (“wiggle”).

Tap the  
counterclockwise  
button

Exit “Link Diagnostics Mode”, by 
pressing and holding the “Close 
Limit Button” (   ) on the EDU for 5 
seconds. All EDUs on the link will 
stop wiggling and their LED will 
turn off.

13.4

LED off

Press and hold the
close limit button
for 5 seconds

Green LED 
flashing quickly

13.3

This EDU is now trying to  
communicate with all other devices. 
All EDUs communicating on the  
link will wiggle and flash their green  
LED quickly. Verify that all other  
devices are able to communicate 
with this device. If you discover any 
EDUs that are not wiggling, verify 
that the EDU is powered and  
wired properly. “Link diagnostics 
mode” will automatically time out 
after 10 minutes.

Green LED 
flashing quickly

Page 18

Sivoia

®

 QS 

roller 100

TM

 Pocket Mount 

Installation instructions

Summary of Contents for Sivoia QS roller 100

Page 1: ...Sivoia QS roller 100TM pocket mount Installation Instructions...

Page 2: ...acket attached 1 4 pin terminal block 2 4 in 102 mm cable ties 2 Extra retaining screws 6 x 1 4 in 6 x 6 mm Phillips head screws 1 Pocket 1 flap and 2 end caps if applicable 8 Mounting screws 8 x 1 75...

Page 3: ...arance of at least 1 3 feet 0 4 meters between the fully lowered system and any permanent object Installation shall be executed by a qualified electrician according to national wiring rules Codes Inst...

Page 4: ...he tube System width must be less than or equal to pocket width System Height System Width Package Label System Width System Height 1 1 Orient pocket for installation as shown to right The shade and s...

Page 5: ...of pocket during installation without pinching the wire Leave 12 to 18 in 305 to 457 mm of cable exposed Wall Drill for cable 5 in 13 mm from end of pocket and 5 in 13 mm from top of pocket Ceiling D...

Page 6: ...headrail Installation of grommet 1 Insert the enclosed grommet into the hole be sure it is completely inserted into the hole 2 Run the power wire through the grommet and finish the installation as per...

Page 7: ...ket must be mounted to support a weight of at least 300 pounds 136 kg The fasteners provided with the sub brack ets may not be appropriate for use in all applications Screws must be at least 6 in 152...

Page 8: ...side edge of the shade tube Note Fabric edge may not line up with the edge of tube 4 2 Once their position has been established insert sub brackets by hooking their lower edges behind notch in pocket...

Page 9: ...s for each shade tube must be mounted to support a weight of at least 300 pounds 196kg The fasteners provided with the sub brackets may not be appropriate for use in all applications If pocket width e...

Page 10: ...lation is inside of the terminal block Notes The EDU connector will support wire sizes from 12 AWG 2 5 mm to 26 AWG 0 2 mm See the instruction sheet for your power supply to choose an appropriate wire...

Page 11: ...wn until bottom of shade brackets rest against sub brackets Note Ensure cable is kept outside the shade bracket 6 4 Final position Note placement of cable NOTICE Shades wider than 4 ft 1 2 m require t...

Page 12: ...ment is not restricted at this point Shades wider than 4 ft 914 mm require two people to center the shade 7 2 Insert and tighten retaining screws on BOTH brackets to secure the shade into position Scr...

Page 13: ...level Adjust shade projection from window so that it clears any window trim or hardware when operating It may be necessary to remove the shade from the pocket to make this adjustment Confirm roller t...

Page 14: ...lock on cable into EDU terminal block a cable tie can be used to secure the terminal blocks together Dress wires to ensure fabric does not rub while the shade is moving 9 1 9 2 Page 13 Sivoia QS rolle...

Page 15: ...y down using the adjustment buttons Place a piece of tape on the side of the tube that the fabric is telescoping away from When finished press the close limit button once This technique is referred to...

Page 16: ...at the EDU is in Set open limit mode Green LED Tap the open limit button 11 2 Adjust the position of the EDU to the desired open limit using the clockwise and counterclockwise buttons Use the counterc...

Page 17: ...EDU to the desired close limit using the clockwise and counterclockwise buttons Use the counterclockwise and clockwise buttons to move the EDU Press and hold the close limit button for 5 seconds The g...

Page 18: ...e tapping the open limit button The shade will travel to the open limit 12 2 Verify the close limit by double tapping the close limit button The shade will travel to the close limit Page 17 Sivoia QS...

Page 19: ...erclockwise button Exit Link Diagnostics Mode by pressing and holding the Close Limit Button on the EDU for 5 seconds All EDUs on the link will stop wiggling and their LED will turn off 13 4 LED off P...

Page 20: ...nd then the EDU will reset The EDU is now restored to factory default settings The limits will not be affected 14 4 Returning an EDU to its factory default setting Returning an EDU to its factory defa...

Page 21: ...nels Check fabric tracking EDU does not move and the LED is blinking red slowly four times and then turning off for 4 seconds The EDU has reached its maximum run time Wait 20 minutes before attempting...

Page 22: ...TIONS This Warranty will be void and Lutron and its suppliers will have no responsibility under this Warranty if Lutron or its representatives can not access any components of the System to inspect di...

Page 23: ...N OR SUCH OTHER PARTY WAS ADVISED OF THE POSSIBILITY OF SUCH DAMAGES NOTWITHSTANDING ANY DAMAGES THAT CUSTOMER MIGHT INCUR FOR ANY REA SON WHATSOEVER INCLUDING WITHOUT LIMITATION ALL DIRECT DAMAGES AN...

Page 24: ...ermany Tel 49 309 710 4590 Fax 49 309 710 4591 FREEPHONE 00800 5887 6635 France Lutron LTC S A R L 90 rue de Villiers 92300 Levallois Perret France Tel 33 0 1 41 05 42 80 Fax 33 0 1 41 05 01 80 FREEPH...

Reviews: