


ALL PROGRAMMING IS OPTIONAL
Programming is not required for default functionality
Reset Factory Default Settings
Test Mode
Note:
It may be necessary to reset the device to factory default settings. Before beginning, ensure the device is
connected and powered.
Note:
Any device associations or programming previously set up with the sensor dimmer / switch will be erased
and will need to be re-programmed after resetting to factory defaults.
1.
Triple-tap
T
and hold until the
ML
lights and the load lights begin to flash rapidly (for the switch) or brighten and
dim rapidly (for the dimmer). Then release
T
.
2.
Within 1 second of releasing
T
, rapidly tap
T
three times again (release after third tap). The
ML
lights and the load
lights will begin to flash slowly (for the switch) or brighten and dim slowly (for the dimmer). This indicates that the
device will reset to factory defaults. Give the device about 10 seconds to complete the reset process.
When in Test Mode, Occupancy has a short timeout (< 15 seconds) that can be used to test the coverage of the
sensor with the existing settings.
1.
Wait at least 2 minutes after power is turned on.
2.
Press and hold
T
until the Sensor LED under the PIR lens turns on (about 3 seconds). This indicates that you are
in test mode. Once you let go of
T
, the Sensor LED will go out. However, it will turn on with any detected motion
and stay on until the 15 second Timeout is allowed to expire.
3.
The device will exit test mode after 5 minutes of inactivity or when
T
is pressed.
The sensor LED behind the lens will turn on while occupied and turn off while vacant.
Note
: If you try to enter test mode within 2 minutes of turning on power, the Sensor LED will blink.
Stand-Alone Sensor Dimmer /
Switch Programming *
For set-up, programming, and troubleshooting with a
Vive system, please refer to the installation instructions
included with the Vive hub or at www.lutron.com/vive
* Stand-Alone refers to devices that have NOT been commissioned
into a Vive system. Features and Settings that are only available
on the Sensor Dimmer / Switch when installed in a Vive system
are not shown in this installation guide. Please refer to the Vive
documentation at www.lutron.com/Vive
Note: If a device is connected to a Vive system, settings can only be
configured through the Vive GUI and cannot be changed locally at
the device.
Lutron Electronics Co., Inc. 7200 Suter Road
Coopersburg, PA 18036-1299 USA
Lutron, Radio Powr Savr, Pico, Maestro, and Vive are trademarks or registered trademarks of Lutron Electronics Co., Inc. in the U.S. and other countries.
App Store is a service mark of Apple, Inc. Android and Google Play are registered trademarks of Google LLC. iOS is a trademark or registered trademark of Cisco in the U.S. and other countries and is used under license.
© 2019 Lutron Electronics Co., Inc.
Symptom
Possible Causes and Solutions
Lights cannot be manually turned
ON or OFF with the newly installed
sensor dimmer / switch.
• Verify proper wiring. Neutral must be connected for product to function properly.
• Wait 10 seconds and try to turn ON or OFF again.
Wireless device will not associate
to a sensor dimmer / switch.
• Wireless device is out of range.
• Wireless performance is being affected by the physical setup of the space.
See
Wireless Communication
section of this document for more information.
Not all of the sensor modes are
available when programming.
• Sensor modes are limited for vacancy only models
(MRF2S-8SDV010 and MRF2S-8SSV).
• Device may be part of a Vive system.
Lights do not automatically turn
ON when space is occupied.
• Sensor Mode is set to Vacancy (Manual-ON / Auto-OFF).
• The sensor dimmer / switch may be a vacancy only model
(MRF2S-8SDV010 and MRF2S-8SSV).
• The room may be too bright for the existing light level setting if in
Fixed ALD Occupancy Mode.
• The room may be too bright for the “learned” light level if in Learning ALD
Occupancy Mode.
Driver / ballast cannot be dimmed
up or down.
• Verify proper connection of gray and purple wires.
• Driver / ballast does not comply with IEC 60929 Annex E.2.
Lights flicker when dimmed all the
way down.
• Raise the low-end trim level of the dimmer until the lights no longer flicker when
fully dimmed.
Troubleshooting
www.lutron.com/support
1
Sensor Mode is locked as “Vacancy” in vacancy only models (MRF2S-8SDV010 and
MRF2S-8SSV) when in Stand-Alone.
2
Only available in Stand-Alone. Not available when used in a Vive system.
3
Only available with the sensor dimmer. Not available with sensor switch.
4
Available in Stand-Alone. When the device is used in a Vive system, these adjustments are
only available via the Vive software.
5
Learning ALD (Ambient Light Detection): Lights remain off if enough natural light is present.
If the lights turn on and the user does not want that much light, they can tap
T
within
5 seconds of entering the space. Similarly, if the lights do not turn on when entering a space
and the user wants more light, they can tap
T
within 5 seconds of entering the space.
Over time, the sensor will learn the preferred light level.
6
Fixed ALD: Lights turn on only when there is less than a set (locked) amount of natural light
available. The level can be adjusted in “Fixed ALD Level” settings.
7
This setting will override the sensor mode of the Radio Powr Savr occupancy / vacancy
sensor.
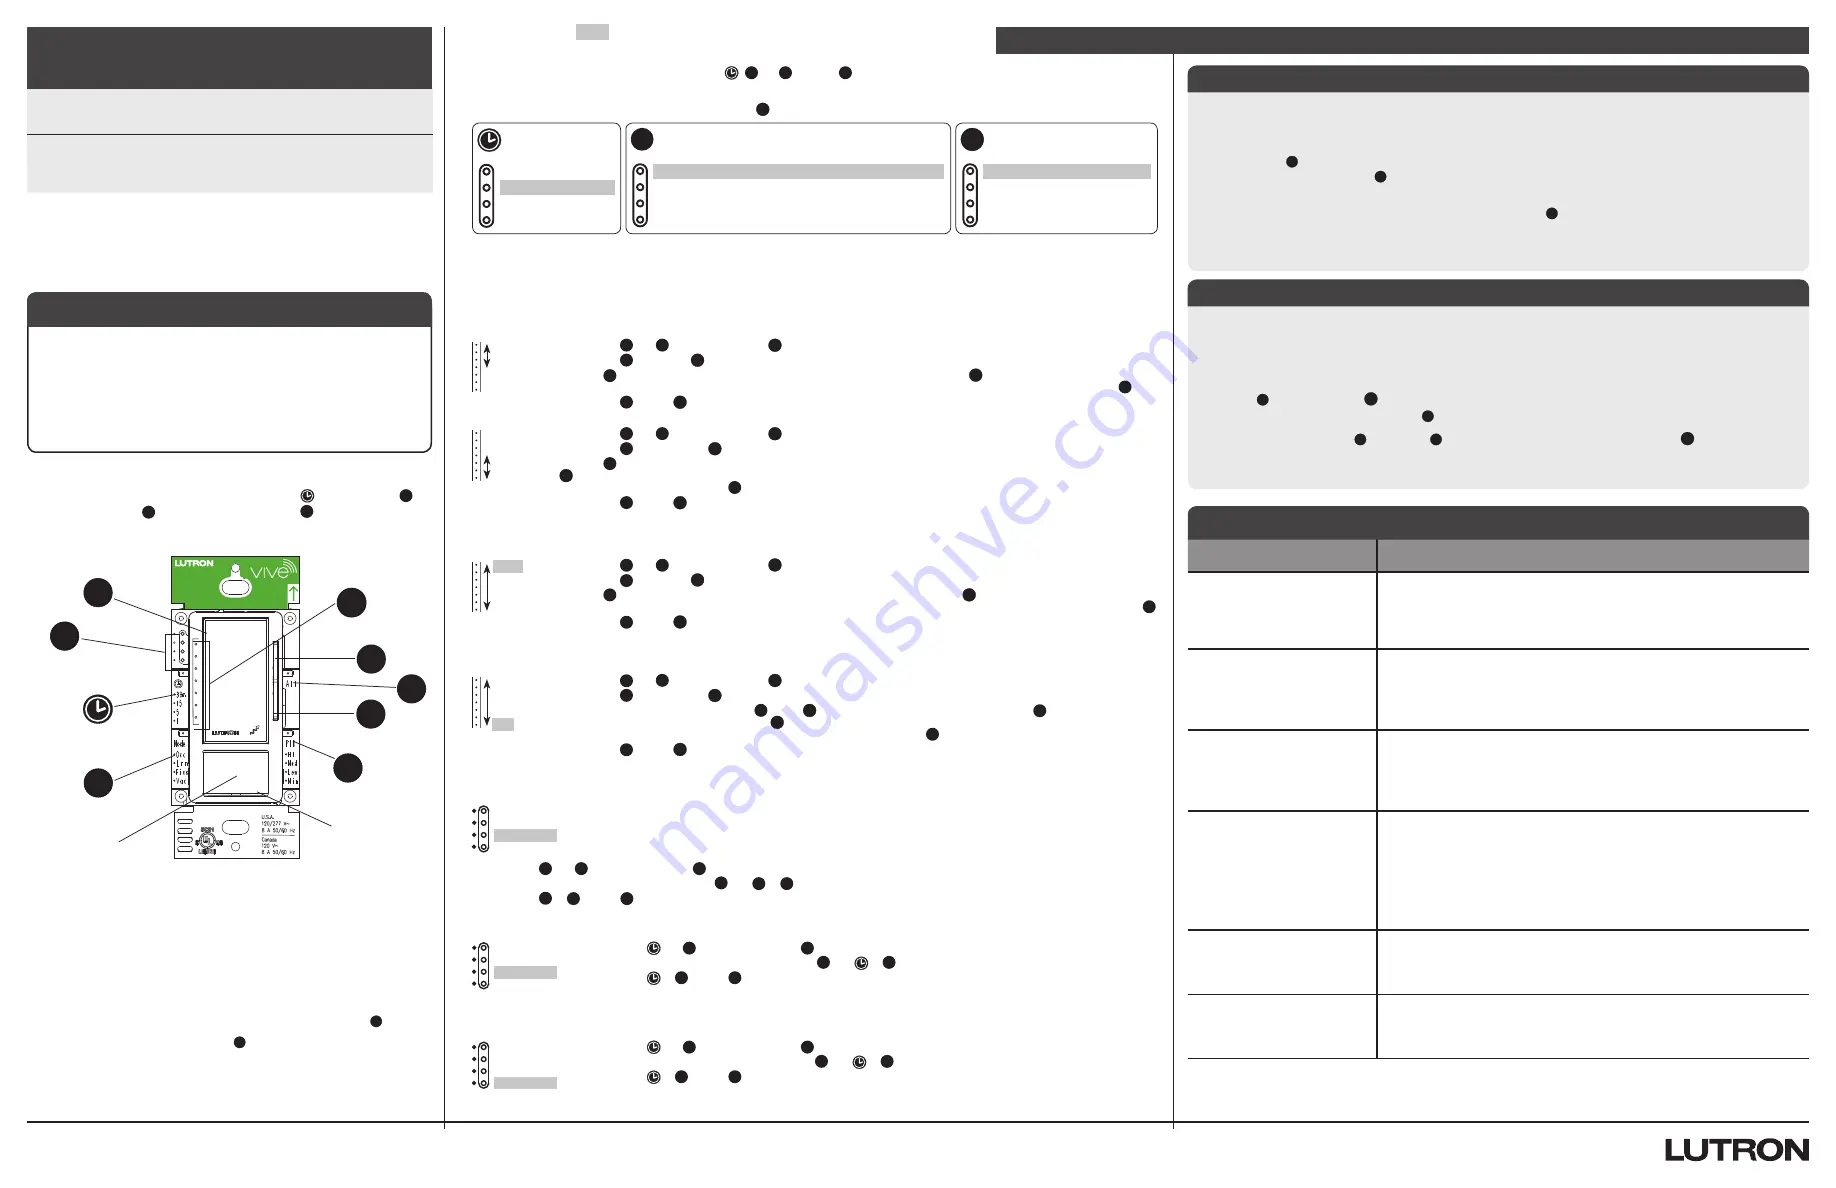
IL
Indicator LEDs
2
Tap button
(on / off)
M
P
Sensor LED
(behind lens)
Sensor
mode
1,4,7
Timeout
4
M
PIR lens
Sensor dimmer shown
PIR
sensitivity
4
Raise
3
Maestro
LEDs
Lower
3
Alt
2
L
R
ML
Alt
High-End Trim
3, 4
1.
Press and hold
T
and
R
simultaneously until a
ML
flashes (about 6 seconds).
2.
Press and hold
R
until the top
ML
is reached and the lights brighten no further.
3.
Hold or tap
L
to decrease the high-end trim level until the desired level is achieved. The top 3
ML
LEDs give visual feedback of where the
high-end trim setting is within the adjustable range. If you want to increase the high-end trim during programming process, press
R
.
4.
Press and hold
T
until the
ML
turns off to lock your selection (about 6 seconds).
Low-End Trim
3, 4
1.
Press and hold
T
and
L
simultaneously until a
ML
flashes (about 6 seconds).
2.
Press and hold
L
until the bottom
ML
is reached and the lights dim down no further.
3.
Hold or tap
R
to increase the low-end trim until the desired level is achieved and / or all lights are on and stable (no flickering). The bottom
3
ML
LEDs give visual feedback of where the low-end trim setting is within the adjustable range. If you want to decrease the low-end trim
during the programming process, press
L
.
4.
Press and hold
T
until the
ML
turns off to lock your selection (about 6 seconds).
Occupancy Level
1,3,4
The level at which the sensor dimmer dims up to when motion is detected. This level is adjustable from 1% to 100% within the range of the low-end and
high-end trims.
1.
Press and hold
M
and
R
simultaneously until a
ML
begins to flash (about 6 seconds).
2.
Press and hold
R
until the top
ML
is reached and the lights brighten no further.
3.
Hold or tap
L
to decrease the occupancy level until the desired light level is achieved. The 7
ML
LEDs give visual feedback of where the
occupancy level setting is within the adjustable range. If you want to increase the occupancy level during programming process, press
R
.
4.
Press and hold
M
until the
ML
turns off to lock your selection (about 6 seconds).
Vacancy Level
3, 4
The level at which the sensor dimmer dims to or turns off when motion has not been detected for the timeout period.
This level is adjustable from 1% to 100% within the range of the low-end and high-end trim or can be set to OFF.
1.
Press and hold
M
and
L
simultaneously until a
ML
begins to flash (about 6 seconds).
2.
Press and hold
L
until the bottom
ML
is reached and the lights dim down no further.
3.
To set the vacancy level to off, press and hold
L
until all
ML
s flash (about 3 seconds). Otherwise, hold or tap
R
to increase the vacancy
level until the desired light level is achieved. The 7
ML
LEDs give visual feedback of where the vacancy level setting is within the adjustable
range. If you want to decrease the vacancy level during programming process, press
L
.
4.
Press and hold
M
until the
ML
turns off to lock your selection (about 6 seconds).
Fixed ALD Level
1,2,6
The light level that determines when a sensor will turn lights on or keep lights off when detecting occupancy.
This setting only affects sensors set to “Fixed ALD” mode.
1.
Press and hold
M
and
Alt
simultaneously until an
IL
begins to flash (about 3 seconds).
2.
The “Fixed ALD” light level will now be displayed by the
IL
. Tap
M
or
Alt
to cycle to your desired setting.
3.
Press and hold
M
or
Alt
until the
IL
turns solid to lock your selection (about 3 seconds).
Walk-through Mode
2
(MRF2S-8SD010 and MRF2S-8SS only)
Allows the lights to turn off before the Timeout has expired if occupancy is detected only briefly.
1.
Press and hold
and
Alt
simultaneously until an
IL
begins to flash (about 3 seconds).
2.
The walk-through setting will now be displayed by the
IL
. Tap
or
Alt
to cycle to the desired setting.
3.
Press and hold
or
Alt
until the
IL
turns solid to lock your selection (about 3 seconds).
Electronic Off
2,3
Affects how the lights are turned off. If enabled, the driver remains powered, but the lights turn off. This requires that the driver supports this method of
control. If disabled, the driver has power removed every time the lights are turned off. All drivers support this method of control.
1.
Press and hold
and
M
simultaneously until an
IL
begins to flash (about 3 seconds).
2.
The electronic off setting will now be displayed by the
IL
. Tap
or
M
to cycle to the desired setting.
3.
Press and hold
or
M
until the
IL
turns solid to lock your selection (about 3 seconds).
Change Basic Settings
Change Advanced Settings
To Check Existing Settings
2
1.
Press and hold the desired programming button ( ,
M
, or
P
) until an
IL
flashes (about 3 seconds).
2.
Tap the same programming button to cycle to your desired setting.
3.
Press and hold the same programming button until the
IL
turns solid (about 3 seconds). The setting has been saved.
For complete programming options and additional information, visit www.lutron.com/TechnicalDocumentLibrary/048687.pdf
Timeout:
15 minutes
Sensor Mode:
Occupancy (Auto-On / Auto-Off)
1
PIR Sensitivity:
High
Occupied Level:
100%
Vacancy Level:
0%
Fixed ALD Level:
Low (when in Fixed ALD mode)
Default Settings
To display the existing settings, tap the Timeout ( ), Sensor Mode (
M
),
or PIR Sensitivity (
P
) button. The indicator LED (
IL
) that corresponds to
the existing setting will illuminate.
T
P
Timeout
4
Sensor Mode
1,4,7
(determines when lights turn on)
PIR Sensitivity
4
m
30
15
5
1
Occ
Lrn
Fixd
Vac
Mode
Hi
Med
Low
Min
PIR
Alt
100%
55%
m
30
15
5
1
Occ
Lrn
Fixd
Vac
Mode
Hi
Med
Low
Min
PIR
Alt
45%
1%
30 minutes
15 minutes
5 minutes
1 minute
Occupancy (Auto-ON / Auto-OFF)
4
Occupancy with Learning ALD
2, 5
Occupancy with Fixed ALD
2, 6
Vacancy (Manual-ON / Auto-OFF)
4
High
Medium
Low
Minimum
m
30
15
5
1
Occ
Lrn
Fixd
Vac
Mode
Hi
Med
Low
Min
PIR
Alt
100%
0%
m
30
15
5
1
Occ
Lrn
Fixd
Vac
Mode
Hi
Med
Low
Min
PIR
Alt
1%
100%
Default settings in
bold
High (turn ON lights unless area has a lot of light)
Medium
Low
Minimum (turn ON lights only when room is dark)
m
30
15
5
1
Occ
Lrn
Fixd
Vac
Mode
Hi
Med
Low
Min
PIR
Alt
(unused)
(unused)
Disabled
Enabled
m
30
15
5
1
Occ
Lrn
Fixd
Vac
Mode
Hi
Med
Low
Min
PIR
Alt
(unused)
(unused)
Enabled
Disabled
m
30
15
5
1
Occ
Lrn
Fixd
Vac
Mode
Hi
Med
Low
Min
PIR
Alt
In order for proper function of device, the device orientation needs to be installed
like shown above.
Arrêtez le Courant
Turn Off Power
Corriente
Desconecte la
1.844.588.7661
lutron.com
Customer Assistance | 1.844.LUTRON1
U.S.A. / Canada
| +1.888.235.2910
Mexico
| +1.610.282.3800
Others
| www.lutron.com/support
Notes:
• The device will retain all basic and advanced programming settings if power is removed and then restored.
• ALD stands for Ambient Light Detect. See http://www.lutron.com/TechnicalDocumentLibrary/048687.pdf for more information.


