Quick Operation Guide of -7200/7300FH/WH/ HV Series DVR
4
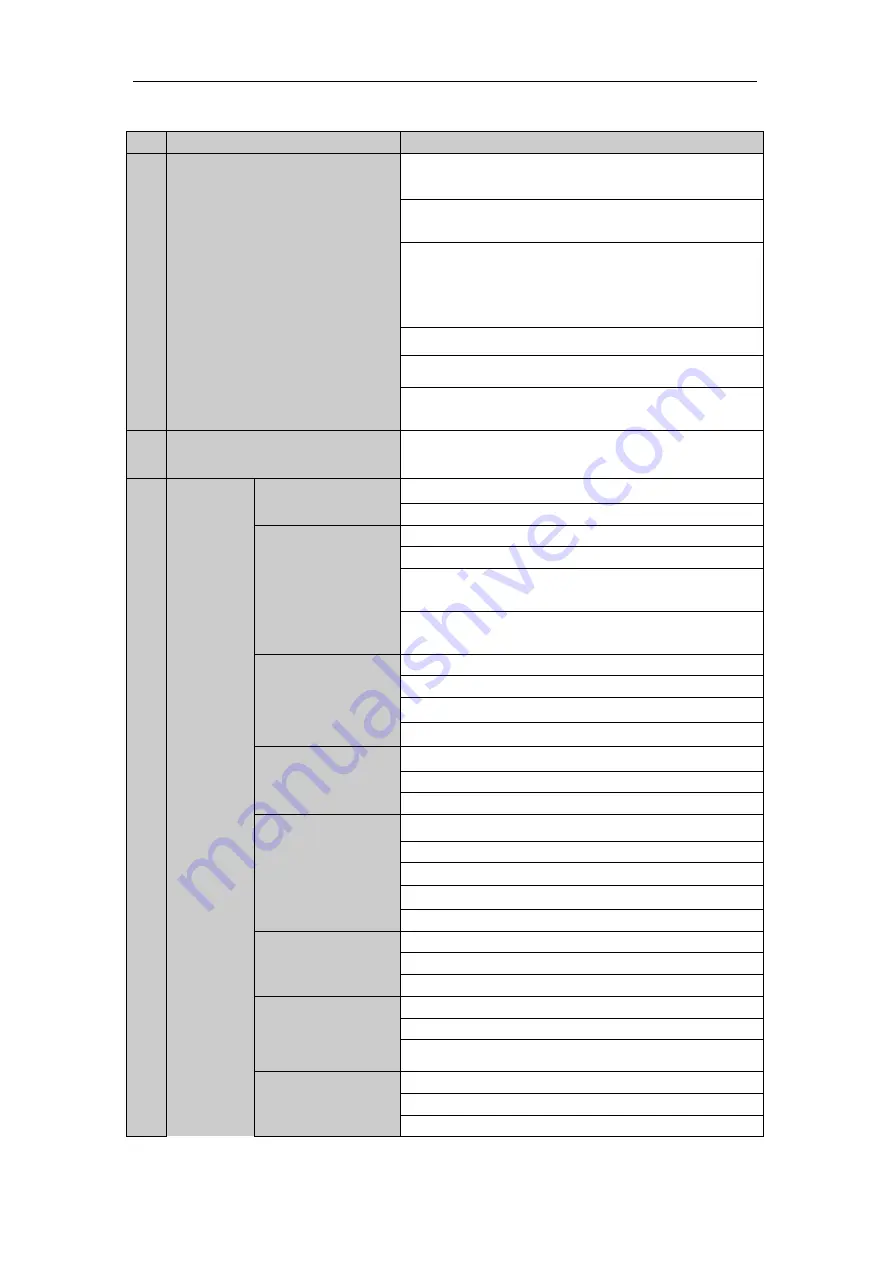
Table 1 Description of Control Panel Buttons
No.
Name
Function Description
1
Status Indicators
POWER: the POWER indicator turns green when NVR is
powered up.
READY: The indicator light is green when the device is
running normally.
STATUS: 1.The light is green when the IR remote control is
enabled; 2.The light is red when the function of the composite
keys (SHIFT) are used; 3. The light is out when none of the
above condition is met/
ALARM: the light is red when there is an alarm occurring.
HDD: the indicator flickers red when HDD is reading/writing.
Tx/Rx: TX/RX indicator flickers green when network
connection is functioning normally.
2
USB Interfaces
Universal Serial Bus (USB) ports for additional devices such as
USB mouse and USB Hard Disk Drive (HDD).
3
Composite
Keys
1/MENU:
Enter numeral “1”;
Access the main menu interface.
2/ABC/F1:
Enter numeral “2”;
Enter letters “ABC”;
The F1 button when used in a list field will select all items in
the list.
In PTZ Control mode, it will turn on/off PTZ light and when
the image is zoomed in, the key is used to zoom out.
3/DEF/F2:
Enter numeral “3”;
Enter letters “DEF”;
The F2 button is used to change the tab pages.
In PTZ control mode, it zooms in the image.
4/GHI/ESC:
Enter numeral “4”;
Enter letters “GHI”;
Exit and back to the previous menu.
5/JKL/EDIT:
Enter numeral “5”;
Enter letters “JKL”;
Delete characters before cursor;
Check the checkbox and select the ON/OFF switch;
Start/stop record clipping in playback.
6/MNO/PLAY:
Enter numeral “6”;
Enter letters “MNO”;
Playback, for direct access to playback interface.
7/PQRS/REC:
Enter numeral “7”;
Enter letters “PQRS”;
Open the manual record interface.
8/TUV/PTZ:
Enter numeral “8”;
Enter letters “TUV”;
Access PTZ control interface.


