background image

Lowrey EZP3 EASY Piano

23

Line Out EQ

EQ (Equalization) is a feature that adjusts the tonal character of the sound.  

There are two settings for the EQ feature: On or Off.

Off  -  Recommended for normal playing circumstances, such as in a living room or classroom.

With headphones connected, the normal sound of the piano is reproduced.

On  -  Recommended when connected to external speakers, or when recording.

With headphones connected, the normal sound of the piano is reproduced (same as Off).

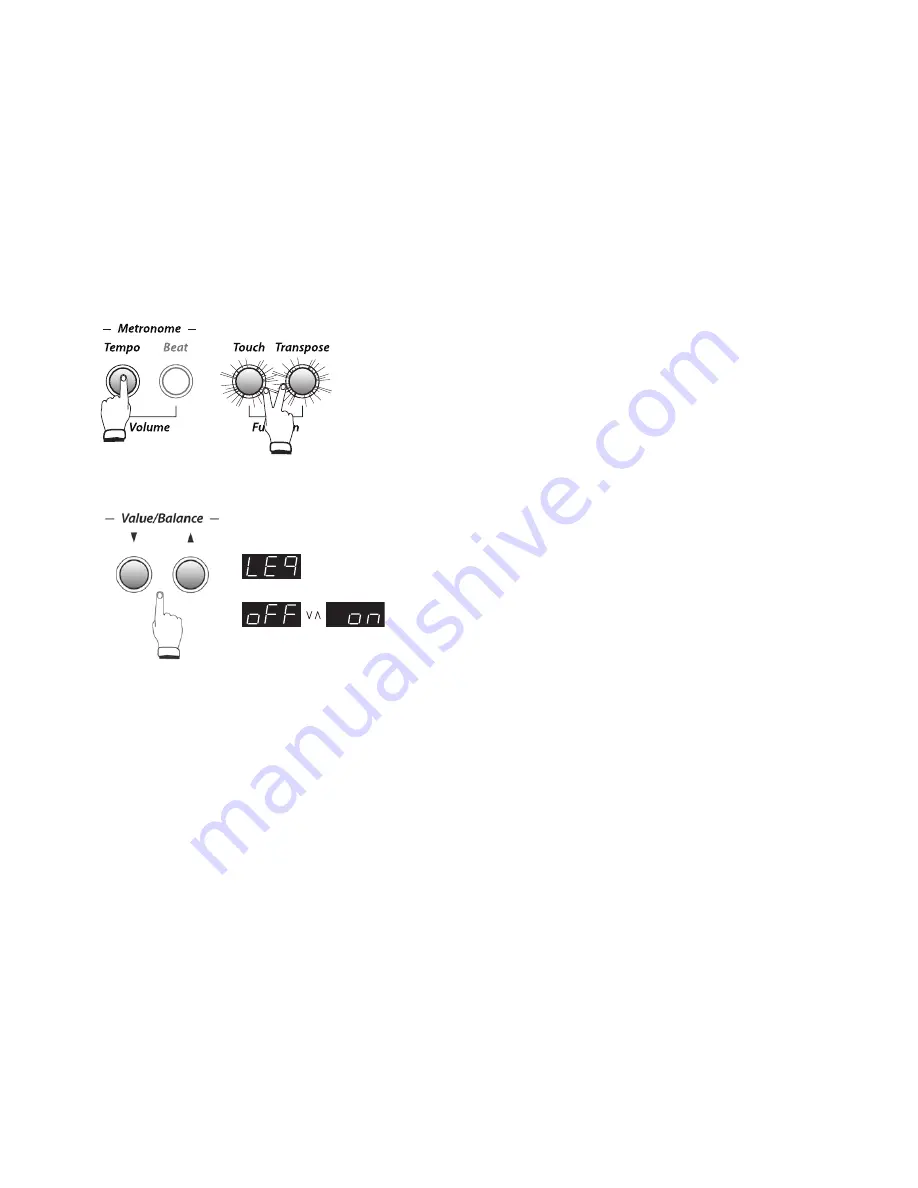
1. Press and hold the Touch and Transpose buttons.  While holding Touch and Transpose, press the 

Tempo button.  Release the buttons.


TouchTranspose, and Tempo will start to flash, indicating that 

the EQ function has been selected.

LEQ (Line out EQ) and the current settings will be shown in the 

display.

2. Press the

 q

 or 

p

   Value/Balance buttons to select the desired EQ setting.


    Off 

              On

LEQ

3. Press the Tempo button to exit EQ.  Touch, Transpose and Tempo will stop flashing.

EQ

 settings are global for all the sounds. Individual settings for each sound is not possible.

- Changes made to the 

EQ

 mode will remain until the power is turned off.

EQ

 settings return to the default (Off) when power is turned off. 

- It is possible to store preferred 

EQ

 settings.  See page 48, Memory Backup.

Summary of Contents for EZP3 EASY Piano

Page 1: ...Owner s Guide ...

Page 2: ......

Page 3: ...1 Effects 22 Line Out EQ 23 Touch Curve 24 Transpose 25 Voicing 26 Metronome 27 Starting The Metronome 27 Changing The Metronome Time Signature 27 Adjusting The Metronome Volume 28 Song Recorder 29 Recording a Song 29 Playing Back a Song 30 Erasing a Song 30 Function Settings 32 Selecting Adjusting a Function 32 Brilliance 33 Tuning 33 Damper Effect 34 String Resonance 35 Temperament 36 Key Signat...

Page 4: ......

Page 5: ......

Page 6: ......

Page 7: ......

Page 8: ...Lowrey EZP3 EASY Piano 8 Components EZP3digitalpiano The EZP3 digital piano package contains the components listed here ACPowerAdapter PS 154 FootPedal F 10H MusicRack Owner sGuide ...

Page 9: ...tion to the rich piano sounds range in scope from electric pianos and organs to harpsichord strings and percussion instruments PowerfulAudioSystem The EZP3 features an incredibly powerful 6 speaker audio system that delivers live performance sound without additional amplification gear Simply power up and play to enjoy the innovative speaker box enclosure that provides deep bass and crisp highs all...

Page 10: ...s also used to operates the Recorder pg 29 Headphone Stereo jacks are located on the right and left sides Connect two pair of stereo headphones at the same time LineInStereo Connect a portable music player CD player or other audio device pg 51 LineOut Connect the EZP3 to an external amplifier speaker system or audio recording devices pg 51 SpeakerOn Off Turn the EZP3 speakers on and off pg 12 Damp...

Page 11: ...onance to sounds pg 21 Recorder Facilitates two track song recording and playback pg 29 MetronomeProvides a steady rhythm by which to practice Adjustable tempo time signature and volume pg 27 TouchAdjust the touch sensitivity of the keyboard pg 24 TransposeRaise or lower the pitch of the keyboard in half step increments pg 25 PowerTurn the EZP3 on and off Always turn the power off after playing pg...

Page 12: ...er keys played are released The pedal also responds to half pedaling which is continuous damper effect relating to foot pressure rather than just an on off pedal condition TurningtheSpeakersOnandOff The Speaker switch located on the back of the instrument turns the EZP3 speaker output on or off ON Sound is output from the EZP3 speakers OFF EZP3 speakers are muted no sound output The Off position i...

Page 13: ...l light and the Grand Piano sound will be selected 4 Adjust the volume level using the Volume slider The VOLUME slider controls the volume of the EZP3 speakers and connected headphones Move the slider to the right to increase volume Move the slider to the left to decrease volume Set the volume to a comfortable listening level The middle is often a good starting point 5 Play the piano The sound of ...

Page 14: ...lit See page 18 to move the split location MajorChord Play any major chord with the conventional three notes or a single note The one note major chord MCS formula is Chord letter name major chord For example to play a C Major chord using MCS play the second C note in the left hand lower section of the keyboard The chord name being played will appear in the display MinorChord Play any minor chord w...

Page 15: ...y notes Left handplays theboxedchords Righthand playsthe melodynotes Yes ter day all my trou bles seemed so far a way Keyboard Split To play a C seventh C7 chord using MCS play the black Bb note to the left of C Play both notes at the same time The number 7 shown after the chord name indicates the chord being played is a seventh chord Chord names and chord symbols as shown in the display are illus...

Page 16: ...d Bass 2 Drawbar Organ 2 Electric Bass 3 Church Organ 3 W Bass Ride Strings Choir 1 Slow Strings 2 String Ensemble 3 Choir For example press the E Piano button The button will light and the number 1 will appear in the display indicating the Classic E Piano sound is selected Press the lighted E Piano button again The number 2 will appear in the display indicating the Modern E P sound is selected Pr...

Page 17: ...numbers will be shown in the display The left number represents the primary sound the right number the secondary sound 2 Play the piano The sounds of a Concert Grand Piano and Strings Choir will be heard 3 Press and hold the Strings Choir button Press and release the Piano button Release the Strings Choir button The sound variation numbers 2 1 will be shown in the display indicating the primary so...

Page 18: ...ected sound variation numbers will be shown in the display The left number represents the Lower section the right number represents the Upper section 2 Play the piano The Concert Grand sound will be heard in the Upper Lower sections The number of keys used for the Upper and Lower sections can be adjusted by changing the Split Point The default Split Point setting is the third C key from the left C...

Page 19: ...tons in this fashion to assign other sounds to the lower section 6 Press the q or p Value Balance buttons to adjust the volume balance between the Upper and Lower sections The current volume balance between the Upper and Lower sections will be illustrated in the display The sum of the Upper and Lower sections volume balances will always total 10 with larger values producing greater volume 7 Press ...

Page 20: ...own from the original pitch while sounds from the Lower section are transposed two octaves up from the original pitch allowing two people to play within the same key range The number of keys used for the Upper and Lower sections can be freely adjusted by changing the Split Point The default Split Point setting is the third F key F3 Keyboard Split When Four Hands is activated the Lower Octave Shift...

Page 21: ... a small hall or live stage Hall1 The ambiance of a concert hall or theatre Hall2 A hall larger than that in Hall 2 1 Press and hold the Reverb button While holding Reverb press the q or p Value Balance buttons to select the desired reverb type Release both when the desired Reverb type is shown in the display The active reverb type will be shown in the display Room 1 Room 2 Stage Hall 1 Hall 2 2 P...

Page 22: ...uttons 1 Press and hold the Effects button While holding Effects press the q or p Value Balance buttons to select the desired effect type Release both when the desired effect is shown in the display The active effect type will be shown in the display Chorus Delay Tremolo Rotary 1 Rotary 2 2 Press the Effects button to turn the feature off Pressing Effects once again will reactivate the feature to ...

Page 23: ...buttons While holding Touch and Transpose press the Tempo button Release the buttons Touch Transpose and Tempo will start to flash indicating that the EQ function has been selected LEQ Line out EQ and the current settings will be shown in the display 2 Press the q or p Value Balance buttons to select the desired EQ setting Off On LEQ 3 Press the Tempo button to exit EQ Touch Transpose and Tempo wi...

Page 24: ...ord 1 When the Touch button is off the touch setting is Normal standard acoustic piano touch When the Touch button is on a different touch type is being used 2 Press and hold the Touch button While holding Touch press the q or p Value Balance buttons to select the desired Touch setting When the desired setting is shown in the display release Touch Heavy 2 Heavy 1 Light 1 Light 2 Off 3 Press Touch ...

Page 25: ...ard Press and hold the Transpose button While holding Transpose press and release a key located from the second C key C2 through the fourth C key C4 to set the desired transpose value Release Transpose The setting will be shown in the display 12 C2 0 C3 12 C4 2 Press Transpose again to turn the feature off Pressing Transpose once again will reactivate the feature to the previous transpose setting ...

Page 26: ...ing that a different voicing type is being used 2 Press and hold the Voicing button While holding Voicing press the q or p Value Balance buttons to select the desired setting The current voicing type will be shown in the display Mellow Dynamic Bright 3 Press Voicing again off to return to the standard Normal voicing setting The voicing setting is global for all of the sounds Individual voicing set...

Page 27: ...t is possible to store a preferred Metronome Tempo for power on See page 48 Memory Backup Changing The Metronome Time Signature The metronome produces two types of click sounds with a bell sound indicating the first beat of a bar this is a 4 beat or 4 4 time signature There are seven different types of time signature from which to choose 1 4 2 4 3 4 4 4 5 4 3 8 and 6 8 There are also 30 drum rhyth...

Page 28: ...he q or p Value Balance buttons to set the metronome volume to a desired level The metronome volume can be set within the range of 1 soft to 10 loud 3 Press the Tempo and Beat buttons simultaneously again to turn off the metronome Changes made to the metronome volume will remain until the power is turned off at which time the metronome volume will return to the default setting of 5 It is possible ...

Page 29: ...rding The Sound Selection button will also turn on indicating that the sound to be used for recording can be changed 3 Play the piano The recorder will automatically start recording with the first note played The Play Stop and Rec buttons will turn on Any changes made to the sound while recording will also be recorded The recording can also be started by pressing the Play Stop button instead of pr...

Page 30: ...ally PlayingBackaSong The Play Stop button is used to start and stop playback of recorded songs In the following example the song recorded to the Song 1 memory will be played back 1 Press and hold the Play Stop button While holding Play Stop press and release the Piano button to select Song 1 The Piano button will start to flash 2 Release the Play Stop button Song 1 will start to play 3 Press the ...

Page 31: ...se the Piano button to erase Song 1 Release the Play Stop and Rec buttons Song 1 is erased Repeat the steps using the Song 2 or Song 3 button to erase those songs ErasingAllSongs To erase all songs from memory at once press and hold the Play Stop and Rec buttons while turning on the power ...

Page 32: ...ckup function See page 48 Selecting AdjustingaFunction 1 Press and hold Touch and Transpose buttons While holding Touch and Transpose press and re lease one of the Menu buttons The Menu button pressed will start to flash indicating that the function has been selected An abbreviation of the function name and the current settings will be shown in the display 2 Press the q or p Value Balance buttons ...

Page 33: ... power is turned off When the power is turned off the Brilliance setting will return to the default value of 0 It is possible to store a preferred Brilliance setting for power on See page 48 Memory Backup Tuning Finely adjust the pitch of the EZP3 using the Tuning function It may prove useful when playing along with other instruments 1 Press and hold the Touch and Transpose buttons Press and relea...

Page 34: ... resonance The Damper Effect function of the EZP3 simulates this phenomenon 1 Press and hold the Touch and Transpose buttons Press and release the Voicing button Release Touch and Transpose Voicing The buttons will start to flash indicating that the Damper Effect function has been selected The name of the function dEF Damper Effect and the current settings will be shown in the display 2 Press the ...

Page 35: ...sonance Off 1 10 2 Press the q or p Value Balance buttons to increase or decrease the String Resonance level to the desired value The String Resonance value can be set within the range of 1 to 10 Setting the String Resonance to Off will disable the function entirely A String Resonance value of 1 produces a very subtle effect while the maximum level of 10 creates a stronger more pronounced resonanc...

Page 36: ... for thirds was devised to eliminate the lack of consonances experienced with certain fifths for the Mersenne pure temperament It produces chords that are more beautiful than those with the equal temperament Werckmeister III Temperament Kirnberger III Temperament These two temperaments are placed in between Meantone and Pythagorean For music with few accidentals this temperament produces the beaut...

Page 37: ... must be taken to choose the key signature to play in For example if the song to be played is written in D major D would be chosen as the temperament key 1 While the Temperament function is selected press one of the 88 piano keys to select the desired key signature of the temperament C C D D E F F G G A A B The key signature of temperament function will have no effect when equal temperament has be...

Page 38: ...tting will remain until the power is turned off When the power is turned off the Lower Octave Shift setting will return to the default value of 0 It is possible to store a preferred Lower Octave Shift value for power on See page 48 Memory Backup DamperHoldOn Off This function determines whether or not pressing the damper pedal will sustain continuous sounds such as organ or strings after the keys ...

Page 39: ...ng data MIDI IN and MIDI OUT Each uses a special cable with a DIN connector MIDI IN For receiving note program change and other data MIDI OUT For sending note program change and other data MIDI uses channels to exchange data back and forth between MIDI devices There are receive MIDI IN and transmit MIDI OUT channels Most musical instruments or devices with MIDI functions are equipped with both MID...

Page 40: ...nstrument or device when multi timbral mode is turned on Transmit receive exclusive data Transmit receive front panel or menu function settings as exclusive data Transmit recorder playback data Songs recorded using the recorder can be played back from a MIDI connected musical instrument or recorded by an external sequencer via the MIDI OUT jack Note that Metronome data will not be transmitted Plea...

Page 41: ...ram change numbers using this function and any program change number from 1 to 128 can be sent to external MIDI devices and instruments by EZP3 1 Press and hold the Touch and Transpose buttons Press and release the Clavi Guitar button Release Touch and Transpose Clavi Guitar The buttons will start to flash indicating that the Send Program Change Number function has been selected The name of the fu...

Page 42: ...e Balance buttons to select the desired Local Control setting Local Control Off On When set to On the EZP3 will play a sound when the keyboard is played With set to Off the EZP3 will not play a sound when the keyboard is played yet will continue to trans mit data on the selected MIDI channel to an external MIDI device 3 Press the Touch or Transpose button to exit Local Control On Off setting mode ...

Page 43: ... 121 0 17 3 Church Organ 9 95 0 20 Strings Choir 1 Slow Strings 10 121 1 45 2 String Ensemble 11 121 0 49 3 Choir 12 121 0 53 Harpsi Mallets 1 Harpsichord 13 121 0 7 2 Vibraphone 14 121 0 12 3 Marimba 15 121 0 13 Clavi Guitar 1 Clavi 16 121 0 8 2 Steel Guitar 17 95 20 26 3 Nylon Acoustic 18 121 0 25 Bass 1 Wood Bass 19 121 0 33 2 Electric Bas 20 121 0 34 3 W Bass Ride 21 95 1 33 MIDI reception onl...

Page 44: ...ns to select the desired Transmit Program Change setting Transmit Program Change Off On When transmit program change is set to Off program change and other panel information will not be transmitted via MIDI When transmit program change is set to On program change and other panel information will be trans mitted via MIDI 3 Press the Touch or Transpose button to exit Transmit Program Change On Off s...

Page 45: ...n a MIDI signal is received 1 Press and hold the Touch and Transpose buttons Press and release the Reverb button Release Touch and Transpose Reverb The buttons will start to flash indicating that the Multi timbral mode On Off function has been selected The name of the function MLt Multi and the current settings will be shown in the LED display 2 Press the q or p Value Balance buttons to select the...

Page 46: ... the Channel Mute function has been selected The channel number e g 1 and the current settings will be shown in the display 2 Press one of the 16 lowest white keys to select the desired MIDI channel Off On Channel 1 Channel 16 PressaKey SelecttheChannel 3 Press the q or p Value Balance buttons to select the desired Channel Mute setting When set to Off the selected channel will not receive MIDI inf...

Page 47: ...setting Lower Pedal Off On When set to On pressing the damper pedal will sustain the Lower section sounds When set to Off pressing the damper pedal will not sustain the Lower section sounds Note that regardless of the On or Off setting pressing the damper pedal will always sustain the Upper section sounds 3 Press the Touch or Transpose button to exit Lower Pedal On Off setting mode The buttons wil...

Page 48: ...on has been selected The name of the function MEM Memory Backup and the current settings will be shown in the display 2 Press the q or p Value Balance buttons to select the desired Memory Backup function Memory Backup Reset User When set to rES Reset the EZP3 will reset all settings to the default value however the song and registrations memories will not be reset When set to uSr User the EZP3 wil...

Page 49: ... Bb Db Bb Ab Bb E Bb D F Bb Db Ab Bb A Bb Eb F Bb Db E Ab B B B D B A B F B D G B D A B A B E F B D F A CHORD b 5 3 notes MIN w MAJ 7 3 notes 6th 4 notes MIN 6th 4 notes DIM 7th 4 notes 9th 3 notes 13th 3 notes C C E Gb C Eb B C E G A C Eb G A C Eb Gb A E Bb D Bb E A Db Db F G Db E C Db F Ab Bb Db E Ab Bb Db E G Bb F B Eb B F Bb D D F Ab D F C D F A B D F A B D F Ab B F C E C F B Eb Eb G A Eb Gb D...

Page 50: ...50 ChordnamesandSymbols Below illustrates how chord names and chord symbols are shown in the EZP3 display C Chord Flat D Chord Minor E Chord Diminished F Chord Augmented G Chord Suspended A Chord Flat 5 B Chord Seventh Ninth ...

Page 51: ...naural device use only the L Mono connector The audio signal from the Line In Stereo jack is also routed to these jacks In addition the panel Volume slider can be used to control the output level from the Line Out jacks without affecting the level of the Line In Stereo audio signal 3 MIDI Jacks These jacks are used to connect external MIDI devices with the EZP3 There are two terminals MIDI IN and ...

Page 52: ...andard commercially available MIDI interface in order to establish a MIDI connection with the EZP3 Notes on Usage When both MIDI jacks and the USB port are connected simultaneously the USB port has priority When connecting a USB cable to the EZP3 digital piano first connect the USB cable and then turn the EZP3 power on When the EZP3 is connected to a computer via the USB port there may be a short ...

Page 53: ...ark of Apple Computer Inc Other company names and product names mentioned referenced herein may be registered trademarks or trademarks of respective owners RhythmStyleList Display RhythmName r 1 8 Beat 1 r 2 8 Beat 2 r 3 16 Beat 1 r 4 16 Beat 2 r 5 16 Beat 3 r 6 Ride Beat 1 r 7 Ride Beat 2 r 8 Rock Beat r 9 Surf Rock r10 Ballad 1 r11 Ballad 2 r12 Light Ride 1 r13 Light Ride 2 r14 Smooth Beat r15 S...

Page 54: ...2 SD1 Room SD1 Analog SD1 D 1 39 Hand Clap E 1 40 Std1 SD2 Std2 SD2 Room SD2 Analog SD2 F 1 41 Std1 LowTom2 RoomLowTom2 Analog LowTom2 F 1 42 Std1 HHC Room HHC Analog HHC G 1 43 Std1 Low Tom1 RoomLowTom1 Analog Low Tom1 G 1 44 Std1 HHP Analog HHP A 1 45 Std1 Mid Tom2 RoomMidTom2 Analog Mid Tom2 A 1 46 Std1 HHO Room HHO Analog HHO B 1 47 Std1 Mid Tom1 RoomMidTom1 Analog Mid Tom1 C 2 48 Std1 Hi Tom2...

Page 55: ... F 3 66 Low Timbale G 3 67 Hi Agogo G 3 68 Low Agogo A 3 69 Cabasa A 3 70 Maracas Analog Maracas B 3 71 Short Whistle C 4 72 Long Whistle C 4 73 Short Guiro D 4 74 Long Guiro D 4 75 Claves Analog Claves E 4 76 Hi Wood Blk F 4 77 Low Wood Blk F 4 78 Mute Cuica G 4 79 Open Cuica G 4 80 Mute Triangle A 4 81 Open Triangle A 4 82 Shaker B 4 83 Jingle Bell C 5 84 Bell Tree Bar Chimes C 5 85 Castanets D ...

Page 56: ...ity approximately 15 000 notes Other Functions Dual Split Dual Split balance adjust Four Hands EQ 2 types Touch curve 6 types Transpose Brilliance Tuning Voicing Damper effect String resonance Temperament Lower octave shift Lower pedal Damper hold Memory backup MIDI function settings Pedal Damper External Jacks Headphones x 2 LINE IN Stereo LINE OUT L MONO R Pedal MIDI IN OUT USB to Host Output Po...

Page 57: ...ON O 9nH v 1 127 O Note OFF X 8nH v 0 X After Key s X X Touch Ch s X X Pitch Bend X X 0 32 O O Bank Select 1 7 X O Volume 10 X O Panpot 11 X O Expression 64 O O Damper Pedal Control Change Prog O O 1 Change System Exclusive O O Song Pos X X Common Song Sel X X Tune X X System Clock X X Real time Commands X X Aux Local ON OFF X O All Notes OFF X O Active Sense O O Reset X X 1 Please refer to the Pr...

Page 58: ...Lowrey EZP3 EASY Piano 58 ...

Page 59: ...EZP3 EASY Piano 59 EZP3 EASY Piano Owner s Guide Lowrey 847 North Church Court Elmhurst Illinois USA 60126 1036 www lowrey com 993 048811 000 Copyright 2012 Lowrey Organ Company All Rights Reserved 817757 R100 ...

Reviews: