background image

16 | 

Menus and settings | 

FishHunter 3D/PRO Operator Manual

Menus and settings

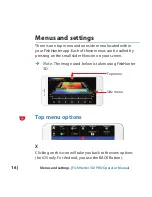
There is one top menu and one side menu located within 

your FishHunter app. Each of these menus can be called by 

pressing on the small slider like icon on your screen.


¼

Note: 

The image used below is taken using FishHunter 

3D.

Top menu

Side menu

Top menu options

X

Clicking on this icon will take you back to the view options 

(for iOS only. For Android, you use the BACK Button).

Summary of Contents for FishHunter 3D/PRO

Page 1: ...www lowrance com ENGLISH FishHunter3D PRO Operator Manual...

Page 2: ......

Page 3: ...SUBSIDIARIES BRANCHES AND AFFILIATES DISCLAIM ALL LIABILITY FOR ANY USE OF THIS PRODUCT IN A WAY THAT MAY CAUSE ACCIDENTS DAMAGE OR THAT MAY VIOLATE THE LAW Governing Language This statement any inst...

Page 4: ...aters and coastal sea areas administered by countries of the USA E U and E E A Compliance Statements This equipment complies with CE under 2014 53 EU Directive The requirements of level 2 devices of t...

Page 5: ...Canada applicables aux appareils radio exempts de licence L exploitation est autoris e aux deux conditions suivantes 1 l appareil ne doit pas produire de brouillage et 2 l utilisateur de l appareil do...

Page 6: ...g antenna Increase the separation between the equipment and receiver Connect the equipment into an outlet on a circuit different from that of the receiver Consult the dealer or an experienced technici...

Page 7: ...7 Contents 7 Contents 8 Overview 16 Menus and settings 29 Coverage and modes 35 3D Structure mapping 38 3D Fishing 40 Bathymetric mapping 45 Ice fishing flasher 49 Technical specifications...

Page 8: ...ducers can be casted from a bank or dock as well as trolled behind your boat or used for ice fishing The FishHunter 3D PRO wireless fish finder sonar connects to your smartphone tablet via Wi Fi using...

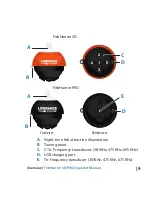
Page 9: ...ishHunter 3D 2 1 4 5 3 C D Bottomview D E Frontview B A FishHunter PRO A Night time fish attraction illumination B Towing point C 5 Tri Frequency transducers 381KHz 475 KHz 695 KHz D USB charging port...

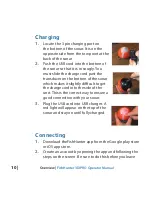
Page 10: ...ansducer on the bottom of the sonar which makes it slightly difficult to get the charge cord into the side of the unit This is the correct way to ensure a good connection with your sonar 3 Plug the US...

Page 11: ...the FishHunter into the water 6 The sonar will automatically turn on when placed in water and will begin slowly flashing red from the top of the sonar If you don t see any lights then the FishHunter i...

Page 12: ...r a few minutes If the lights remain on after it is removed from water ensure the charging pins are free from any water or debris by blowing on them Additionally you can insert and remove the charging...

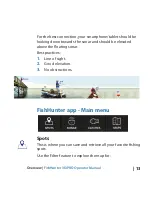
Page 13: ...d be looking down towards the sonar and should be elevated above the floating sonar Best practices 1 Line of sight 2 Good elevation 3 No obstructions FishHunter app Main menu Spots This is where you c...

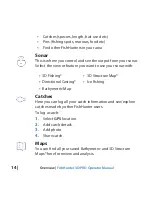
Page 14: ...Select the view or feature you want to use your sonar with 3D Fishing Directional Casting Bathymetric Map 3D Structure Map Ice Fishing Catches Here you can log all your catch information and see expl...

Page 15: ...ap pin to view its details or to navigate right back to the area where you made the map FishHunter 3D parts included FishHunter 3D sonar USB charging cord 4 5 m 15 ft leash FishHunter PRO parts includ...

Page 16: ...within your FishHunter app Each of these menus can be called by pressing on the small slider like icon on your screen Note The image used below is taken using FishHunter 3D Top menu Side menu Top men...

Page 17: ...e in M metric or FT imperial Scale location Choose between left or right hand side scales Sound Ability to turn on and off sound for detecting fish Drop pin Creates and saves the GPS location Can late...

Page 18: ...area and adjust its settings automatically to balance the gain and pulse width of your sonar to give you the best results Every time you cast the FishHunter into the water the screen will take a few...

Page 19: ...ter allows you to customize how much of the area on the surface you would like your FishHunter to ignore or include to give you the most accurate fish detection possible The filter is set to the cente...

Page 20: ...Try to set the Surface Filter to a number that matches where you see the surface noise stop in the Raw data view on your screen In the example below you would set the top sonar to 2 m 6 5 ft and the b...

Page 21: ...most sensitive The Fish Sensitivity Slider can be changed in real time so you can see the direct impact each position change has on having the FishHunter display and notify you of fish that have been...

Page 22: ...ll allow you to see your jig very clearly but lead to more surface reverb while less power will lead to minimal surface reverb but less clarity on tracking your jig You might need to adjust this setti...

Page 23: ...Adjust the screen to the place on the screen that you would like to focus on by taking your finger and scroll the screen to move the screen up and down to get to the correct position Note That when yo...

Page 24: ...sh to attach your FishHunter to the back side of your kayak As you drift along the FishHunter will be giving you a strong reading for the area located around the floating sonar and below your kayak Th...

Page 25: ...our FishHunter will be behind your seat When you are moving along in this case we have used about 1 m 4 ft of the tether the FishHunter may bounce off the side of your kayak from time to time but that...

Page 26: ...shHunter to the top side of your boat This will allow you to have both hands free to focus on fishing As you drift along the FishHunter will be giving you a strong reading for the area around the floa...

Page 27: ...r screen this is just a sound reflection off of your metal boat When this happens you will see fish continuously on the screen at the same depth level Since this situation only occurs with certain boa...

Page 28: ...nter to be about 15 25 cm 6 10 behind the back of the boat when you are finished so it will float freely in the water The actual length required will depend on the height of your trailer mounting brac...

Page 29: ...e FishHunter gives you coverage of the bottom contour with incredible resolution You gain access to detailed information about your favorite spots or current location to help you catch more fish Take...

Page 30: ...view Shallow water mode The shallow water mode allows you to get into water that is only 0 4 m 1 4 ft deep This mode uses our tri frequency technology to give you detailed information about the bottom...

Page 31: ...wer slider to ensure you have the right amount of power for your area Failure to adjust power can cause your FishHunter not to find the bottom correctly 4 You can pull down the top menu to select Raw...

Page 32: ...er 13 appears This indicates fish are on the right side of your FishHunter 3D at a depth of 4 m 13 ft Now cast in that direction and increase your chances of catching fish Click on any of the 5 round...

Page 33: ...ates fish under that transducer and its depth 4 m 13 ft Front transducer can be changed by pressing the rotating circle Weeds Bottom contour Fish detected Fish detected with depth Water temperature Go...

Page 34: ...at transducer with their depth 4 You can select any transducer on the screen to get the bottom contour by pressing on the circle 5 You can view a split screen of the bottom contour and 5 transducers b...

Page 35: ...by placing the FishHunter 3D in the water and then reeling drifting trolling it over the area you want to measure Use the color coded scale to see drop offs or toggle on off the grid overlay to know...

Page 36: ...w Leftsideview Sidemenu Color depth scale Side menu Turn on off each Distance Grid and Depth Grid Map color option Tilt option either Medium or Full View orientation Front or Left Side Distance away f...

Page 37: ...e FishHunter sonar icon 3 Select START FISHING 4 Select the 3D Structure Mapping icon within the FishHunter app from your phone tablet screen 5 Cast drop FishHunter into the water in the area you woul...

Page 38: ...and 5 Tri Frequency transducers allows us to create life like images of the bottom so you can quickly evaluate bottom contour Knowing the bottom contour when fishing is critical to improve your catch...

Page 39: ...ual 3Transducer RawView 1 Open the FishHunter app and go into the sonar section 2 Select 3D Fishing 3 Cast drop FishHunter 3D into the water in the area you would like to map 4 You will now start to r...

Page 40: ...lake or favorite fishing spots Troll your FishHunter across the area that you are interested in mapping and FishHunter starts to track the depth and bottom contour as it travels around your lake Once...

Page 41: ...tor Manual Bathymetric mapping menu Sidemenu Topmenu Splitview Depth range Area covered Color scale Depth Boat location Surface reverb See Surface Filter Slider Ice Thickness Slider on page 19 Continu...

Page 42: ...nter Wi Fi in your settings 3 Open the FishHunter app and go into the Sonar section 4 Select My Bathymetric Maps 5 Select New Map 6 The app will validate your current GPS location and click Next 7 The...

Page 43: ...4 Select My Bathymetric Maps 5 Select the Map from the list you would like to add to or choose it from the map view 6 Navigate back to the are you wish to continue mapping Note You must be within 500...

Page 44: ...otrecorded bysonar Areanotcaptured Eachpassoftheboatwastoo farapart Sonarandyourdevice temporarilylostconnection Steps for solution 1 Navigate to missing spot Note You must be within 500 m of the last...

Page 45: ...withstanding weather conditions as cold as 30 C 22 F Ice Fishing Flasher View utilizes 2 ultra high frequencies 475 kHz and 695 KHz to enable you to see your jig in real time Both the SPLIT Screen Fla...

Page 46: ...flasher FishHunter 3D PRO Operator Manual Ice fishing flasher views Fullflashermode SplitView RawView Fish detected Fish detected Depth Temperature Bait and jig line movement Bait and jig line moveme...

Page 47: ...ect FishHunter XXX 3 Open the FishHunter app and go into the sonar section 4 Select the Ice Fishing icon 5 You will now start receiving Ice Fishing Flasher data to your device screen Sidemenu Note Sur...

Page 48: ...hrough ice 1 Clear the snow from the surface of the ice ensure ice surface is flat smooth 2 Plug the charge cord into the bottom of the sonar and remove it This will turn on your sonar for about 2 min...

Page 49: ...o 55 m 160 ft Wi Fi range up to 65 m 200 ft Frequency 381 kHz 475 kHz 695 kHz Number of elements 5 Trolling speed up to 3 km h 2 mph Illumination LED above water Battery life up to 10 active hours 500...

Page 50: ...t Wi Fi range up to 45 m 150 ft Frequency 381 kHz 475 kHz 675 kHz Number of elements 1 Trolling speed up to 3 km h 2 mph Illumination LED above water Battery life up to 10 active hours 500 hours stand...

Page 51: ......

Page 52: ...988 12048 001...

Reviews: