background image

 15

LMF-400: EP-80R TH  

Temp Configuration 

This section will show you how to use the LMF-400 Multi-function 

gauge to configure your EP-80R TH Temperature Sensor.  


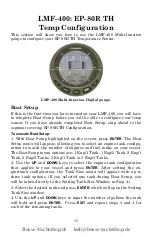
LMF-400 Multi-function Digital gauge. 

Boat Setup 

If this is the first time you have turned on your LMF-400, you will have 

to complete Boat Setup before you will be able to configure your temp 

sensor. If you have already completed Boat Setup, skip ahead to the 

segment covering EP-80R TH Configuration.  

To execute Boat Setup: 

1. With Boat Setup highlighted on the screen, press 

ENTER

. The Boat 

Setup menu will appear, allowing you to select an engine-tank configu-

ration to match the number of engines and fuel tanks on your vessel. 

The Boat Setup menu options are: 1 Eng/1 Tank, 1 Eng/2 Tank, 2 Eng/1 

Tank, 2 Eng/2 Tanks, 3 Eng/1 Tank or 3 Eng/3 Tanks. 
2. Use the 

UP

 and 

DOWN

 keys to select the engine-tank configuration 

that applies to your vessel and press 

ENTER

. After setting the en-

gine/tank configuration, the Tank Size menu will appear with up to 

three tank options. (If you selected one tank during Boat Setup, you 

will be taken directly to the Setting Tank Size Window in Step 4.) 
3. Select the desired tank and press 

ENTER

, which will open the Setting 

Tank Size window.  
4.


Use the 

UP 

and

 DOWN 

keys to input the number of gallons the tank 

will hold and press 

ENTER

.  Press 

EXIT

 and repeat steps 3 and 4 for 

each of the remaining tanks. 
 

Busse-Yachtshop.de     [email protected]

Summary of Contents for EP-80R TH

Page 1: ...ranceNet All Lowrance NMEA 2000 capable devices are either NMEA 2000 certi fied or certification is pending CAUTION Installing LowranceNET NMEA 2000 devices is significantly different from installing...

Page 2: ...d to a blue connector network by using a red fe male to blue female adapter cable Your sensor MUST be connected to a NMEA 2000 network or it WILL NOT function The NMEA 2000 red female to blue female a...

Page 3: ...thru hull temperature sensor can be mounted in any location on the hull with the most common application being on the transom Wherever you install it make sure the temp module will be in contact with...

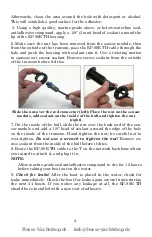
Page 4: ...nside of the hull and tighten the nut right 7 On the inside of the hull slide the nut over the back end of the sen sor module and add a 1 8 bead of sealant around the edge of the hole on the inside of...

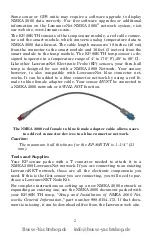
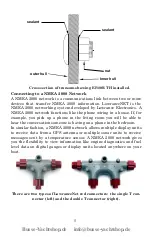
Page 5: ...hear the conversation someone is having on a phone in the bedroom In similar fashion a NMEA 2000 network allows multiple display units to receive data from a GPS antenna or multiple sonar units to re...

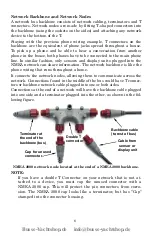
Page 6: ...out a home It connects the network nodes allowing them to communicate across the network Connections found in the middle of the bus could have T connec tors or backbone network cable plugged into one...

Page 7: ...ng connection and install the T connector between them If you want to add a node at the end of the backbone network bus re move the terminator from the last connector like the figure above In stall th...

Page 8: ...8 Notes Busse Yachtshop de info busse yachtshop de...

Page 9: ...irst time you have turned on your LMF 200 you will have to complete Boat Setup before you will be able to configure your temp sensor If you have already completed Boat Setup skip ahead to the se gment...

Page 10: ...following message will appear Hit menu to reset Eng Tnk 3 Press MENU The Setup screen will appear with Boat Setup high lighted EP 80R TH Configuration The EP 80R TH temperature sensor has three confi...

Page 11: ...ame Already Selected message will appear If all three temps are configured meaning there is no name configura tion available follow the first set of instructions If the desired con figuration name is...

Page 12: ...tside Temp Displaying EP 80R TH Temp Sensor Data You can display your temperature sensor data on the Gauge Single Digital and Dual Digital pages Page Screen Rotation The Page Screen Rotation consists...

Page 13: ...se the UP and DOWN keys to display it on the screen 2 Press MENU select CUSTOMIZE and press MENU 3 Highlight TEMP and press MENU The Select Temp will appear allow ing you to choose from three temp typ...

Page 14: ...14 Notes Busse Yachtshop de info busse yachtshop de...

Page 15: ...igu ration to match the number of engines and fuel tanks on your vessel The Boat Setup menu options are 1 Eng 1 Tank 1 Eng 2 Tank 2 Eng 1 Tank 2 Eng 2 Tanks 3 Eng 1 Tank or 3 Eng 3 Tanks 2 Use the UP...

Page 16: ...p sensor 1 Press MENU use the UP and DOWN keys to select SYSTEM SETUP and press ENTER 2 Highlight BUS DEVICES and press ENTER The Bus Devices list will ap pear 3 Select an unconfigured temp sensor UNC...

Page 17: ...ps are configured meaning there is no name configura tion available follow the first set of instructions If the desired con figuration name is available follow the second set of instructions The first...

Page 18: ...ress ENTER to open the Temp Selection menu which will have three options Water Outside and Inside 4 Highlight OUTSIDE and press ENTER You will be directed to the Bus Devices list where the temp will n...

Page 19: ...To customize Single Analog page 1 Make sure the Single Analog page has been added to the page screen rotation 2 Use the ENTER and EXIT keys to scroll the Single Analog page onto the main display 3 Pr...

Page 20: ...ide Temp 6 Select the desired temp type and press ENTER You will be directed to the Position menu Repeat steps 4 and 5 to customize the other posi tions or press EXIT twice to return to the main displ...

Page 21: ...TER and EXIT keys to display it on the main screen 2 Press MENU use the UP and DOWN keys to select CUSTOMIZE and press ENTER The Position menu will appear with four options Data Box 1 Data Box 2 Data...

Page 22: ...22 Notes Busse Yachtshop de info busse yachtshop de...

Page 23: ...e version installed in your unit Both menus al low you to perform the same NMEA 2000 related functions NOTE Some of the menus shown in this section may differ slightly from the menus in your display u...

Page 24: ...me to configure your temp sensor NOTE Changing the Device Name only will affect the way the EP 80R is shown on your display unit The customized device name will not be seen by other devices or display...

Page 25: ...guration menu will open The device name will be reset to its default setting Press EXIT repeatedly to return to the main display To select Temp Type 1 Press MENU twice select NMEA 2000 or NETWORKING a...

Page 26: ...nfiguring a temp sensor A temp sensor can be reconfigured by changing its temp type If the desired configuration name is already configured to another temp sen sor you can unconfigure that sensor to m...

Page 27: ...t PRESS ENT TO ADD and press ENTER 3 Highlight NMEA 2000 and press ENTER A list of devices on the net work will appear 4 Select the desired temp sensor and press ENTER Its temp type con figuration wil...

Page 28: ...28 Notes Busse Yachtshop de info busse yachtshop de...

Page 29: ...29 Notes Busse Yachtshop de info busse yachtshop de...

Page 30: ...30 Notes Busse Yachtshop de info busse yachtshop de...

Page 31: ...DESCRIBED IS THE EXCLUSIVE REMEDY AVAILABLE TO YOU AGAINST US FOR ANY DEFECT MALFUNCTION OR NON CONFORMITY CONCERNING THE PRODUCT OR FOR ANY LOSS OR DAMAGE RESULTING FROM ANY OTHER CAUSE WHATSOEVER W...

Page 32: ...cts manufac tured by Lowrance Electronics and Eagle Electronics To order Lowrance or Eagle accessories please contact 1 Your local marine dealer or consumer electronics store To locate a Lowrance deal...

Reviews: