background image

Technical Manual LÖWEN Dart HB8 


01/2019 

17 

3.4 

Sensors 

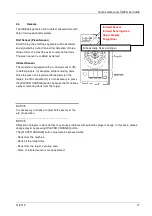
The HB8 dart game is able to detect missed darts with 
help of two specialized systems.  
 

Dart Sensor (Piezo Sensor)


A dart hitting the catching segments will be detected, 
and signaled by a short tone. After detection of three 
thrown darts, the machine asks to remove the darts.  
The piezo sensor is enabled by default.  
 

Infrared Sensor 

The machine is equipped with an infrared sensor (IR) 
to detect players, for example, while removing darts. 
Once the piezo has registered three darts (on the 
target), the IR is activated. It is not necessary to press 
the [PLAYER CHANGE] button because the IR notices 
a player removing darts from the target.  


NOTICE 


It is necessary to check or adjust both sensors at the 
site of operation. 

_____________________________________ 


NOTICE 
Detection of players in dark clothes may cause problems with automatic player change. In this case, please 
change player by pressing [PLAYER CHANGE] button. 

The [PLAYER CHANGE] button must also be pressed when 

- Darts miss the machine. 

- Darts hit the target door. 

- Darts miss the target’s scoring area. 

- Piezo or infrared sensors are deactivated. 

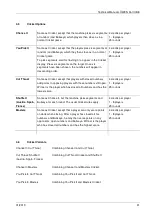
Infrared Sensor 
Infrared Sensing Area 
Upper Display 
Target Door 

Bitte aktuelle Skizze einfügen 

Summary of Contents for HB8

Page 1: ...Technical Manual L WEN Dart HB8 01 2019 1 Manual for the Sports Games L WEN Turnier Dart HB8 L WEN Cougar Dart HB8...

Page 2: ...y be registered brands and or trademarks of the respective Novomatic Group of companies All rights are reserved No part of this manual may be reproduced in the form of printing photocopying or any oth...

Page 3: ...laying Instructions 26 4 3 Playing Instructions for Each Game 27 4 4 01 Games Options 30 4 5 Cricket Options 31 4 6 Cricket Variants 31 4 7 Team Options for 301 501 701 901 and 301 Elimination 32 4 8...

Page 4: ...e Statistics 66 6 2 3 S03 SEL tP View Credit Statistics 67 6 2 4 Statistics Printout 68 7 Test Options 70 7 1 Self Checking Tests 70 7 2 Diagnostic Routines Test Programs 71 7 2 1 t01 SEL bUt Push But...

Page 5: ...to the device or injury to persons The product contains no components of any kind that a layperson could repair Always turn for repairs to a specialist trained to make them This product meets establi...

Page 6: ...the device Danger of electrical shock or fire If liquids have been spilled in the device de energize it and have a specialist examine it WARNING The danger of possible bodily injury or death exists i...

Page 7: ...is not suitable to set up out of doors Never expose the device to wetness or temperatures above 50 C Ambient temperature around operating devices must not exceed 35 C If the device has been heavily u...

Page 8: ...620 mm Depth 600 mm Weight app 82 kg Connected Load Voltage 230 V 50 Hz Power Consumption 30 W while idling 70 W while in operation Target Lighting 230 V 40 W R63 E27 socket Operation Conditions Temp...

Page 9: ...art HB8 01 2019 9 Recommended Working Area Width 3 00 m minimum Depth 3 00 m minimum Ceiling clearance 2 50 m minimum Skizze Safety distance 1 20 m Distance floor Bull 1 72 m Distance board throwing l...

Page 10: ...Technical Manual L WEN Dart HB8 01 2019 10 Aktuelle Skizzen System Diagramm HB8 und LP Dart Steuerungn...

Page 11: ...Technical Manual L WEN Dart HB8 01 2019 11...

Page 12: ...ackaging the machine must be prepared as follows 1 Open the electronics compartment cover 2 Remove the thumb screws and the mains cable from the cashbox and lay them out in the electronics compartment...

Page 13: ...possible risk of injury that way 5 Connecting the mains cable Upon delivery the mains cable lies rolled up in the cash box Guide the mains cable s free end through the opening and pull enough mains c...

Page 14: ...Wood eyebolt M Screw N Washer P Floor plug R Fender washer Required tools Tape measure or scale size 1 screwdriver size 1 Phillips head screwdriver combination pliers 6 mm and 12 5 mm wood metal drill...

Page 15: ...e brick pumice etc 3 Drill a 6 mm diameter hole about 35 mm deep at the marked spot 4 Insert wall plug K into the drilled hole and screw in eyebolt J 5 Guide the chain through the eyebolt and screw th...

Page 16: ...ning knob SPEAKER VOLUME at the lower left corner of the controller board 1 Open electronics compartment 2 Adjust volume 3 Close electronics compartment Machine ID Code Programming Program the machine...

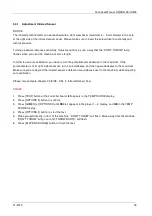
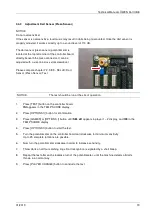
Page 17: ...hree darts on the target the IR is activated It is not necessary to press the PLAYER CHANGE button because the IR notices a player removing darts from the target NOTICE It is necessary to check or adj...

Page 18: ...ometer is at its right side maximum turn it anti clockwise and then again clockwise to the maximum Make sure you are beyond the infrared sensor s detection era sidewise next to the machine while adjus...

Page 19: ...e run at the site of operation 1 Press TEST button on the controller board tSt appears in the TEMP SCORE display 2 Press OPTIONS II button for confirmation 3 Press GAMES or OPTIONS I button until SEL...

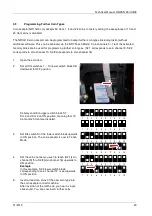
Page 20: ...s 1 10 lower switch block S2 downward to OFF position Delivery condition upper switch block S1 DIL 2 and DIL 3 on ON position meaning that 10 Cent and 20 Cent are disabled 1 2 3 4 5 6 7 8 9 10 1 2 3 4...

Page 21: ...lower switch block back to OFF position You hear two click sounds 1 2 3 4 5 6 7 8 9 10 1 2 3 4 5 6 7 8 9 10 7 Set back the DIL switch of the taught channel Example In this example DIL switch S2 4 1 2...

Page 22: ...ower supply the position of the DIP switches for the supply voltage has to be checked in order to ensure safe operation of the machine Depending on your power supply type adjust the DIP switches as fo...

Page 23: ...n off the dart machine and open the electronics compartment 6 Insert the USB flashdrive into a USB port any position on the controller board 7 Turn on the dart machine 8 The update process starts auto...

Page 24: ...e not carried out No new program version available Update takes too long Use a USB 2 0 flashdrive Long beep tone Update failed remove USB flashdrive and repeat update process If this error occurs agai...

Page 25: ...ines in the machine s manual as well as the technical instructions and guidelines according to DIN VDE 3 8 1 Target Cleaning Turn off the machine Unlock the target door and cautiously lift it out of t...

Page 26: ...ing Instructions NOTICE Some features are machine and country dependent and are thus only visible for the corresponding machine model and country version Selecting the Game Press GAMES button until th...

Page 27: ...until the player moves away from the game The machine will automatically change player NOTICE If the machine has not registered 3 thrown darts the player has to press PLAYER CHANGE button before remo...

Page 28: ...player who closes all segments and Bullseye and has the highest score If two players have the same score the player who first closed all numbers and Bullseye is winner of the match Example To close se...

Page 29: ...at the next designated segments but prior to the elapse of the timer Only the flashing designated segment can be scored upon Each segment hit is displayed in the left side of the Cricket display Each...

Page 30: ...wn In team play the player s own team members will not be wiped out Double In Each player must hit a double segment or Inner Bullseye to begin play All hits prior to hitting double segment or Inner Bu...

Page 31: ...e player who has closed all numbers and has the lowest score 4 credits per player 1 8 players 25 rounds Shuffle It Austria Spain France Same as Chance It but the machine picks segments and Bullseye fo...

Page 32: ...Team A players 2 4 6 and 8 are Team B 3 After selecting a 01 or 301 Elimination game press OPTIONS II until TEAM 4 PLAYER is lit 4 Press the red PLAYER CHANGE button to select all players for the team...

Page 33: ...round 0 players 1 2 and 3 score with their spot darts Afterwards the game starts with round 1 as usually and all 4 players may score Handicap Rounds Spot Darts Option 1 Deposit correct number of coins...

Page 34: ...is selected 2 Press red PLAYER CHANGE button Wait for the green Throw Darts lamp to flash before starting the game by throwing the first dart 4 11 HAPPY HOUR If a HAPPY HOUR time slot has been program...

Page 35: ...r Round Shows average points per round for the first three rounds for each player WIN A win Assist An assist while playing Team with a partner 6th Dart Out 301 A win in six darts 7th Dart Out 301 A wi...

Page 36: ...E Display Description Marks per Round Average marks per round WIN A win Assist An assist while playing Team with a partner 8 Dart Out Finish in eight darts 9 Dart Out Finish in nine darts 9 Mark Nine...

Page 37: ...OPTIONS II button Confirm changes and settings by accustic signal PLAYER CHANGE button Exit current mode Please use the following buttons on the controller board for your input TEST button Enter prog...

Page 38: ...pears in player 1 2 display and P01 in the TEMP SCORE display 5 Press GAMES or OPTIONS I button until desired programm Pxx appears in the TEMP SCORE display 6 Press OPTIONEN II button to confirm 1 2 3...

Page 39: ...8 digit machine ID code 53 P12 SEL dPr Configuration Data Saving transferring user specific settings via Transfer USB 54 P13 SEL StP Stepper Mode Programming Stepper bonus credits 56 P14 SEL rPd Time...

Page 40: ...the player 1 display and 301 in the TEMP SCORE display The number of credits per game is displayed in player 2 display 1 2 3 4 1 2 3 4 5 6 7 8 TEMP SCORE 5 6 7 8 5 Press GAMES or OPTIONS I button unt...

Page 41: ...ORE 5 6 7 8 9 Press segments 1 9 and Bullseye 0 to program the new round limit for example press segment 2 and Bullseye for rL 20 If you wish to program no round limit press Bullseye only 0 appears in...

Page 42: ...asters Out dbE UL 4 701 dbE UL 3 701 Double In dbE UL 4 701 Double Out dbE UL 4 701 Double In Double Out dbE UL 5 701 Master s Out dbE UL 4 701 Double In Masters Out dbE UL 5 Cricket dbE 25 2 Cricket...

Page 43: ...utton until Pr9 appears in the TEMP SCORE display 3 Press OPTIONS II button to confirm P01 appears in the TEMP SCORE display 4 Press GAMES or OPTIONS I button until SEL LAN appears in the player 1 2 d...

Page 44: ...credits per coin token or banknote Cr while player 4 display will show the corresponding coin channel CHn 7 Press the corresponding target segments 1 9 in order to program a different number of credit...

Page 45: ...8 6 Press and hold the PROGRAM button on the controller board while pressing target segments 1 9 and Bullseye 0 to enter the current security code factory setting is 0000 7 Once the current code has b...

Page 46: ...9 appears in the TEMP SCORE display 3 Press OPTIONS II button to confirm P01 appears in the TEMP SCORE display 4 Press GAMES or OPTIONS I button until SEL FEA appears in the player 1 2 display and P05...

Page 47: ...Frozen Player in Team bUSt A blocked player reaching 0 will bust and the game will continue LOSE The team loses if a blocked player reaches 0 F07 dE LA Y Delay Time upon Player Change FASt Time for p...

Page 48: ...allow F18 1 St St Ar Stop Watch Start Game Timer dart Stop Watch timer starts with 1 st dart 9AnE Stop Watch clock starts automatically F19 1 Si nb Y Player Selection Bullseye Value BE OFF Setting BE...

Page 49: ...year hour 24 hour clock and minute 1 2 3 4 1 2 3 4 5 6 7 8 TEMP SCORE 5 6 7 8 6 Please note that the game does not accept dates prior to the year 2011 At first check the year and adjust if necessary...

Page 50: ...round display starts flashing and shows the current weekday for the Happy Hour slot 1 2 3 4 1 2 3 4 5 6 7 8 TEMP SCORE 5 6 7 8 7 Use GAMES or OPTIONS I button to select Happy Hour weekdays 1 Monday t...

Page 51: ...the TEMP SCORE display 4 Press the GAMES or OPTIONS I button until SEL HHP appears in the player 1 2 display and P07 in the TEMP SCORE display 5 Press the OPTIONS II button to confirm 6 Use GAMES or O...

Page 52: ...Press GAMES or OPTIONS I button until Pr9 appears in the TEMP SCORE display 3 Press OPTIONS II button to confirm P01 appears in the TEMP SCORE display 4 Press GAMES or OPTIONS I button until SEL dOr a...

Page 53: ...board tSt appears in the TEMP SCORE display 2 Press GAMES or OPTIONS I button until Pr9 appears in the TEMP SCORE display 3 Press OPTIONS II button to confirm P01 appears in the TEMP SCORE display 4 P...

Page 54: ...n the player 1 display 3 Press GAMES or OPTIONS I button until Pr9 appears in the TEMP SCORE display 4 Press OPTIONS II button to confirm P01 appears in the TEMP SCORE display 5 Press GAMES or OPTIONS...

Page 55: ...ayer 2 display and d02 in the TEMP SCORE display 1 2 3 4 1 2 3 4 5 6 7 8 TEMP SCORE 5 6 7 8 8 Press OPTIONS II button to start the upload The settings will be copied from the USB flash drive to the da...

Page 56: ...nd P13 in the TEMP SCORE display 5 Press OPTIONS II button to confirm Factory setting Player 1 display shows SbL player 2 display shows oFF figure 2 is flashing player 3 display shows Sbb player 4 dis...

Page 57: ...n all 21 LEDs Factory setting 5 0 seconds 1 Press TEST button on the controller board tSt appears in the TEMP SCORE display 2 Press GAMES or OPTIONS I button until Pr9 appears in the TEMP SCORE displa...

Page 58: ...lay 3 Press OPTIONS II button to confirm P01 appears in the TEMP SCORE display 4 Press GAMES or OPTIONS I button until SEL Sto appears in the player 1 2 display and P15 in the TEMP SCORE display 5 Pre...

Page 59: ...V10 Factory setting OFF or 0 1 Press TEST button on the controller board tSt appears in the TEMP SCORE display 2 Press GAMES or OPTIONS I button until Pr9 appears in the TEMP SCORE display 3 Press OPT...

Page 60: ...ress GAMES or OPTIONS I button until Pr9 appears in the TEMP SCORE display 3 Press OPTIONS II button to confirm P01 appears in the TEMP SCORE display 4 Press GAMES or OPTIONS I button until SEL Con ap...

Page 61: ...pears in the TEMP SCORE display 3 Press OPTIONS II button to confirm P01 appears in the TEMP SCORE display 4 Press GAMES or OPTIONS I button until SEL ANL appears in player 1 2 display and P19 in the...

Page 62: ...II button to confirm P01 appears in the TEMP SCORE display 4 Press GAMES or OPTIONS I button until SEL ANt in player 1 2 display and P20 in the TEMP SCORE display 5 Press OPTIONS II button to confirm...

Page 63: ...n the TEMP SCORE display 3 Press OPTIONS II button to confirm P01 appears in the TEMP SCORE display 4 Press GAMES or OPTIONS I button until SEL brI appears in player 1 2 display and P21 in the TEMP SC...

Page 64: ...he TEMP SCORE display 5 Press GAMES or OPTIONS I button until the desired program appears in the TEMP SCORE display 6 Press OPTIONS II button to confirm 7 Press GAMES button to select 8 Press OPTIONS...

Page 65: ...4 5 6 7 8 TEMP SCORE 5 6 7 8 5 Press GAMES button repeatedly to view all programmed coin channels 1 thru 6 The number of the coin channel 1 thru 6 appears in player 1 display the number of coins bank...

Page 66: ...TEMP SCORE display 4 Press GAMES or OPTIONS I button until SEL 9A appears in the player 1 2 display and S02 in the TEMP SCORE display 5 Press OPTIONS II button to confirm 6 Press GAMES button until th...

Page 67: ...nfirm S01 appears in the TEMP SCORE display 4 Press GAMES or OPTIONS I button until SEL tP appears in player 1 2 display and S03 in the TEMP SCORE display 5 Press OPTIONS II button to confirm Explanat...

Page 68: ...d S01 in the TEMP SCORE display 5 Plug the DATAreader into the VDAI socket cashbox compartment left side Data transfer starts automatically according to the individual DATAreader settings short middle...

Page 69: ...ALUE TOTAL COIN 0 50 1 00 Inserted 50 Cent coins COIN 1 00 2 00 Inserted 1 coins COIN 2 00 4 00 Inserted 2 coins GRAND TOTAL 7 00 Cashbox content STATISTICS COINED 28 Paid credits STEP CRD BONUSED 2 N...

Page 70: ...r front push button switches If a switch is stuck closed the TEMP SCORE display will identify the stuck switch by displaying the corresponding three digit characters The machine will also generate a s...

Page 71: ...7 Press PLAYER CHANGE button to abort the test or to exit Overview Diagnostic Routines Program Display Description Page t01 SEL bUt Push Button Switch Test 72 t02 SEL dIS 7 Segment Display and LED Tes...

Page 72: ...RE display 7 Press PLAYER CHANGE button PLC appears in the TEMP SCORE display 8 Press PROGRAM button on the controller board Pr9 appears in the TEMP SCORE display 9 Press TEST button to exit the test...

Page 73: ...ME is located in the lower left corner of the controller board 7 2 4 t04 SEL tAr Target Segment Test This test checks if each target segment will register thrown darts correctly 1 Press TEST button on...

Page 74: ...he TEMP SCORE display 4 Press OPTIONS II button to start the test After all lamps have been tested this test program automatically returns to TEST mode tSt 7 2 6 t06 SEL Crt Cricket Display LED Test A...

Page 75: ...Press PLAYER CHANGE button again All LEDs and lamps are flashing 7 Press PLAYER CHANGE button once again to exit the test 7 2 8 t08 SEL Ir Infrared Sensor Test Testing the infrared sensor 1 Press TES...

Page 76: ...ard Please compare chapter Fehler Verweisquelle konnte nicht gefunden werden Fehler Verweisquelle konnte nicht gefunden werden 7 2 10 t10 SEL PLr Game Select LED Test The game select LEDs will be swit...

Page 77: ...transmission is finished The DATAreader signals end of transmission by a bleep 8 Press PLAYER CHANGE button to leave the printout menu NOTICE The printout is determined by machine used periphery as w...

Page 78: ...ation sound F03 F21 OFF Shorty disable RTC 13 10 2011 10 23DST END DATA CLEARED 2011 10 13 10 23 V01 10 Exemplary short printout Auslessp DrSpeicher LOEWEN DART Nr 00000000 SYSTEM HB8 GERMANY D PCB V1...

Page 79: ...e EC guidelines 2004 108 EG Electromagnetic Comptability 2006 95 EG Low Voltage The product L WEN ENTERTAINMENT Sports Game L WEN HB8 has been developed designed and manufactured in accordance with th...

Reviews: