background image

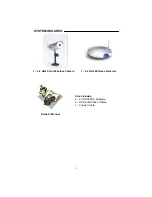
SYSTEM INCLUDES:

1 - 2.4 GHz Color Wireless Camera

Owner’s Manual

Also includes:

2 – 9V DC 500mA Adapters
2 – RCA Audio/Video Cables
1 – Coaxial Cable

2

1 - 2.4 GHz Wireless Receiver

Summary of Contents for SG6350

Page 1: ...R MORE INFORMATION WWW STRATEGICVISTA COM Before operating the system please read this manual thoroughly and retain it for future reference This product broadcasts over public airwaves and its video and audio signals may be intercepted without your consent ...

Page 2: ... the FCC Rules These limits are designed to provide reasonable protection against harmful interference in a residential installation This equipment generates uses and can radiate radio frequency energy and if not installed and used in accordance with the instruction may cause harmful interference to radio communications However there is no guarantee that interference will not occur in a particular...

Page 3: ...ower supply cord or plug is damaged b If liquid has been spilled or objects have fallen into the product c If the product has been exposed to rain or water d If the product does not operate normally by following the operating instructions Adjust only those controls that are covered by the operating instructions e If the product has been dropped or the cabinet has been damaged f When the product ex...

Page 4: ...eiver INSTALLATION OF WIRELESS CAMERA INSTALLATION OF WIRELESS RECEIVER Operation with TV Using RCA Cables Operation with TV Using Coaxial Cable SYSTEM OPERATION Multiple Cameras Auto Scanning Auto Manual Options Selectable Settings TROUBLE SHOOTING TECHNICAL SPECIFICATIONS CARE MAINTENANCE 1 2 3 4 5 6 7 8 9 10 11 12 ...

Page 5: ... additional cameras sold separately with the option to automatically scan between locations To learn more about this 2 4GHz Wireless Camera Receiver System and our complete range of CCTV products please visit our website at www strategicvista com FEATURES Turns your TV into a Video Security System Flexible move camera from room to room Listen in audio Camera has AC or battery option 300 ft Wireles...

Page 6: ...SYSTEM INCLUDES 1 2 4 GHz Color Wireless Camera Owner s Manual Also includes 2 9V DC 500mA Adapters 2 RCA Audio Video Cables 1 Coaxial Cable 2 1 2 4 GHz Wireless Receiver ...

Page 7: ... Switch Controls power to the camera Note Please ensure that you set the switch to the OFF position before plugging the AC adapter into the unit 5 Battery Compartment Optional 4 AA batteries not included can be used to power the camera 6 Bracket Metal bracket connects to camera for mounting to walls ceilings or table 7 DC IN Jack Connects to the 9V DC 500mA adapter 8 2 4GHz Antenna High gain dipol...

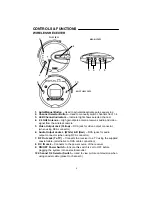
Page 8: ...ck for video output connector when using RCA connector 6 Audio Output Jacks L White R Red RCA jacks for audio output connector when using RCA connector 7 RF Out Jack To TV Connects the receiver to a TV using the supplied coaxial cable alternative to RCA cable connection 8 DC IN Jack Connects to the power source of the receiver 9 ON OFF Power Switch Ensure this switch is set to OFF before plugging ...

Page 9: ... Attach the camera with the stand to the stand base and firmly tighten the joint knob on the stand base 4 Connect the supplied 9V 500mA DC adapter to the DC IN jack at the rear of the camera and plug it into an electrical outlet If you are using batteries to power the camera follow these steps 1 Make sure that the power switch on the camera is turned OFF 2 Carefully slide open the battery compartm...

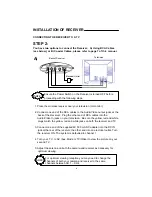
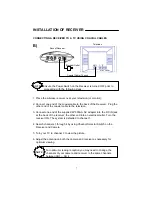
Page 10: ...r and TV 3 Connect one end of the supplied 9V 500 mA AC adapter into the DC IN jack at the rear of the receiver the other end into an electrical outlet Turn the receiver ON The system is defaulted to channel 1 4 Turn your T V to AX Aux Mode or TV Video to view the picture on your second T V 5 Adjust the antenna on both the camera and receiver as necessary for optimum viewing For optimum viewing re...

Page 11: ...coaxial cable to the television 3 Connect one end of the supplied 9V 500mA AC adapter into the DC IN jack at the back of the receiver the other end into an electrical outlet Turn the receiver ON The system is defaulted to channel 1 4 Search channels 1 through 4 by using Channel Selector Switch on the Receiver and Camera 5 Turn your TV to channel 3 to view the picture 6 Adjust the antenna on both t...

Page 12: ...t of the receiver will turn ON Releasing the Auto Manual button to remain in the four channel switching option 2 Continue to press and hold the Auto Manual button The Channel 4 LED button will turn off The system is now set to scan between three camera locations Channel 1 3 3 Continue to press and hold the Auto Manual button The Channel 3 LED button will now be turned off The system is now set to ...

Page 13: ...NG Dwell Setting is the time duration between each camera view in the auto sequence mode This system provides you with three selectable dwell options 2 5 and 10 seconds when the system is set to Auto Mode This system is preset to a 2 second selection Changing Dwell Time 1 Press and hold the CH Select button The LED button will turn on to indicate that it is set to 2 seconds 2 Continue to press and...

Page 14: ...st brightness control on TV monitor Strong spot light in the field of view Lighting source in the field of view Picture flickering Picture too bright or too dark Adjust antenna direction Improper channel 1 4 selection AC adapter not plugged in Power switch not turned ON Poor Reception AC adapter not plugged in Power switch not turned on TV or Monitor not turned on Improper A V or coaxial cable con...

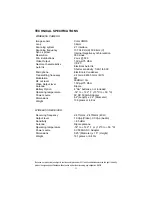
Page 15: ...x 1 5 Height 181 grams or 6 4 Oz Image sensor Lens Scanning system Scanning frequency Sync system Resolution Min illuminations Video Output Gamma characteristics Auto Iris Microphone Transmitting frequency Modulation RF out level Video Output level Antenna Battery Option Operating temperature Power source Dimensions Weight Color CMOS 3 6mm 2 1 interlace 15 734 KHz H 59 94Hz V Internal Negative syn...

Page 16: ...l temperature environment Extreme temperatures can shorten the life of the electronic devices Handle the monitor carefully Dropping it can cause serious damage to the unit Occasionally clean the unit with a damp cloth to keep it looking new Do not use harsh chemicals cleaning solvents or strong detergents to clean the unit Keep the unit away from excessive dirt and dust It can cause premature wear...

Reviews: