background image

8

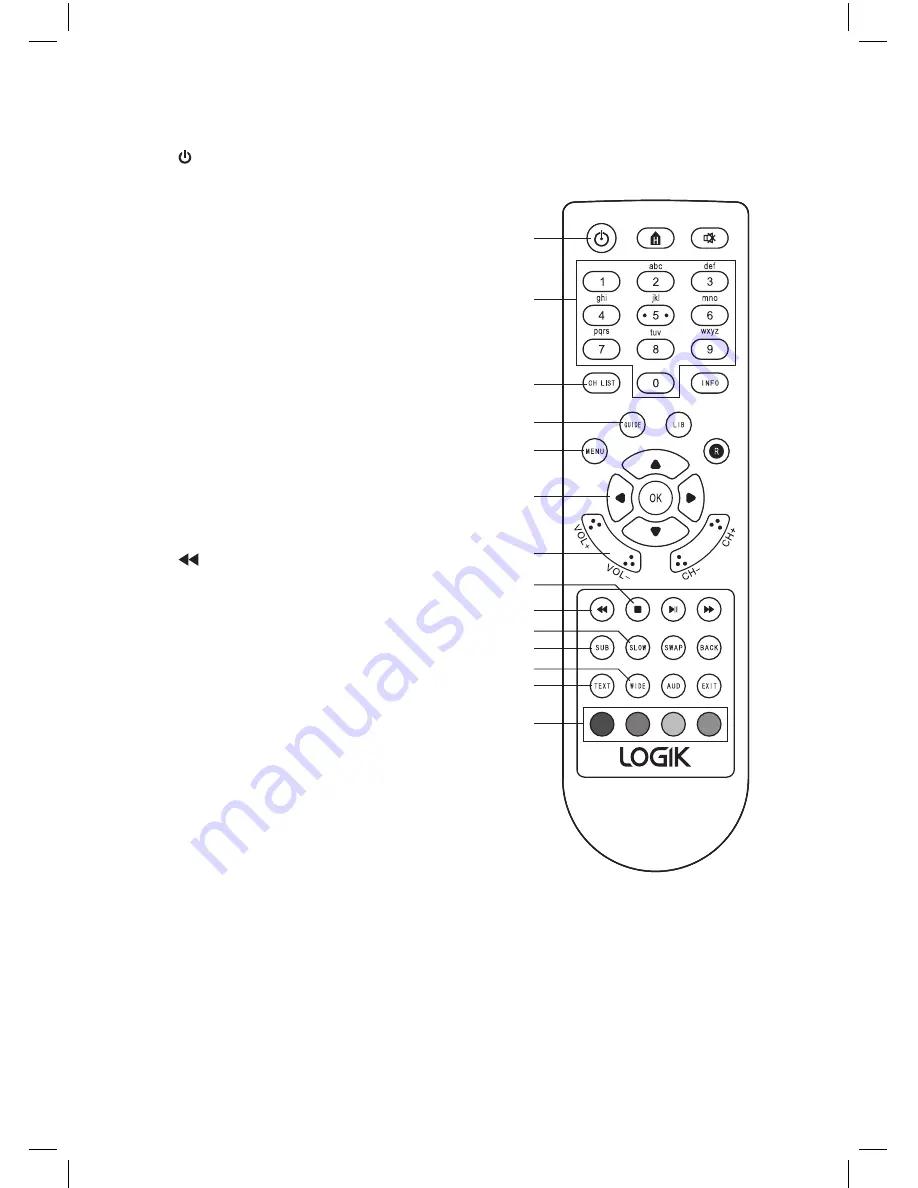
Remote Control

1. 

 Standby Button

•  Switches the unit on and into standby.

2.  0-9 Buttons

•  Selects a channel.

•  Enter numeric values in the set-up 

menus.

•  Selects characters for renaming.

3.  CH LIST Button

•  Displays the Channel list menu.

4.  GUIDE Button

•  Displays the Programme Guide.

5.  MENU Button

•  Displays the Main Menu.

6.  Navigation Buttons

•  Navigates around the menus.

7.  VOL +/- Buttons

•  Adjusts the volume level. 

8.  STOP Button

•  Stops a recording. 

9. 

 Fast Rewind Button

•  Rewinds a recording  

2X-4X-8X-16X-32X.

10.  SLOW Button

•  Plays a recording in slow motion  

five different speeds (1-2-3-4-5).

11.  SUB Button

•  Switches subtitles on and off.

12.  WIDE Button

•  Switches the Aspect Ration between  

4:3 - 16:9 and AUTO screen size.

13.  TEXT Button

•  Displays digital text when available.

14.  Coloured Buttons 

(Red, Green, Yellow, Blue)

•  For interactive use and navigating menus.

1

2

3

4

5

6

7

8

9

10
11
12
13

14

L5SSTB13_IB.indd   8

28/08/2014   11:53

Summary of Contents for L5SSTB13

Page 1: ...Instruction Manual 500GB Freeview TV recorder L5SSTB13 L5SSTB13_IB indd 1 28 08 2014 11 53...

Page 2: ...5 Programme Information 16 Audio Channel 16 Selecting Subtitles 16 Selecting the Aspect ratio 16 Pausing Live TV 17 Pausing and playing TV 17 Fast Forward 17 Fast Rewind 17 Slow Motion 17 Digital Text...

Page 3: ...Display Settings 25 Parental Lock 26 Factory Reset 26 Advanced Setting 27 Format HDD 28 Retune 28 System Information 29 Hints and Tips 30 Specifications 31 L5SSTB13_IB indd 3 28 08 2014 11 53...

Page 4: ...Please dispose of batteries correctly by following the guidance in this manual The batteries shall not be exposed to excessive heat such as sunshine fire or the like Read all the instructions careful...

Page 5: ...int within an equilateral triangle is intended to alert the user to the presence of important operating and maintenance servicing instructions in the manual accompanying the unit Service To reduce the...

Page 6: ...ding this instruction manual in order that you fully understand all the operational features it offers You will also find some hints and tips to help you resolve any issues Read all the safety instruc...

Page 7: ...C IN Socket 1 2 3 4 If you already have a Digital TV we recommend that you connect an RF lead from the RF OUT socket on the set top box to the aerial socket on your TV If you have an Analogue TV then...

Page 8: ...he menus 7 VOL Buttons Adjusts the volume level 8 STOP Button Stops a recording 9 Fast Rewind Button Rewinds a recording 2X 4X 8X 16X 32X 10 SLOW Button Plays a recording in slow motion five different...

Page 9: ...programmes 20 OK Button Press to confirm menu settings 21 CH Button Press to scroll up and down channels 22 PLAY PAUSE Button Press the play or pause recordings 23 FAST FORWARD Fast forwards a recordi...

Page 10: ...batteries Do not dispose of used batteries as domestic waste Dispose of them in accordance with local regulations Handling the Remote Control Take care of your fingernails when you press and hold the...

Page 11: ...cable not supplied to the TV socket on the rear panel of the unit and the other end to the SCART socket on your TV Aerial To aerial wall socket To RF IN socket To SCART socket RF Coaxial Cable not in...

Page 12: ...of the RF coaxial cable not supplied to the aerial socket on the wall and the other end to the RF IN socket on the rear panel of the unit 3 Connect one end of the SCART cable not supplied to the TV so...

Page 13: ...hours if the unit hasn t dectected any activity You can switch this feature off or change it to switch into standby after 4 hours 1 Press MENU 2 Press the buttons to highlight Settings Then press OK S...

Page 14: ...itter East Anglia Channels Found 16 Progress Signal 45 90 TV Region Selection Fri 08 Mar 16 52 Select Confirm OK Please select your preferred region England London is your currently selected region En...

Page 15: ...tch off at the mains Selecting a programme You can select a programme in a few different ways You can select a programme directly by using the CH or NUMBER buttons OR Press CH LIST and then the button...

Page 16: ...programme you are viewing 2 Press the INFO button again to display the Service information 3 Press the INFO button a third time A brief description of the current and next programme with be displayed...

Page 17: ...e red recording LED will light on the unit 2 Press the PLAY PAUSE button again to resume the recorded TV programme 3 Press the STOP button to resume watching LIVE TV Fast Forward 1 Press the FAST FORW...

Page 18: ...his menu you can select a programme to watch record or set a reminder so you don t miss the programme Navigating the Programme Guide 1 Press the GUIDE button to display the Programme Guide 2 Press the...

Page 19: ...his programme has subtitles AD This programme has audio description SL This programme has sign language A reminder has been set for this programme This programme has been set to be recorded R L5SSTB13...

Page 20: ...ingle Event Series Event Wed 08 Sep 16 52 Programme Guide 001 BBC ONE 002 BBC TWO 003 ITV 1 004 Channel 4 005 FIVE 006 ITV 2 Digging for Britian New Tricks Paul O Grady Live Ultimate Big The Mentalist...

Page 21: ...when a psychic tells his daughter to resolve his unfinished business DRAMA S AD Big Brother OK R 2 Hours 2 Hours 24 Hours 24 Hours Rec Watch EXIT Exit Menu Navigate 21 00 22 00 23 00 R 3 Press the RE...

Page 22: ...t Name Date Status New Tricks BBC ONE 1 10 Dead Man Talking UCOS reinvestigate the death of Recorded at 21 00 00 Total Time 01 02 34 0001 0002 0003 0004 New Tricks Countdown BBC News The One Show 07 0...

Page 23: ...re tune the set top box Locking a Channel Channels can be locked to prevent people from watching them To watch locked channel the user will need to know the password 1 Press the buttons to highlight...

Page 24: ...E 6 ITV 2 7 BBC THREE 9 BBC FOUR 10 ITV 3 1 BBC ONE BBC ONE 3 ITV 1 Moving a Channel 1 Press the buttons to hightlight the channel that you would like to Move 2 Press the BLUE button the highlighted c...

Page 25: ...ormat HDD 1 Press the MENU button to view the Main Menu 2 Press the buttons to hightlight Settings and press OK button Display Settings From the Display Settings Menu you can access the following Aspe...

Page 26: ...first time you set the Password the Old Password option will be skipped 4 Press to switch the Parental Pin ON 5 Press the button to highlight New Password press the NUMBER buttons to enter a new passw...

Page 27: ...ay wish to record view Lip Sync Sometimes you may notice a delay between the sound and the picture You can use the Lip Sync feature to correct this 1 Switch Lip Sync ON 2 When watching a programme pre...

Page 28: ...tune The Retune feature is very handy if you have moved to a different area You will need to retune the channels to pick up the local channels in your new area Selecting Retune will tune in all of the...

Page 29: ...formation will be useful Select Confirm OK Return BACK Wed 08 Sep 16 52 Main Menu Exit Menu EXIT Retune System Information Settings Library Channel Organiser Return BACK Exit Menu EXIT System Informat...

Page 30: ...aspect ratio Change the aspect ration on the unit and your TV Picture freeze or has block effects Bad record signal Reposition the aerial for better reception No response with remote control Unit in s...

Page 31: ...z Input Frequency 470 Mhz 862 Mhz Maximum Power Consumption 12 W Standby Power Consumption 0 5 W Hard Disk 500GB Dimensions 218 x 175 x 44 mm Weight 0 8 kg Features and specifications are subject to c...

Page 32: ...r licence DTV Services Ltd 2002 Manufactured under license from Dolby Laboratories Dolby and the double D symbol are trademarks of Dolby Laboratories All trademarks are the property of their respectiv...

Reviews: