Logik L40LCD11 Instruction Manual Download Page 41

41

GB

U

sing the F

ea

tur

es

Parental Guidance

This function allows you to set up blocking schemes to block specific programmes and ratings. It operates according to 
information from the broadcasting station, therefore if the signal has incorrect information, this function will not operate. This 
allows you to set up blocking schemes to block specific programmes and ratings.

This TV is programmed to remember which option it was last set to even if you switch the TV off.

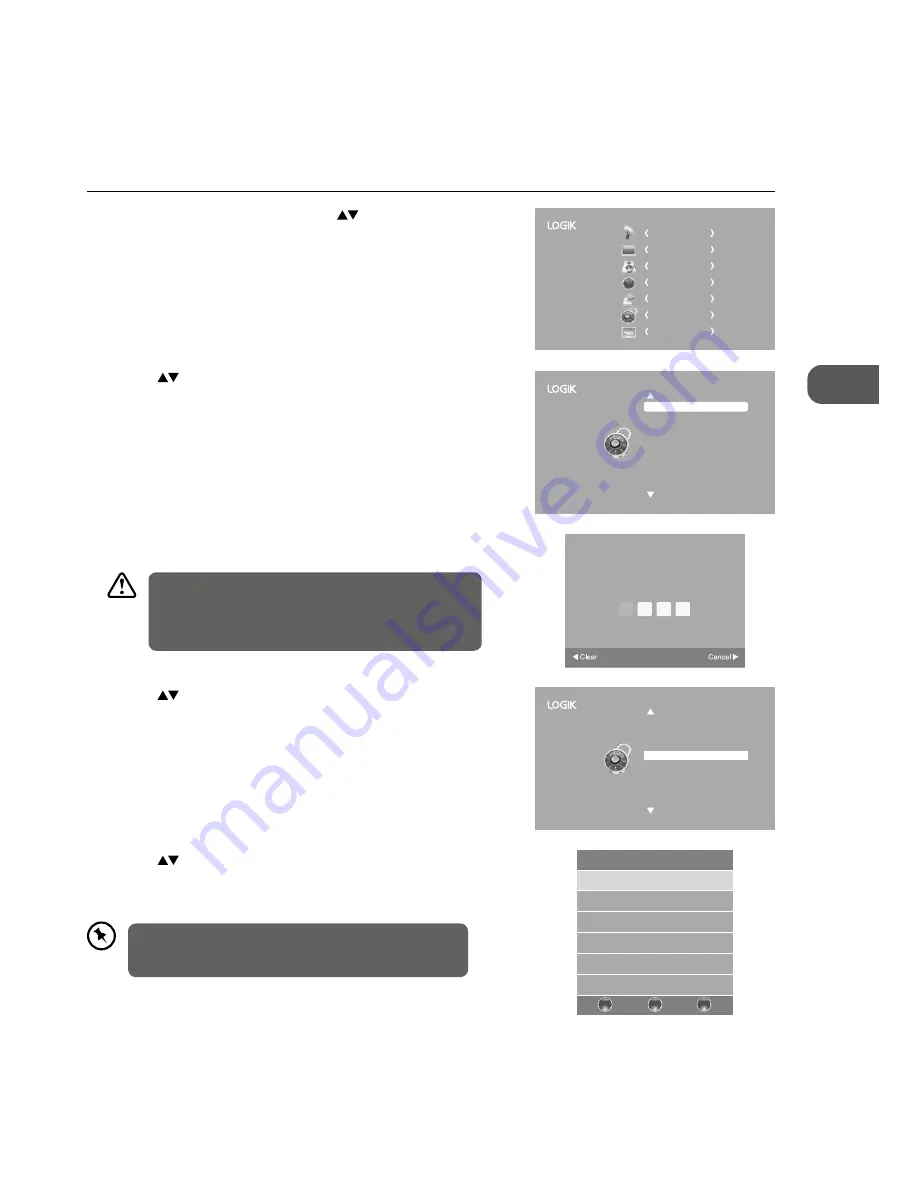
1.  Press the MENU button and then press the 

 buttons to select the 

LOCK menu and then press the OK button.

CHANNEL

PICTURE

SOUND

TIME

OPTION

LOCK

EXIT

Lock System

Set Password
Block Channel
Parental Guidance

Off

Key Lock

Off

Off

2.  Press the 

 buttons to select Lock System and then press the OK 

button.

5.  Press the 

 buttons to select an age rating: Off, 4-18. Then press the OK 

button to confirm to return to the previous menu.

6.  Press the EXIT button to exit the menu.

4.  Press the 

 buttons to select Parental Guidance and then press the 

OK button.

Lock System
Set Password
Block Channel

Parental Guidance

Off

Key Lock

Off

Off

Parental Guidance

 Off

 4

 5

6

7

8

BACK

MENU

EXIT

3.  Use the 0-9 buttons to input a 4-digit password to enter the LOCK menu 

and then press the OK button to turn the Lock System On.

Please enter password

The default password is “0000”.

If you change the password, be sure to remember the new 
password! If you forget the new password, press the master 
password“8899”.

When a programme is rated above the selected age rating, 

the programme will be blocked, a valid password must be 

entered.

Summary of Contents for L40LCD11

Page 1: ...40 HD Ready 1080p Digital LCD TV Instruction Manual L40LCD11...

Page 2: ......

Page 3: ...Selecting the Input Source 19 Display Channel Information 19 Volume Adjustment 19 Using the Features 20 Customising the Channel Setting TV DTV or Radio Mode 20 Auto Tuning ATV DTV mode 20 ATV Manual...

Page 4: ...4 EPG Electronic Programme Guide DTV Mode 44 Switch On Off EPG 44 Select a Programme 45 Using the Features via USB Port 46 Photo 46 Music 46 Movie 47 Text 48 PVR Personal Video Recorder 49 Time Shift...

Page 5: ...1 Thank youfor purchasing your new Logik 40 HD Ready 1080p Digital LCD TV Your new TV has many features and incorporates the latest technology to enhance your viewing experience We recommend that you...

Page 6: ...nected to the TV 2 Lay the TV down on a flat surface with the back side facing up Please make sure to place a soft cushioned material such as a pillow or thick piece of foam beneath the screen plugs l...

Page 7: ...ill illuminate blue when the timer programming has started in the standby mode 3 VOL Adjusts the volume Press to select and adjust a setting in the OSD menu 4 CH Press to select a channel or select a...

Page 8: ...r devices with a VGA interface 6 CI Common Interface Slot Allows the insertion of a Common Access Module Refer to page 24 for details 7 SCART To connect to a VCR DVD Player or other AV device with a S...

Page 9: ...nly use the battery type indicated in this manual When the batteries are exhausted the remote will not function Replace both batteries at the same time with new ones Do not install new batteries with...

Page 10: ...usic Movie Sports Personal 11 ASPECT Allows you to watch the screens in various formats Auto 4 3 16 9 Zoom Smart Zoom Dot to Dot Subtitle Dot to Dot only operates in YPBPR HDMI mode 12 GUIDE Displays...

Page 11: ...e current programme DTV mode 27 To start the timeshift playback DTV mode To start playback or pause Media DVD mode 28 PROG Programme the DVD DVD mode 29 Stop To stop the playback or recording DVD Medi...

Page 12: ...f the index from teletext ATV mode AUDIO Switches between the audio languages only applicable when the TV programme disc has this features DTV DVD mode Select stereo Dual Sound Reception ATV mode 39 C...

Page 13: ...ins cable 3 Press the I button at the front right side of the TV or the button on the remote control to turn on your TV 4 Press the SOURCE button at the front right side of the TV or the INPUT button...

Page 14: ...onnect the TV s PC AUDIO input socket to the computer s audio output socket 2 Plug the connected devices into the mains socket before switching on the POWER ON OFF switch which is located at the rear...

Page 15: ...hen press the OK button to confirm Connecting an AV Device with a SCART Cable 1 Use a SCART cable to connect the TV s SCART input socket to an external AV device s SCART output socket 2 Plug the conne...

Page 16: ...at the front right side of the TV or the INPUT button on the remote control to display the Source List Use the buttons to select any desired input source and then press the OK button to confirm Connec...

Page 17: ...ect the TV to the mains supply until you have completed all the connections If a hard disk is used make sure its mains adapter is connected to the mains supply If a USB hub is used make sure its mains...

Page 18: ...e First Time 1 Connect the mains cable to the mains socket after you have completed all the connections 2 Switch on the POWER ON OFF switch which is located at the rear of the TV next to the mains cab...

Page 19: ...blocked channel is selected the password screen will be displayed Press the 0 9 buttons to enter the password the channel will then be unlocked refer to page 22 23 for details on Channel Edit Press th...

Page 20: ...n and then press the buttons to select the country where you will operate the TV Press the OK button to confirm 2 Press the buttons to select Auto Tuning and then press the OK button Customising the C...

Page 21: ...IT button to exit the menu DTV Manual Tuning DTV mode Allows you to make manual fine tuning adjustments of the channel under DTV mode 1 Press the MENU button and then press the buttons to select the C...

Page 22: ...Press the buttons to select Channel Edit and then press the OK button 3 A Channel Edit screen will pop up Press the buttons to select the programme you want to edit a Delete Press the RED button to d...

Page 23: ...the OK button d Skip Press the BLUE button to select the channels that you want to skip when you are selecting channels Press the BLUE button again to undo it e FAV Favourite Press the FAV button to s...

Page 24: ...he Common Access Module 1 Before you remove the Common Access Module ensure that the TV is switched off 2 Pull the Common Access Module from the slot 3 Switch the TV on CI Common Interface DTV Mode Th...

Page 25: ...nax Conditional Access Main menu Press OK to select Press EXIT to quit CI Information Smart Card Information Language Software Download Module Information This screen is for illustration only 2 Press...

Page 26: ...nload 20 Software Update OAD 66 If you experience difficulties after the software update we recommend that you restore your TV to the factory default settings To do this follow the steps below 1 Press...

Page 27: ...irm Adjusts the colour components independently to achieve a warm or cool for Personal mode Cold Increases blue tint Normal Warm Increases red tint Noise Reduction Press the buttons to select to reduc...

Page 28: ...provides an enhanced listening experience unlike any other technology that has been offered for a two speaker playback environment TruSurround HD builds upon its predecessor the industry leading surro...

Page 29: ...s the secondary broadcast language to the loudspeakers DUAL I II Sends the primary and secondary broadcast languages to the loudspeakers Speaker Sound Output Selection DTV Mode While watching a DTV pr...

Page 30: ...180 240 min directly 2 To cancel the sleep time press the SLEEP button repeatedly until Off appears Sleep Timer Off 10min 20min 30min 60min 90min BACK MENU EXIT Auto Standby The unit will automatical...

Page 31: ...ack Light 8 English English West English 3 Press the buttons to navigate the menu and change the settings Press the OK button to confirm and return to the previous menu 4 Press the EXIT button to exit...

Page 32: ...n to exit the menu 2 Press the buttons to select Audio Language and then press the OK button Audio Language DTV Mode Allows you to select your desired audio language Available for digital channels if...

Page 33: ...Press the EXIT button to exit the menu 2 Press the buttons to select Hearing Impaired and then press the OK button to select On Off and return to the previous menu 3 Press the EXIT button to exit the...

Page 34: ...your preferred file type between FAT32 and Hi Speed FS If you select Hi Speed FS press the button and then press the buttons to select your preferred file size Press the OK button to confirm and then...

Page 35: ...e picture without any alteration while filling the entire screen However the top and bottom of the picture will be cropped This selection will allow you to zoom in the picture without any alteration w...

Page 36: ...Back Light 8 English English West English CHANNEL PICTURE SOUND TIME OPTION LOCK EXIT Backlight Allows you to adjust the backlight setting of your TV This controls the brightness and display performa...

Page 37: ...on Hearing Impaired Aspect Ratio Blue Screen HDMI CEC Restore Factory Default OSD Language Audio Language TT Language PVR File System Subtitle Language Off Auto On Back Light 8 English English West En...

Page 38: ...OCK Setting To access the LOCK menu you must enter the password Enter the default password 0000 for first time use To change the password please refer to page 39 Set Password Lock System The Lock Syst...

Page 39: ...new password If you forget the new password press the master password 8899 2 Press the buttons to select Set Password and then press the OK button Lock System Set Password Block Channel Parental Guid...

Page 40: ...00 If you change the password be sure to remember the new password If you forget the new password press the master password 8899 Lock System Set Password Block Channel Parental Guidance Off Key Lock O...

Page 41: ...ey Lock Off Off 2 Press the buttons to select Lock System and then press the OK button 5 Press the buttons to select an age rating Off 4 18 Then press the OK button to confirm to return to the previou...

Page 42: ...Off Key Lock Off Off 3 Use the 0 9 buttons to input a 4 digit password to enter the LOCK menu and then press the OK button to turn the Lock System On Please enter password The default password is 0000...

Page 43: ...text while watching a TV programme press the TEXT button twice The text will be superimposed over the TV programme Double height text If you have difficulty reading the text on the TV you can double...

Page 44: ...Guide EPG to help you navigate through all the possible viewing options The EPG supplies information such as programme listings start and end times for all available services In addition detailed info...

Page 45: ...to confirm BLUE Remind Press the BLUE button while on the selected programme the Reminder setting menu will be displayed Press the buttons to adjust the settings and then press the OK button to confir...

Page 46: ...uttons to select the MEDIA mode and then press the OK button to display the functions bar 2 Press the buttons to select MUSIC and then press the OK button 3 Press the buttons to select your storage de...

Page 47: ...ct MOVIE and then press the OK button Some audio file formats will not be supported Supported file formats MPEG1 2 5 Select the music you want to play it will show the music information Album Title Bi...

Page 48: ...ect your storage device and then press the OK button Text 1 Press the SOURCE button at the front right side of the TV or the INPUT button on the remote control then press the buttons to select the MED...

Page 49: ...nd return to the current live broadcast press the button and then press the button to confirm Time Shift Mode and Recording functions may not work if the signal strength is weak Stop the time shift fu...

Page 50: ...duled recording 1 Press the GUIDE button on the remote control The EPG menu will appear 10 00 11 00 Pinky and perky Frankenstei No information 2 BBC TWO My Fair Lady 7 BBC THREE This is BBC THREE 70 C...

Page 51: ...VE 1 11 Mar 2008 10 00 Schedule List 15 30 10th Mar Delete Time Date Programme Title Channel Name Back 4 Press the buttons to select the MY PVR folder and then press the OK button Press the buttons to...

Page 52: ...to display the function bar 6 Press the buttons and then press the OK button to select the function Pause FB FF Prev Next Stop Repeat All Set A Playlist Info 7 Press the EXIT button or the Stop button...

Page 53: ...ext to the mains cable is switched on Make sure all connected AV devices are switched off before switching on your TV The remote control does not work Check to see if there are any objects between the...

Page 54: ...ed to rescan your digital box or TV Don t worry it easy to do And once you ve done it you should get all the Freeview channels available to you If problems persist you may need to get your aerial chec...

Page 55: ...720 x 480 576I 720 x 576 50 576P 720 x 576 720P 1280 x 720 50 60 1080I 1920 x 1080 50 60 1080P 1920 x 1080 50 60 PC Mode Please check the display settings of your computer before connecting to the TV...

Page 56: ...CAM BG DK DK Brightness 360 450 cd m2 Contrast Ratio 3000 4500 1 Inputs Output SCART 1 HDMI 3 VGA 1 PC AUDIO 1 YPbPr 1 Common Interface 1 AV 1 USB 1 AUDIO IN RCA 1 L R COAXIAL 1 RF 75 1 Speaker Power...

Page 57: ...ecting other devices or moving the unit Unplug the unit from the mains socket during a lightning storm Mains Cable Make sure the unit or unit stand is not resting on top of the mains cable as the weig...

Page 58: ...llowing the guidance in this manual Supervision Children should be supervised to ensure that they do not play with the unit and the remote control Never let anyone especially children push anything in...

Page 59: ...poration Reverse engineering and disassembly are prohibited Restriction on Use Rovi Trade Mark Rights Use of the copyright protection technology contained in this product must be authorised by Rovi Co...

Page 60: ......

Page 61: ......

Page 62: ......

Page 63: ......

Page 64: ......

Reviews: