background image

14

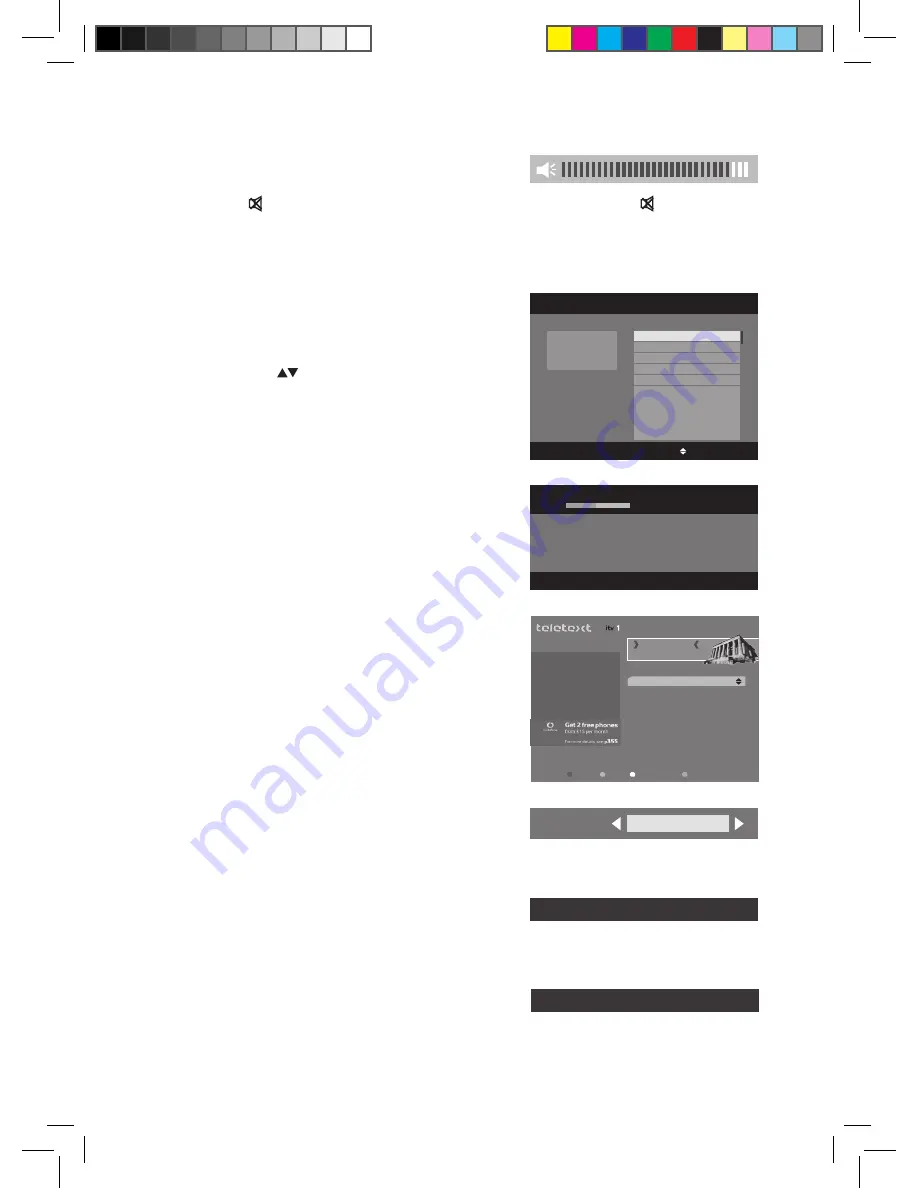
Aspect Ratio

Press the WIDE button on the remote control to select 

the menu in 16:9, 4:3 pan scan or 4:3 letter box.

Subtitles

Press the S button on the remote control to switch 

subtitles ON / OFF.

Audio Description

Press the AD button on the remote control to switch 

Audio Description ON / OFF.

Teletext Selection

1.  Press the TEXT button on the remote control to 

enter Teletext. (If Teletext is transmitted)

2.  Press the TEXT button again or press the EXIT 

button on the remote control to exit the Teletext 

(TV mode).

Volume Adjustment

1.  Press the V+ / – buttons on the remote control to 

adjust the volume.

2. 

Press the   button on the remote control to switch the sound off. Press the 


button again or 

press the V+ / – buttons to cancel this function.

Channel Selection

1.  Press the P+ / – buttons on the remote control 

repeatedly or the 0-9 buttons on the remote 

control to select the channel.

2.  Press the OK button to enter the Channels List. 

Then use the 

 buttons to select the channel 

and then press the OK button to watch. 

TV/RADIO Selection

Press the TV/R button on the remote control to switch 

between TV and radio mode.

NICK SNAITH

Send in you all-time favourites as Nick Snaith presents

the Lunchtime Playlist. 

738     HEART

NOW

Sat, 12 Sep 19:25

TX

300

400
150
200
170
110
800
160
818

News  


Sport    
Weather   
Holidays     
Holiday Ideas    
TV Guide  
Entertainment   
Traffic/Travel      
Night Out listings  

Press Text to exit

Feb 1

Home

ON

A to Z

HELP

SHORTCUTS

MENU

ESCAPE TO EUROPE 

FOR THE WEEKEND!

p200

DVB Subtitle  ON(English)

Audio Description ON(English)

Aspect ratio

16:9

OK:Tune

GUIDE

BACK

Press MENU to group

channels by theme or 

user.

CHANNEL LIST                                                                          Sat, 12 Sep 19:23

1        BBC ONE
2        BBC TWO
7        BBC THREE

L160_250STB11_IB_final110705.indd   14

05/07/2011   4:28 PM

Summary of Contents for L160STB11

Page 1: ...160GB 250GB Freeview TV Recorder Instruction Manual L160STB11 L250STB11 L160_250STB11_IB_final110705 indd 1 05 07 2011 4 28 PM ...

Page 2: ...L160_250STB11_IB_final110705 indd 2 05 07 2011 4 28 PM ...

Page 3: ...Passive Standby Mode 12 Basic Features 13 Information Bar 13 Volume Adjustment 14 Channel Selection 14 TV RADIO Selection 14 Teletext Selection 14 Aspect Ratio 14 Subtitles 14 Audio Description 14 Audio Selection 15 Favourite List 15 TV Guide 16 Switch On Off TV Guide 16 Select a Programme 16 Button Functions in a 7 Days Guide 16 Planner TV 17 Switch On Off Planner TV 17 Record Column 17 Button Fu...

Page 4: ... Recorded Programme 22 Channel Zero 23 Channels Menu 26 Organise 26 Groups 27 Install Menu 28 Automatic Tune 28 Manual Scan 29 Restore Factory Default 30 Version 31 Format Hard Drive 31 Settings Menu 32 Language 32 TV 33 Time 34 Parental Lock 35 Updates 36 Hints and Tips 37 Specification 38 Safety Warnings 39 L160_250STB11_IB_final110705 indd 4 05 07 2011 4 28 PM ...

Page 5: ... 321012 70 Thank youfor purchasing your new Logik Freeview TV Recorder We recommend that you spend some time reading this instruction manual in order that you fully understand all the operational features it offers You will also find some hints and tips to help you resolve any issues Read all the safety instructions carefully before use and keep this instruction manual for future reference If item...

Page 6: ... Button To record the current programme 5 Remote Control Sensor 6 Power indicator Illuminates red in standby mode Illuminates green in on mode Flashes red when a programme is recording Alternatively flashes red and green when two programmes are being recorded at the same time Illuminates amber when Channel Zero is loading 7 LED Display Displays the current time in standby mode Displays the current...

Page 7: ... TEXT Button To turn the teletext function on off 7 AUDIO Button To display the Audio Channel menu 8 MENU Button To display the Main menu 9 EXIT Button To exit the menu and return to normal TV viewing 10 GUIDE Button To display the TV Guide 11 V Button To increase and decrease the volume 12 P Button To select channels 13 Button To display the current channel s information such as the current time ...

Page 8: ...e 21 AD Button To switch On Off audio description if available 22 PLAY Button Press once to display the Planner TV Press twice to start playback in the Planner TV menu when you select the recorded programme 23 Button To stop playback or recording 24 Button To pause playback To start timeshifting Press repeatedly to play frame by frame 25 Button To record the current programme 26 Button To skip rew...

Page 9: ...aste Dispose of them in accordance with the local regulations If you are not going to use the unit for a long time remove the batteries to avoid change from battery leakage and corrosion Handling the Remote Control Do not drop or cause impact to the remote control Do not spill water or any liquid on the remote control Do not place the remote control on a wet object Do not place the remote control ...

Page 10: ...t on the rear panel of the unit 3 Connect the female end of the loop through cable included to the RF OUT1 socket and the male end to the RF IN2 socket on the rear panel of the unit 4 Connect one end of the SCART cable not supplied to the SCART socket on the rear panel of the unit and the other end to the SCART socket on your TV 5 Connect another RF coaxial cable not supplied to the RF OUT2 socket...

Page 11: ...f this happens when you install your unit the TV Region Selection screen will appear Please select your preferred region Making this choice will ensure that you will receive the correct regional news programmes TUNE page 1 of 1 Tue 1 Jun 00 08 666 000 MHz FFT 2K GI 1 32 QAM 16 FEC 3 4 Progress Signal TV 6 CBBC Channel BBC Red Button BBC NEWS BBC THREE BBC TWO BBC ONE BACK 0 71 Radio 0 3 The tuning...

Page 12: ...o confirm The unit will then enter the passive standby and the power indicator will illuminate red In passive standby mode less power will be dissipated The clock will display on the LED display To turn the unit on again first press the button once the unit will then enter the active standby mode and Stby will be displayed on the LED display Press the button again to turn the unit on the power ind...

Page 13: ...IT The prople of Norfolk pour in to have their antiques valued by experts Philip Serrell and Mark Stacey Paul Martin also hears some heart warming tales when he visits the Redwings Horse Sanctuary S 2 BBC TWO NEXT 20 00 1 30 13 05 V I AD S TX H O H 16 1 Channel number currently viewed 2 Channel name currently viewed 3 Programme progress bar 4 Programme start time 5 Programme duration 6 Information...

Page 14: ... the P buttons on the remote control repeatedly or the 0 9 buttons on the remote control to select the channel 2 Press the OK button to enter the Channels List Then use the buttons to select the channel and then press the OK button to watch TV RADIO Selection Press the TV R button on the remote control to switch between TV and radio mode NICK SNAITH Send in you all time favourites as Nick Snaith p...

Page 15: ...st 1 Press the button on the remote control when you watching a live programme a pop up confirmation screen will be displayed Press the button to select YES and then press the OK button to enter Channel Organiser menu 2 Press the buttons to select your desired channel to be set as favourite Press the 1 button on the remote control and then press the OK button to confirm 3 Press the EXIT button on ...

Page 16: ...ame Select a Programme Press the buttons to select the desired channel and then press the buttons to select the desired programme Press the OK button to confirm Button Functions in a 7 Days Guide Remote Control Button Function or To select a channel or To select a channel programme P or P To display previous or next page To display the detail Information for the selected programme OK To confirm an...

Page 17: ...city OK To start the playback of the selected programme only for the recorded or currently recording programme RED Delete Press the RED button while on the selected programme to delete the programme from the list a pop up confirmation screen will be displayed Press the button to select YES and then press the OK button to delete or press the button select NO and then press the OK button to cancel G...

Page 18: ...s the OK button to confirm 2 A recording progress bar will be displayed on the screen for a short while You may press the button to display the recording progress bar at any time during recording You hace started a recording What do you want to do RECORD UNTIL I PRESS STOP STOP AT END OF THIS PROGRAMME Question Time Extra STOP AT END OF NEXT PROGRAMME BBC NEWS YES NO Are you sure you want to stop ...

Page 19: ...ecording in the Channel List menu press the OK button to display the Channel List the recording programme will be highlighted in red Press the buttons to select the channel and then press the button on the remote control 2 A pop up confirmation screen will be displayed Press the button to select YES and then press the OK button to stop recording or press the button to select NO and then press the ...

Page 20: ...C NEWS 24 BBCi SINGLE SOUTH TODAY 18 30 19 00 0 30 BBC ONE Press i for program details TV GUIDE Sat 12 Sep 19 22 P P OK Tune BACK Date PLANNER Rec Sat 12 Sep 18 30 South Today Ben Fogle s Spendaholics Africa Cup of Nations 2 This is CBBC News 24 Tonight BBC News Torchwood The One S EastEnders T 19 00 19 30 BBC ONE BBC TWO BBC THREE CBBC Channel BBC NEWS 24 BBCi REMIND 2 If the programme you select...

Page 21: ... press the button to play the missed broadcast programme The time shift progress bar will display on the screen again The video and sound may have a little bit of delay or be out of sync for a few seconds when the unit starts to playback the missed broadcast programme It will soon turn to normal Remote Control Button Function During playback press the button to display a still screen and then pres...

Page 22: ...LO 09 05 09 15 0 10 FIVE Press i for details PLANNER TV Fri 4 Jun 09 33 GUIDE DELETE Ebb and Flo Fri 4 Jun 09 11 Thu 12 Oct 13 03 Thu 12 Oct 13 07 Thu 12 Oct 13 03 Fri 4 Jun 09 06 Fri 4 Jun 09 06 EVENT 9 EVENT 10 EVENT 9 GMTV GMTV Recording 0 03 Recording 0 03 Failed 0 01 Failed 0 05 Partial 0 00 Partial 0 02 3 The playback progress bar will be displayed for a short while Press the button to displ...

Page 23: ...very 3 Press the OK button to search and a message will be displayed Your interactive content is not available Have you unplugged your receiver or recently had a power cut To receiver content leave your receiver in standby and switched on at the mains when not in use Press OK to search for content or BACK to cancel To learn more visit www ch zero tv Searching for a service please wait Pree BACK to...

Page 24: ...24 L160_250STB11_IB_final110705 indd 24 05 07 2011 4 28 PM ...

Page 25: ...25 L160_250STB11_IB_final110705 indd 25 05 07 2011 4 28 PM ...

Page 26: ...m Rename Press the 5 button A pop up confirmation screen will be displayed Press the button to select YES and then press the OK button to confirm The rename channel menu will be displayed Press the 0 9 buttons to rename the channel name and then press the OK button to confirm P P OK Save 1 Fav 2 Lock 3 Skip 4 Delete 5 Rename BACK 1 BBC ONE 2 BBC TWO 3 SIT 3 4 SIT 4 5 SIT 5 7 BBC THREE 56 Test HD 1...

Page 27: ... Sep 19 23 Organise Groups 3 Press the buttons to select the channels and then press the Coloured buttons on the remote control to group the channels The group colour will be displayed on the left side and the channels are displayed on the right side 4 Press the button to edit the group name on the left side and then press the buttons to select a colour for the group to be renamed Press the 0 butt...

Page 28: ...ton to select YES and then press the OK button to start automatic tune Install Menu Automatic Tune 1 Press the MENU button and then press the buttons to select Install Press the button or the OK button to confirm 2 Press the buttons to select Automatic Tune and then press the OK button to confirm OK BACK Channels Install Settings MENU Thu 3 Jun 20 21 Automatic Tune Manual Scan Restore Factory Defa...

Page 29: ...ton to confirm 3 Press the buttons to choose the Channel No or Freq MHz and then press the OK button to start manual scan Channel No Press the buttons to select the channel number and then press the OK button to start the manual scan Frequency Press the 0 9 button to input the desired frequency and then press the OK button to start the manual scan 4 When the channel is tuned it will display on the...

Page 30: ...estore Factory Default Version Format hard drive Factory reset will reset your receiver to its original settings Your interactive settings will NOT be changed Please see www ch zero tv for details on how to reset these Are you sure YES NO Please enter PIN 3 A pop up confirmation screen will be displayed Press the button to select YES and then press the OK button to restore to factory default 4 A v...

Page 31: ...Buid 13 OK BACK Channels Install Settings MENU Thu 3 Jun 20 21 Automatic Tune Manual Scan Restore Factory Default Version Format hard drive FORMATTING YOUR MEMORY DEVICE WILL CAUSE ALL RECORDED PROGAMMER TO BE LOST Are you sure YES NO This can take several minutes DO NOT SWITCH OFF YOUR RECEIVER DURING THIS TIME Formatting memory device Version 1 Press the MENU button and then press the buttons to...

Page 32: ...for digital channels if multiple audio languages are broadcast Alternative Audio Allows you to select your desired secondary audio language Available for digital channels if multiple audio languages are broadcast Preferred Subtitles Allows you to select your desired subtitle language Available for digital channels if multiple subtitle languages are broadcast MHEG Language Allows you to select your...

Page 33: ...ut 4 3 Letter box Widescreen picture shown in the full screen with black bars on the top and bottom of the screen 16 9 Widescreen picture shown in the full screen Video Output Allows you to select from CVBS RGB from the SCART socket Digital Audio Allows you to select from Off Compressed PCM Auto Standby Allows you to select from 3 hours 5 hours 8 hours Off The unit will automatically switch to sta...

Page 34: ... as default 4 Press the BACK button on the remote control to return to the previous menu 5 Press the EXIT button on the remote control to exit the menu 3 In the TIME menu press the buttons to select the item you want and then press the buttons to adjust the setting Press the OK button to confirm Time 1 Press the MENU button and then press the buttons to select Settings Press the button or the OK b...

Page 35: ... 12 Sep 18 24 None OK Save 0 9 BACK Parental rating Old PIN New PIN Confirm new PIN PARENTAL LOCK Sat 12 Sep 18 30 None 5 Press the BACK button on the remote control to return to the previous menu 6 Press the EXIT button on the remote control to exit the menu Parental Lock 1 Press the MENU button and then press the buttons to select Settings Press the button or the OK button to confirm 2 Press the...

Page 36: ...ate modes from Auto Manual Off A software updated has been found for your receiver WARNING Do not switch off or unplug your receiver during the updated Do you want to update your receiver YES NO Updates 1 Press the MENU button and then press the buttons to select Settings Press the button or the OK button to confirm 2 Press the buttons to select Updates and then press the OK button to confirm OK S...

Page 37: ... remote control The unit is off Remote control is not being aimed at the unit correctly Front panel is obstructed Batteries are exhausted Plug in and turn on Aim remote control at front panel Check for obstructions Check and replace the batteries in the remote control Forgotten channel lock code Delete locked channel and scan channels again Forgotten menu lock password Master password 2222 After m...

Page 38: ...G 2 ISO IEC13818 1 MPEG 2 Main Profile Main Level Max 15Mbit s 4 3 16 9 Switchable MPEG Layer I II 32 44 1 48KHz RGB CVBS Connection Main Power Cable Tuner Video Audio Data Port Fixed type Antenna input Single scart Stereo audio output digital coaxial audio output RS 232 for service use only Power Supply Input Voltage Power Consumption AC 230V 50Hz MAX 16W standby 2W Features and specifications ar...

Page 39: ... mains socket Read all the instructions carefully before using the unit and keep them for future reference Retain the manual If you pass the unit onto a third party make sure to include this manual Check that the voltage marked on the rating label matches your mains voltage Damage Please inspect the unit for damage after unpacking Do not continue to operate the unit if you are in any doubt about i...

Page 40: ...t contain any user serviceable parts Please leave all maintenance work to qualified personnel Do not open any fixed covers as this may expose dangerous voltages Maintenance Ensure to unplug the unit from the mains socket before cleaning Do not use any type of abrasive pad or abrasive cleaning solutions as these may damage the unit s surface Do not use liquids to clean the unit CAUTION RISK OF ELEC...

Page 41: ...ceiving your existing TV channels and also to pick up new ones Digital UK the body leading the digital TV switchover will advise you when you need to re tune during the switchover For re tuning instructions for this unit please see page 28 30 of this instruction manual If you find you can t receive the extra digital channels it may be because your area is not covered by Freeview yet or that you ne...

Page 42: ...information please contact the local authority or your retailer where you purchased the product NOTE If you require a replacement for any of the items listed below please quote their corresponding part numbers Replacement Part Part Number Remote Control 880 LH4711 TO AAA Battery X 2 890 CZ4157 00 Loop Through Cable 341 321012 70 P N 810 TB11LL 00 Visit Partmaster co uk today for the easiest way to...

Page 43: ...L160_250STB11_IB_final110705 indd 43 05 07 2011 4 29 PM ...

Page 44: ...L160_250STB11_IB_final110705 indd 44 05 07 2011 4 29 PM ...

Reviews: