28
Fertilizer Spreader OM
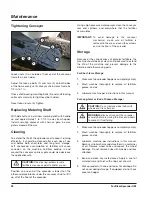
Tightening Conveyor
2
1
5
4
1
3
Loosen nuts (1) on outside of front end of the conveyor
frame (4 on each side).
Adjust the take-up bolts (2) and nuts (3) on both sides
of the frame evenly until conveyor chain clears frame by
1/2 in. to 1 in.
Check shaft bearing mounting bolts (4) and shaft locking
collar set screws (5) for tightness (both sides).
Reset take-up nuts (3). Tighten.
Replacing Metering Shaft
With old shaft out, install new metering shaft with handle
up and approximately 1 to 1-1/2 in. away from hopper.
Install and align sprocket with chain on gate, be sure
gate is closed all the way.
Cleaning
To extend the life of the spreader and to keep it running
efficiently, it should be cleaned after each day of use
and before both short-term and long term storage.
Left unchecked, accumulation of fertilizer will cause
corrosion on the machine. Fertilizer buildup in and
around the conveyor and rear gate could also decrease
the application rate.
CAUTION:
Chemical ingredients in some
fertilizers may cause paint to blister or peel.
Position so one end of the spreader is lower than the
other and place blocks under the conveyor chain to lift it
up off of the floor of the spreader.
Using a high-pressure water sprayer, clean the conveyor,
rear end, spinners, and everywhere that the fertilizer
accumulates.
IMPORTANT:
To avoid damage to the conveyor
mechanism, make sure all fertilizer is
removed in the areas around the spinners
and on the floor of the spreader.
Storage
Because of the corrosiveness of granular fertilizers, the
machine should be kept clean and lubricated to extend
the life of the machine and prevent damage to the
driveline and other moving parts.
For Short-term Storage
1. Make sure the spreader hopper is completely empty.
2. Wash machine thoroughly to remove all fertilizer,
grease, and oil.
3. Lubricate machine per instructions in this manual.
For Long-term or End of Season Storage:
CAUTION:
Do not remove wheel hubs with
wheels and tires attached.
WARNING:
Block and support the spreader
securely before removing the tires and wheels
to prevent it from falling.
1. Make sure the spreader hopper is completely empty.
2. Wash machine thoroughly to remove all fertilizer,
grease, and oil.
3. Lubricate machine per instructions in this manual.
Remove all roller chains and store them in a container
of oil. Remove wheel hubs and repack the wheel
bearings. Do not remove hubs with wheels and tires
attached.
4. Sand and clean any rusted areas. Apply a coat of
metal primer and finish with a top coat of paint.
5. Park spreader with one end lower for drainage. Do
not cover during storage. If equipped, do not have
cover on hopper.
Maintenance
Summary of Contents for FS 800
Page 2: ......
Page 4: ......
Page 8: ......
Page 28: ...20 Fertilizer Spreader OM ...
Page 38: ...30 Fertilizer Spreader OM ...
Page 39: ...31 Fertilizer Spreader OM PARTS IDENTIFICATION AND HYDRAULIC SCHEMATICS Parts Identification ...
Page 63: ...55 Fertilizer Spreader OM Appendix Torque Specifications Inches Hardware and Lock Nuts ...
Page 64: ...56 Fertilizer Spreader OM Appendix Torque Specifications Cont d Metric Hardware and Lock Nuts ...
Page 65: ......

