


13
Battle Ax OM
Checking Rotor Speed
DANGER:
Shut down power from the
excavator before removing the bearing cover
and applying reflective tape to rotor shaft end.
Keep the Battle Ax skids on blocks for this
procedure.
Remove the belt cover. See “Removing Belt Cover” on
page 18 for instructions.
1
2
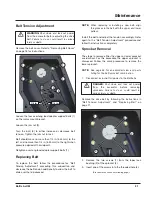
Apply a small piece of reflective tape (1) to the outer edge
of the lower sprocket.
Start the excavator and engage the excavator auxiliary
hydraulics.
DANGER:
Keep hands, feet, and clothing
clear of rotor and bearings while excavator is
running.
Point an electronic (photo) tachometer (2) towards the
edge of the sprocket to check the rotor speed.
NOTE:
The tachometer shown is not supplied with the
Battle Ax.
Test the rotor RPM with excavator engine at full throttle.
Shut down the excavator when done.
If adjustments are necessary, refer to “Adjusting Rotor
RPM” on page 13 to increase or decrease the RPM.
If RPM adjustments are not necessary, make sure power
from the excavator is turned off, then return the belt
cover to its position, securing with all bolts.
Adjusting Rotor RPM
NOTE
: Motor is preset at the factory to maximum
displacement. Motor displacement must be
adjusted on the cutter head to achieve the
recommended speed of 2100 RPM.
Rotor RPM can be fine-tuned for different
applications.
- A higher speed (up to 2600 RPM maximum)
may be desirable for lighter brush and trees.
- A lower speed (down to 2000 RPM minimum)
will provide more torque which can be
helpful in heavier brush and trees.
DANGER:
Shut down power from the
excavator before removing the motor cover to
gain access to the motor.
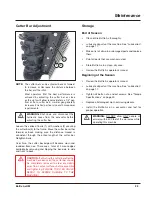
Remove top motor cover. See “Removing Motor Covers”
on page 19 for location and removal instructions.
DANGER:
DO NOT make adjustments while
the machine is running!
DANGER:
Keep hands, feet, and clothing
clear of rotor while excavator is running.
(Procedure continued on following page.)
Set-up Instructions
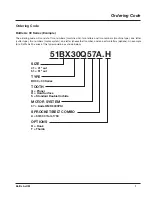
Summary of Contents for 41BX30
Page 2: ......
Page 4: ......
Page 6: ......
Page 8: ......
Page 12: ...2 Battle Ax OM...
Page 35: ...25 Battle Ax OM PARTS IDENTIFICATION Parts Identification...
Page 56: ...46 Battle Ax OM...
Page 59: ...49 Battle Ax OM Appendix Torque Specifications Inches Hardware and Lock Nuts...
Page 60: ...50 Battle Ax OM Torque Specifications Cont d Metric Hardware and Lock Nuts Appendix...
Page 61: ......


