29
Installation
4
4.3
Adjusting the Level Sensor (Automatic Reservoir Only)
☞
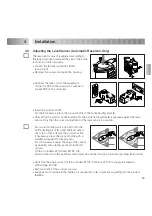
The level sensor must be adjusted according to
the type of product used and the size of the bottle
in order to function properly.
●
Loosen the (3) reservoir knobs
2
and
remove lid
1
.
●
Remove the screws and open the housing.
●
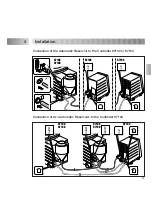
Connect the tank cord to the equipment
connector XS2 on the reservoir as well as to
socket XS2 on the controller.
●
Insert the product bottle.
For the 2 l reservoir, place the product bottle in the bottle nesting block
8
.
●
Check that the product bottle inserted into the bottle nesting block
8
is pressed against the level
sensor. Only then the correct adjustment of the level sensor is possible.
☞
For product bottles which do not fit into the
bottle nesting block
8
, rotate the level sensor
out or in so that it clamps the product bottle.
If necessary, press the product bottle with a
suitable aid against the level sensor.
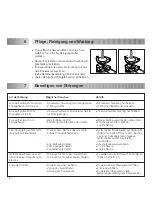
For 0.5 l reservoir adjust the plug of the sensor
by opening and rotating as shown in the left
picture.
On the controllers 97103 and 97123, the
product reservoir in the periphery menu must be switched on (see controller operating instructions).
●
Switch on the power switch of the controller 97102, 97123 or 97103 to supply the reservoir
with voltage 24 VDC.
●
Empty a bottle of the product you use.
●
Leave as much residue in the bottle as is required in order to prevent air getting into the product
feedline.
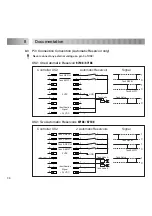
XS2/IN: Controller
XS2/OUT:Tank B
max. operating pressure
8 bar
operating temperature.
0 to +50C
volume:
3,5 Liter
Loctite (Ireland) Ltd.
Ma
de
in G
erm
any
X
S
2
/IN
X
S
2
/O
U
T
P in
XS2/IN
XS2
Summary of Contents for 97105
Page 1: ...R R 97105 97106 97107 97108 ...
Page 2: ......


