background image

3

Preparation

Phillips Screwdriver

To complete the installation you will need:

Flathead Screwdriver

Tape measure or ruler

Pliers

Optional

Screwdriver with drill bits

Drilling is not required to install the lock, and is optional. However if you are installing

your lock on a brand new door, a drill is required if there are no holes prepared for

lock installation.

Summary of Contents for LATCH EDITION SECURE PGD628

Page 1: ...LATCH EDITION INSTALLATION GUIDE SECURE...

Page 2: ...CKLY com installation to watch a video version of this installation guide Download the BILT app in the Apple or Google Play store for step by step interactive 3 D walk through installation instruction...

Page 3: ...This guide will walk you through step by step how to install and get your LOCKLY Secure up and running Installation generally takes less than 30 minutes If you have any questions please reference our...

Page 4: ...lathead Screwdriver Tape measure or ruler Pliers Optional Screwdriver with drill bits Drilling is not required to install the lock and is optional However if you are installing your lock on a brand ne...

Page 5: ...e and confirm that hole in the door edge is 1 25mm You are not required to drill an extra hole on your door We have provided double sided Adhesive tape for you to help stabilize the lock during instal...

Page 6: ...ge of your door and select the correct lockset Select F1 if 2 3 8 60mm or F2 if 2 3 4 70mm 2 3 4 70mm 2 3 8 60mm F 1 F 2 8 m Facing the door exterior install the lockset according to the opening direc...

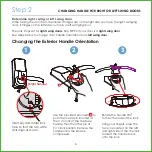
Page 7: ...If hinges on the left side you have a left swinging door Changing the Exterior Handle Orientation Right handle Insert key and rotate lock face so that the two white dots align as shown Use the provide...

Page 8: ...flush against the handle and has popped out Adjust the handle accordingly to make sure the pins are fully decompressed and sits flush against the surface Check that your handle works smoothly by givin...

Page 9: ...irection of the arrow as shown Make sure the screw hole is aligned with the marker as illustrated Changing the Interior Handle Orientation Securely screw clockwise as shown to complete your handle ori...

Page 10: ...leave this pole removed 1 Install Spindle C with the holes side into the base of the lock and align the holes locate in the 3 o clock and 9 o clock position Insert locking pin D in to the hole as show...

Page 11: ...assing the cable and attached rods through the lockset Align the lock straight and press hard if you use the Adhesive tape in step 3 4 to secure the top of the lock Pass the Spindle C through the cent...

Page 12: ...Rods V into the holes to the left and right of the Spindle C The holes are located at the 3 o clock and 9 o clock positions Interior Mounting Plate LK will go against the interior side of your door R...

Page 13: ...o hole was drilled in Preparation P M 5 X 2 5 mm P M 5 X 3 5 mm LK O 3x Pull the cable from the lock exterior through the rectangular hole underneath the positioning rods and spindle Secure the hole a...

Page 14: ...st the interior side of the lock interior so the lock interior sits securely onto the mounting plate 5 6 X Y Plug X cable that is coming through the door into the lock interior Y Match red side of the...

Page 15: ...the lock to the plate by screwing clockwise using provided screws P Insert 4 AA batteries into the lock by aligning the positive and negative orientation markings on the batteries to the battery cham...

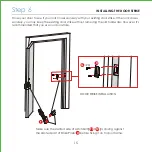
Page 16: ...your existing door strike If the lock closes securely you may keep the existing door strike without removing the old hardware However it s recommended that you use our door strike F H G Make sure the...

Page 17: ...7 Congratulations You have completed the LOCKLY Secure physical lock installation To complete your setup download the LOCKLY app from the iOS or Google Play app Store and follow on screen instruction...

Page 18: ...wireless door sensors that can provide accurate information on the status of your door Whether it s securely shut or still open You can add live status monitoring and voice control capabilities to you...

Page 19: ...equipment FCC Radiation Exposure Statement The Secure Link Wi Fi Hub complies with FCC radiation exposure limits set forth for an uncontrolled environment It should be installed and operated with min...

Page 20: ...ovided Template for drilling instructions if needed 2 3 4 70mm 2 3 8 60mm Measure distance between the center of the hole to the edge of door Use F1 if 2 3 8 60mm or F2 if 2 3 4 70mm R Clamping Tool F...

Page 21: ...meetLOCKLY LOCKLY Connect with us...

Page 22: ...Reference installation parts overview foldout...

Page 23: ...IMPGD62820200923 LOCKLY com help For the latest version of this manual please visit the following link SECURE We re here to help help LOCKLY com...

Reviews: