EN
SlimStone-X
11
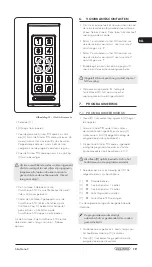
Figure 5.1 -
Waiting light sequence
• Select [1]
• [#] will start flashing
• Enter the Master PIN code you want to use and
press [#]. The Master PIN can be freely chosen,
and must contain a minimum of 4 numbers and a
maximum of 8. Remember this code as it will be
needed to enter the programming mode later on.
• Enter the Master PIN code again and press [#]
to confirm
When two different codes or a wrong code
length is entered, all keys will flash three times,
indicating the code setting hasn’t been saved.
You will be returned to step 1.
• The SlimStone-X will now detect the
SwitchStone-STD. The waiting light sequence will
be shown during this process.
• Once the SlimStone-X is successfully linked to the
SwitchStone-STD, all lights on the SlimStone-X will
light up, indicating it will be ready for use. All lights
will stop flashing on the SwitchStone-STD.
In case the SlimStone-X couldn’t detect the
SwitchStone-STD, you will be returned to the
beginning of the procedure. Please try again.
6. CONTROL INPUTS
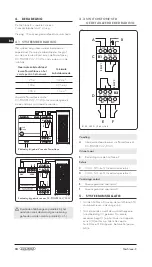
• It is possible to connect an external button or
actuator to activate the relays (for example, an
intercom, or a free-exit button). This button/actuator
will have priority over the PIN code.
• To activate relay 1, connect the NO contact of
the external button for relay 1 between the 2
terminals of ‘E’
• To activate relay 2, connect the NO contact of
the external button for relay 2 between the 2
terminals of ‘F’
• For more details on control inputs,
see the scheme on page 70
Attention! This must be a dry contact with NO
function.
• Тhe corresponding ‘IN’ led on the SwitchStone-STD
will light up when the control input is activated
7. PROGRAMMING
7.1 ACCESS PROGRAMMING
MODE
• Press [#] for 5 sec, [#] will start flashing
• Еnter the Master PIN that was set during the
installation process and confirm with [#].
If correct, [#] will remain lit as long as the
programming mode is activated.
• If a wrong Master PIN is entered, the
programming mode ends and the time out
procedure as described in11.2 applies
If only [#] is lit, you are in the main menu of the
programming mode
• Select a menu and confirm with [#]. The following
menus are available:
[1]
manage PIN code
[3]
set hold time relay 1
[4]
set hold time relay 2
[5]
set lighting mode
[7]
replace SwitchStone-STD
See next paragraph for detailed information
The programming mode ends
automatically when there is no activity
for 60 seconds
• After selecting a menu, it’s possible to return to the
main menu by pressing the [C] key
• Press [C] for 5 seconds to exit the programming
mode


