background image

G Series Gas Grills

LTR50001050, Rev. M

Using Y

our 

Grill

www.calflamebbq.com

17

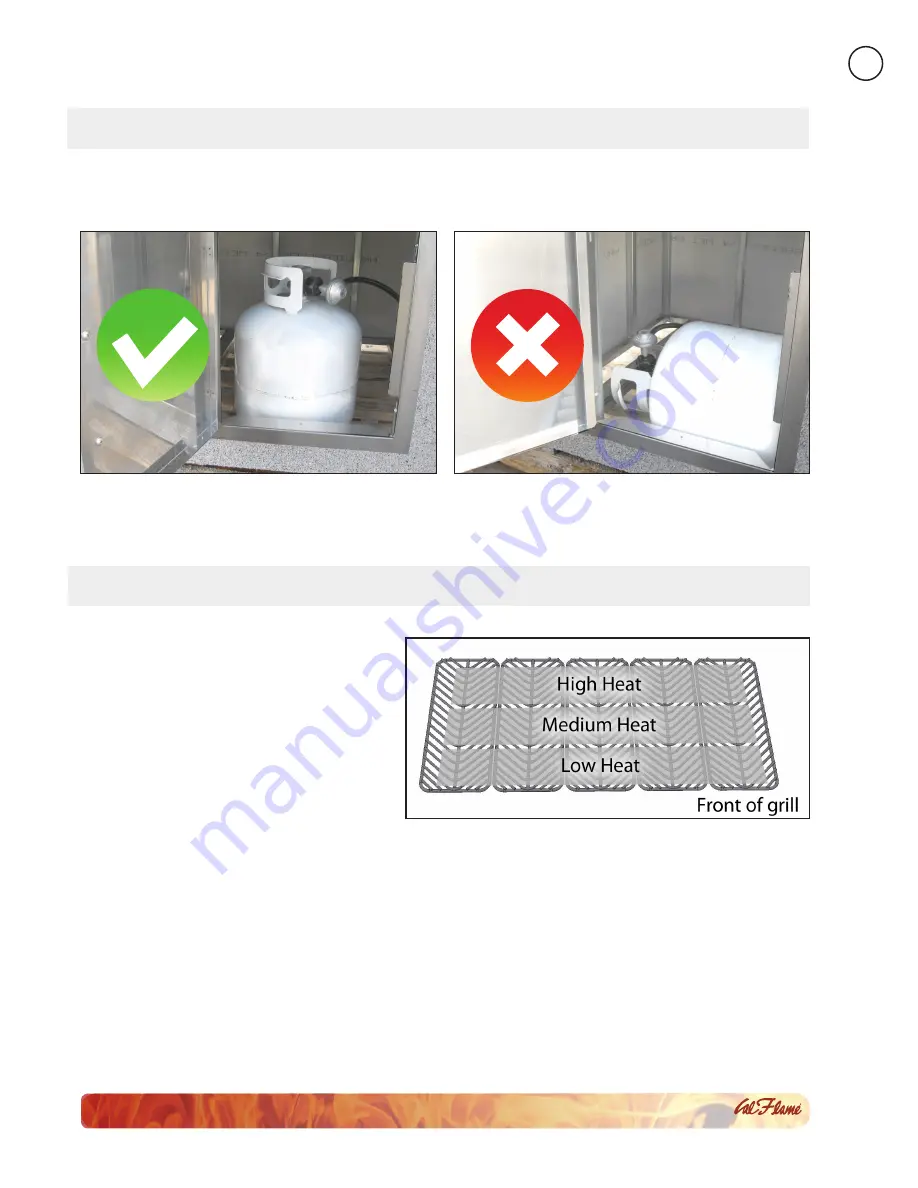
Heat Distribution on the Cooking Grates

When  you  place  food  your  Cal  Flame  grill, 

remember that the back of the grill tends to 

be hotter than the front.
As  your  food  cooks,  you  should  periodically 

shift  it  to  different  spots  on  the  cooking 

grates  to  ensure  everything  cooks  evenly 

without burning.

Gas Cylinder Orientation

LP gas cylinder must be up oriented upright during operation for proper vapor withdrawl. Operating the grill 

with the cylinder on its side will allow liquid gas to flow into the regulator. Erratic gas flow will occur, resulting 

in possible flare-ups or explosion.

Summary of Contents for BBQ08G04

Page 1: ...LTR50001050 Rev M 1 28 19...

Page 2: ...es Sear Zone Infrared Burner 18 Pizza Brick Tray 18 Smoke Tray 18 Charcoal Tray 19 Griddle Tray 20 Pull Out Cutting Board 20 Cleaning and Maintenance Stainless Steel Care and Cleaning 21 Cleaning the...

Page 3: ...e manufacturing process The grates should also be thoroughly cleaned in the same manner WARNING Improper installation adjustment alteration service or maintenance can cause injury or property damage R...

Page 4: ...burner or hot surface until it has fully cooled Never wear loose fitting or hanging garments while using your grill Fabric may ignite and result in personal injury When using the grill do not touch th...

Page 5: ...carbon monoxide which has no odor Using it in an enclosed space can kill you Never use this appliance in an enclosed space such as a camper tent car or home Here are some general considerations when...

Page 6: ...for installing a barbecue island for use A barbecue island is both built in construction and a grill enclosure Read these instructions before constructing your grill enclosure The Cal Flame convectio...

Page 7: ...nections inspected and tested There must be a minimum clearance of 2 inches 51mm between the floor of the LP gas cylinder enclosure and the ground Model Description Width Depth Height BBQ09G03 G3 thre...

Page 8: ...Q08953P Side By Side Flat Burner 24 19 BBQ08852P Single Flat Side Burner 11 17 12 Minimum Distance Between Grill and Side Burner WIDTH DEPTH WIDTH WIDTH DEPTH WIDTH WIDTH WIDTH WIDTH WIDTH Minimum Cle...

Page 9: ...ree area of not less than 10 square inches 254 square mm Ventilation openings shall be provided at floor level and shall have a total free area of not less than 10 square inches 254 square mm If the v...

Page 10: ...der must be constructed and marked in accordance with the Specifications for LP Gas Cylinders of the U S Department of Transportation or the National Standard of Canada CAN CSA B339 Cylinders Spheres...

Page 11: ...ion of your barbecue island needs to be and terminate with a shut off valve with a male fitting Check with a contractor or your local inspector for requirements Always check the rating plate to make s...

Page 12: ...ner does not become overheated Pay careful attention to the location of gas lines Gas lines should be routed away from sources of heat and should make as few bends as possible Check to see if gas line...

Page 13: ...natural gas before connecting the gas line to the regulator See page 28 for instructions on converting the grill from LP to NG Connecting the grill only If you have a grill and side burner combinatio...

Page 14: ...he convection grill can be configured for both LP and NG Make sure you connect to the correct fitting depending on your gas type Connect to gas line to the grill as shown in step 3 a above c Connect t...

Page 15: ...not attempt to repair the cylinder valve if it is damaged The cylinder must be replaced 6 Turn all control knobs back to the full OFF position If you are unable to stop a leak 1 Turn all control knobs...

Page 16: ...rial such as paper cloth or flammable liquids on your grill at any time Do not use grill side shelves cabinets or any area around grill to store flammable materials Basic Grill Operation Before lighti...

Page 17: ...ormal check the orifice and burner for insects or insect nests Ensure the in line gas valve or gas cylinder valve is always shut OFF when the barbecue is not in use Do not operate the side burner with...

Page 18: ...8 If the burner does not light after several attempts see Troubleshooting Guide in the back of this manual Proper Burner Flame The burner flame has been set in the factory and should already be adjus...

Page 19: ...As your food cooks you should periodically shift it to different spots on the cooking grates to ensure everything cooks evenly without burning Gas Cylinder Orientation LP gas cylinder must be up orie...

Page 20: ...burner Do not remove the burner 2 Set the smoke tray in the grilling area so that the notches in the end rest on the round metal posts attached to the inside of the grill area The smoke tray will res...

Page 21: ...ngerous Make sure the drip tray is in the grill before you begin Keep the hood up until you are ready to cook 1 Arrange charcoal in the tray 2 Replace the grates 3 Ignite both burners under the Charco...

Page 22: ...with a bacteria resistant surface It is on a gliding mechanism that locks in full open position A switch in the slider allows the cutting board to be removed for cleaning The griddle tray is an optio...

Page 23: ...a Scotch Brite scrubber or similar product 1 Clean Thoroughly clean stains food and grime using a sponge or damp cloth with warm water and a mild dish soap Use Fantastik or Formula 409 to remove heav...

Page 24: ...Instant Rust Out Spray exterior stainless steel surfaces with Instant Rust Out Let it stand for about 30 seconds then wipe with a clean cloth Apply a second time if necessary Instant Rust Out will lea...

Page 25: ...When not in use and after cooling cover your grill with our full length zippered side canvas cover See your local Cal Flame dealer for details The cover will help protect your grill from detrimental e...

Page 26: ...on t need to be in the grill in order to clean them In fact all of the items can be cleaned in a dishwasher if you wish Leave the drip pan in place for now 2 Remove the burners The burners can be remo...

Page 27: ...rior While the burners are out of the grill you can use this opportunity to clean the interior of your grill thoroughly You should still have the drip pan in place to catch water and grime as you clea...

Page 28: ...wire is connected firmly to the valve ignition device and the electrode Make sure the valve orifice is free of any debris dust or grease Make sure the valve orifice is aligned inside the front hole of...

Page 29: ...t of Igniter on Burner Solution Check for proper position of the electrode tip which should be pointing forward towards the front of the burner and free of grease to allow proper sparking The ignition...

Page 30: ...l The kit contains orifices to convert main burners rear infrared burners and the large infrared burner Your kit will have only the parts you need to convert your grill Before you begin make certain t...

Page 31: ...all burners by carefully lifting them up and away from the valve orifice d Using a 6mm socket or nut driver remove the orifice for the burner e Apply a small amount of pipe compound to the orifice th...

Page 32: ...er from the side burner b Using a 7mm wrench remove the orifice for the burner c Apply a small amount of pipe compound to the orifice threads d Screw in the orifice until it is finger tight e Tighten...

Page 33: ...com 31 14 13 2 4 10 3 8 11 7 6 1 12 17 16 15 5 9 19 18 20 21 C C C C See following page for part numbers To order replacement parts contact an authorized selling dealer Call LMS Customer Service at 80...

Page 34: ...00683 4 burner BBQ07100639 5 burner BBQ07100641 11 Manifold 3 burner BBQ08000510 4 burner BBQ08000511 5 burner BBQ08000512 12 Regulator LP All BBQ04101043 Regulator NG All BBQ04103040 13 Warming rack...

Page 35: ...it in a safe and dry place 7 Install the Sear Zone burner Align the gas inlet on the burner with the gas supply valve on the grill and torch tube with the igniter Make sure they align perfectly Slide...

Page 36: ...Cal Flame Parts Accessories This Limited Warranty is void if Cal Flame the Manufacturer or its designated representative determines that the grill has been subjected to damage or failure due to instal...

Page 37: ...anner whatsoever The Manufacturer will not be responsible for any statements or representations made in any form that go beyond are broader than or are inconsistent with any authorized literature or s...

Page 38: ...G Series Gas Grills LTR50001050 Rev M Appendix www calflamebbq com 36...

Page 39: ...G Series Gas Grills LTR50001050 Rev M Appendix www calflamebbq com 37...

Page 40: ...______________________ Type of fuel circle one Liquid propane Natural gas Date purchased ________________________________________________________________________ Date installed _______________________...

Reviews: