background image


- 4 - 

Introduction  

Thank you for your purchase this professional weather station. The outdoor sensor is solar powered and 
sends data to the console via a low-power radio. It allows you to upload your weather data to weather 
website: 

www.wunderground.com

 which you can share it with your friend. 

 This manual will guide you step-by-step through setting up your device. Use this manual to become familiar 
with your professional weather station, and save it for future reference. 


Installation 


Before placing and installing all components of the weather station at there final destination, please set up 
the weather station with all parts being nearby for testing the correct function. 


Outdoor sensor 

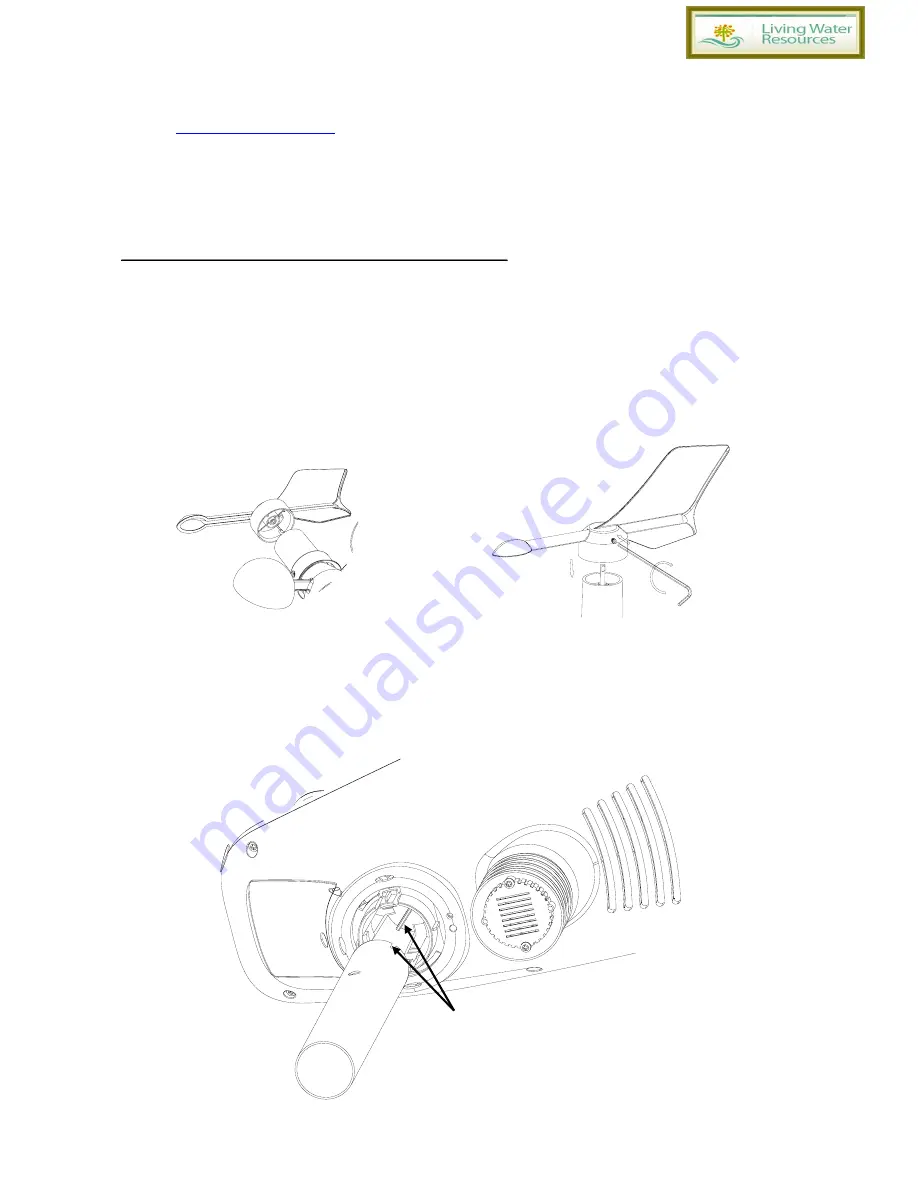
1. Attach the wind vane   
Push the wind vane into the shaft. as shown in figure 1.        
Tighten the set screw with the Allen Wrench (included) as shown in figure 2. Make sure the wind vane spin 
freely. 

Figure 1                                                                            Figure 2


2. Install Mounting Pole 

Insert the pole into the base, as shown in figure 3. Spin the lid onto the base as shown in figure 4. 


Figure 3


Togue and 
groove joint 


Summary of Contents for LWR-WHP1000

Page 1: ...1 PROFESSIONAL WIRELESS INTERNET WEATHER STATION Operation Manual...

Page 2: ...ttery compartment 5 LED Indicator light on for 4s if the unit power up Then the LED will flash once every 16 seconds the sensor transmission update period 6 Reset button 7 Thermo hygro sensor 8 UV sen...

Page 3: ...sor Thermo hygrometer Rain Gauge Wind Speed Sensor Transmitter 1 Wind Vane 1 Indoor sensor 1 5V DC adaptor 1 Stainless Steel Tube D32 H200mm 1 U style Stainless Steel Loop 3 AA 1 5V rechargeable batte...

Page 4: ...er station and save it for future reference Installation Before placing and installing all components of the weather station at there final destination please set up the weather station with all parts...

Page 5: ...argeable batteries in the battery compartment The LED indicator on the back of the transmitter will turn on for four seconds and normally flash once every 16 seconds the sensor transmission update per...

Page 6: ...re 9 Figure 6 Figure 7 there are four alphabet letter of N E S and W representing for the direction of North East South and West as Figure 8 Wind direction sensor has to be adjusted so that the direct...

Page 7: ...e with the sensor about 10 feet away Figure 10 Indoor sensor Remove the battery door on the back of the sensor with a Philips screwdriver there is only one screw at the bottom of the unit Insert two A...

Page 8: ...er data from transmitter The interface as below Then it start to scan the Wi Fi network if it didn t found the available Wi Fi it will shows not find any AP Access Point Press key to return to normal...

Page 9: ...st rel pressure graph In Outdoor temperature graph In Outdoor humidity graph 12 Dew point 4 UV index 13 Outdoor Temperature Humidity 5 Light 14 Indoor Temperature Humidity 6 Barometric Pressure 15 Int...

Page 10: ...y to on off the backlight Graph display key Press this key to choose between Weather Forecast rel pressure graph in outdoor temperature graph and in outdoor humidity graph Pressure display key Press t...

Page 11: ...weather MAX MIN record which need to clear Enter key While select the weather MAX MIN record press this key to popup Message Box Are you sure to clear the Max Min Press key or key to select YES or NO...

Page 12: ...he left of the scrollable area Scroll right key Press this key to view the right of the scrollable area Page up key Press this key to scroll up the page you are viewing Page down key Press this key to...

Page 13: ...o exit and open the selected file Press key to return to History record Mode While in History Record Mode press the key to enter the page selection mode Press or to select a digit in a number press ke...

Page 14: ...scrollable area Scroll right key Press this key to view the right of the scrollable area Select file key Press this key to enter the file selection mode Page down key Press this key to scroll down the...

Page 15: ...scrolls the value Select key Press this key to select the unit or scrolls the value Left key Press this key to select the set value Right key Press this key to select the set value Up arrow key Press...

Page 16: ...digit turn red press the or key to change the month setting Press to set the year the year digit turn red press the or key to change the year setting 3 Time zone setting Press key to select Time zone...

Page 17: ...ime of turn on backlight Turn off the backlisth set the time of turn off backlight Automatic brightness adjustment select this option the brightness will change according to the light intensity measur...

Page 18: ...at 0 00hr every first day of the month The reset of the rain per year refer to rainfall season section 3 1 13 Barometric display Absolutely Relative 3 1 14 Weather threshold 2 4 default 3 It s pressu...

Page 19: ...to adjust the Server Server type and upload type Enter the Station ID and Password from wunderground com Enter your Station ID and password obtained from wunderground com scroll value up scroll value...

Page 20: ...www wunderground com weatherstation about asp and Get Started to add your weather station and you will receive a Station ID Enter the Station ID obtained and password you entered in the console s Wea...

Page 21: ...i network Press key to confirm and enter the password Press key to return to normal display mode Only after connect to WLAN you can upload the data to weather website If the data upload to server succ...

Page 22: ...ge the activated option field Down arrow key Press this key to change the activated option field Set key Press this key to select the Setting sub Mode Return key Press this key to return to previous m...

Page 23: ...t the set value Up arrow key Press this key to change the activated option field Down arrow key Press this key to change the activated option field Set key Press this key to select the Setting sub Mod...

Page 24: ...ture we recommend a mercury or red spirit fluid thermometer Bi metal dial and digital thermometers from other weather stations are not a good source and have their own margin of error Using a local we...

Page 25: ...installations are not perfect and installing the weather station on a roof can be difficult Thus you can calibrate for this error with a wind speed multiplier In addition to the installation challenge...

Page 26: ...No Press the key or key to confirm the selection 3 4 3 Re register outdoor transmitter Please reference section 4 4 1 Procedures and settings are similar to re register indoor transmitter 3 4 4 Clear...

Page 27: ...press key again to cancel the backup Please insert TF card before start backup The data is stored in comma separated value csv file format which can be opened in Microsoft Excel The TF card can be rea...

Page 28: ...onthly Rain in 18 Yearly Rain in 19 Solar Rad lux 3 4 8 Language English Chinese Danish Dutch French German Italian Spanish 3 4 9 About information Maintenance 1 Clean the rain gauge once every 3 mont...

Page 29: ...ote sensors are not transmitting through solid metal acts as an RF shield or earth barrier down a hill Radio Frequency RF Sensors cannot transmit through metal barriers example aluminum siding or mult...

Page 30: ...essure Make sure you properly calibrate the sensor to an official local weather station Reference Section 4 3 for details Rain gauge reports rain when it is not raining An unstable mounting solution s...

Page 31: ...Please help in the preservation of the environment and return used batteries to an authorized depot All rights reserved This handbook must not be reproduced in any form even in excerpts or duplicated...

Page 32: ...ane to the outdoor sensor as described in the User Manual page 4 Note the wind vane and the shaft have a flat side and must be lined up together Step 2 Insert the batteries in the battery compartment...

Page 33: ...ools Setting Key again This will take you into the Alarm menu Press the Tools Setting Key again This will take you into the Calibration Menu Refer photo Use the Up Down Arrow Keys to navigate to and h...

Page 34: ...he wind vane Step 6 Install the Outdoor Sensor outside and in a sunny position and face the solar panel North End of Procedure Press the Return Key to go back to the Normal Display Mode The wind direc...

Reviews: