background image

page 3

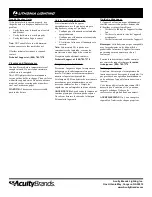
INSTALLATION INSTRUCTIONS

Remove fi xture components and parts pack. 

Check to ensure all 

parts are included. 

Note: 

Account for small parts and destroy packing 

material, as these may be hazardous to children.

Turn OFF Power at circuit breaker box.

CAUTION: 

Do not rely on wall switch alone to turn off  power. 

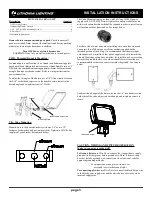
THK - Threaded Knuckle Mounting:

For mounting to a wet location j-box, thread included mounting plate 
onto knuckle and tighten locknut to secure or thread knuckle into a 1/2” 
NPS hole in a compatible mounting apparatus. 

Note: 

Seal arm thread 

using Tefl on tape or silicone sealant. Refer to wiring instructions for 
power connection. 

To adjust the tilt angle of the fi xture, use a 1/4” Allen wrench to loosen 
the 5/16” socket head cap screw in the knuckle, rotate fi xture to the 
desired angle and re-tighten screw to 7.2ft-lbs.

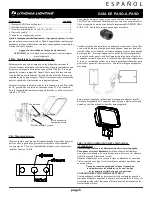
YK - Yoke Mounting:

Mount fi xture to the desired bracketry with


one 5/8” or two 1/2” 

fasteners, lock washer, and nut (not provided). Tighten to 30ft-lbs. See 
template of yoke bracket hole pattern below. 

The Yoke Mount option is provided with 2.6ft long 18AWG power 
supply cord. A UL LISTED water tight cord connector suitable for use 
with wet location fl exible cord shall be required in order to install onto a 
wet location outdoor junction box. See image below.

To reduce risk of water entry when installing onto an outdoor junction 
box ensure that a Tefl on tape or silicone sealant is applied on the 
threaded portion of the fi tting. It is recommended that the water tight 
cord connector be installed so that power supply cord exits towards the 
ground. If existing wiring does not allow for installation of wires exiting 
towards the ground, the use of an elbow suitable for wet location use 
is recommended so that cord can exit towards the ground.  See images 
below.  

To adjust the tilt angel of the fi xture, loosen the 1/4” hex head screw on 
both sides of the yoke, adjust to desired angle and re-tighten screws to 
secure. 

CAUTION: WIRING AND FIXTURE OPERATION 
Make sure power is turned off . 

To Ground fi xture 

use Wire Nut to connect the (copper) house supply 

ground wire & the (green) fi xture ground wire. 

Note: 

If house wiring 

does not include a ground wire, consult your local electrical code for 
approved grounding methods. 

For proper connection, place wire nut over 

wires and twist clockwise until tight.

To connect supply wires 

use Wire Nuts to connect the black fi xture wire 

to the black power supply wire and the white fi xture wire to the white 
(neutral) supply wire.

1hex head screw

FIXTURE PACKING LIST

Description 

Quantity


1) LED Light Fixture ........................................................................................1

 2) Mounting Plate & Gasket* ...........................................................................1
 3) 1/2” 8-32 & 10-24 Mounting screws* ..........................................................4
 4) Wire Nuts* ....................................................................................................3

*Contained in parts packs

Mounting Plate

Locknut

socket head cap screw

Summary of Contents for TFX1 LED

Page 1: ... de procéder à l installation veuillez lire attentivement ces directives et les conserver pour référence ultérieure Date de l installation _____________ Tout manquement au respect de ces instructions pourrait rendre nulles les garanties Pour une liste complète des conditions générales du produit veuillez vous rendre sur www acuitybrands com Acuity Brands Lighting Inc n assume aucune responsabilité...

Page 2: ...remote control of a luminaire that are not factory wired to the luminaire must be checked for compatibility with the luminaire prior to installation LED fixtures must be powered directly off a switched circuit Unless individual product specifications deem otherwise Do not restrict fixture ventilation Allow for some volume of airspace around the fixture Avoid covering LED fixtures with insulation foam or...

Page 3: ...junction box See image below To reduce risk of water entry when installing onto an outdoor junction box ensure that a Teflon tape or silicone sealant is applied on the threaded portion of the fitting It is recommended that the water tight cord connector be installed so that power supply cord exits towards the ground If existing wiring does not allow for installation of wires exiting towards the grou...

Page 4: ...ntaje Evite cubrir los montajes LED con aislación goma u otro material que evitará la convección o el enfriamiento de la conducción A menos que las especificaciones del producto individual consideren lo contrario no supere la temperatura ambiente máxima para el montaje Use el montaje sólo en la ubicación para la que está diseñado Los productos LED son sensibles a la polaridad Asegure la correcta po...

Page 5: ... una instalación en una caja de conexiones al aire libre se requiere de un conector de cable impermeable CERTIFICADO POR LA UL Consulte la imagen que aparece más abajo Cuando se realiza una instalación en una caja de conexiones al aire libre y con el fin de reducir el riesgo de entrada de agua asegúrese de que la cinta de teflón o el sellador de silicona se apliquen sobre la parte roscada de la cone...

Page 6: ...emplacement et le recyclage Tous les luminaires qui contiennent des dispositifs électroniques générant des fréquences supérieures à 9 kHz à partir d un composant situé à l intérieur du luminaire sont conformes à la partie 15 des règles de la Commission fédérale des communications Son fonctionnement est assujetti aux deux conditions suivantes 1 Ce dispositif ne doit générer aucune interférence préj...

Page 7: ...onnexion soit solide RACCORDEMENT DE L ALIMENTATION Employer des capuchons de connexion pour connecter les deux fils noirs de l appareil au fil d alimentation noir et les deux fils LISTE DES PIÈCES Description Quantité 1 Appareil d éclairage DEL 1 2 Plaque de montage et joint 1 3 Vis de montage 8 32 et 10 24 1 2 po 1 25 cm 4 4 Capuchons de connexion 3 Compris dans l emballage de pièces Retirer les co...

Page 8: ...a correctamente El voltaje de la línea en el luminario este correcto Nota Este montaje NO se puede usar con reductores de lumbrado sensores de movimiento u otros dispositivos remotos Si requiere ayuda adicional contacte Technical Support al 800 705 7378 Limpieza y mantenimiento Precaución Asegúrese de que la temperatura del aparato es lo suficientemente fría para tocarlo No limpie ni realice manten...

Reviews: