


page 8
CAUTION: “DO NOT DISPOSE OF BATTERIES IN FIRE, BATTERIES MAY EXPLODE OR LEAK.” - When disposing of
household alkaline batteries, it is best to check with your local and state recycling or household hazardous waste
coordinators concerning the specifics of the program in your area. You may also locate a recycling center by calling
1-800-8-BATTERY or 1-877-2-RECYCLE or visit www.epa.gov/epawaste/index.htm or www.earth911.org for more
information.
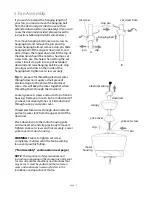
10. Remote Control Operation. (cont.)
Restore electrical power. Within 30 seconds of restoring the power, press
and hold the "O" button on the remote control transmitter for 5 seconds
or until light on fan blinks twice. Test the light and fan functions to
confirm the learning process is complete.
NOTE
: Remove protective covering from front of remote control
transmitter and discard.
IMPORTANT
: To prevent damage to transmitter, remove the battery if not
used for long periods. Store the remote control transmitter away from
excess heat or humidity.
Operation buttons on the panel of the remote control transmitter:
3 button
for
fan
HIGH
speed
2 button
for f
an
MEDIUM
speed
1 button
for
fan
LOW
speed
0 button
to turn
fan
OFF
button
to turn l
ight
ON
or
OFF
Tap button quickly to turn lights off or on. Hold button down to
increase or decrease lights. If you press button in excess of 0.7 seconds,
it becomes a dimmer. The lights vary cyclically in 8 seconds. The light
button has an auto resume function, which keeps the light at the same
brightness as the last time it was turned off.
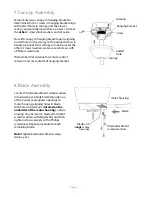
11. Testing Your Fan.
It is recommended that you test fan before finalizing
installation. Test fan speeds with the different fan
speed buttons on remote control. Test the light
ON/OFF function with the button on the remote
control. Test dimmer function by holding down the
button for more than 0.7 seconds. If the remote
control operates all of the functions of the fan and
light, battery has been installed correctly (
diagram 1
).
If fan and/or light does (do) not function, please refer
to "Troubleshooting" section to solve any issues
before contacting Customer Service.
Turn fan completely off
before
moving the reverse
switch (located on top of motor housing). Set reverse
switch to recirculate air depending on the season:
- LEFT position in summer (
diagram 2
)
- RIGHT position in winter (
diagram 3
)
A ceiling fan will allow you to raise your thermostat
setting in summer and lower your thermostat setting
in winter without feeling a difference in your comfort.
Important
: Reverse switch must be set either
completely to the LEFT
or
completely to the RIGHT
for
fan to function. If the reverse switch is set in the
middle
position (
diagram 4
), fan will not operate.
diagram 2
diagram 3
diagram 4
reverse switch
motor housing
diagram 1


